The BRAWL² Tournament Challenge has been announced!
It starts May 12, and ends Oct 17. Let's see what you got!
https://polycount.com/discussion/237047/the-brawl²-tournament
It starts May 12, and ends Oct 17. Let's see what you got!
https://polycount.com/discussion/237047/the-brawl²-tournament
Dismal Mountains
polycounter lvl 7
Hello! I've started a new project after finishing my second year of university for the summer. I'm using a concept by SnowSkadi
http://snowskadi.deviantart.com/
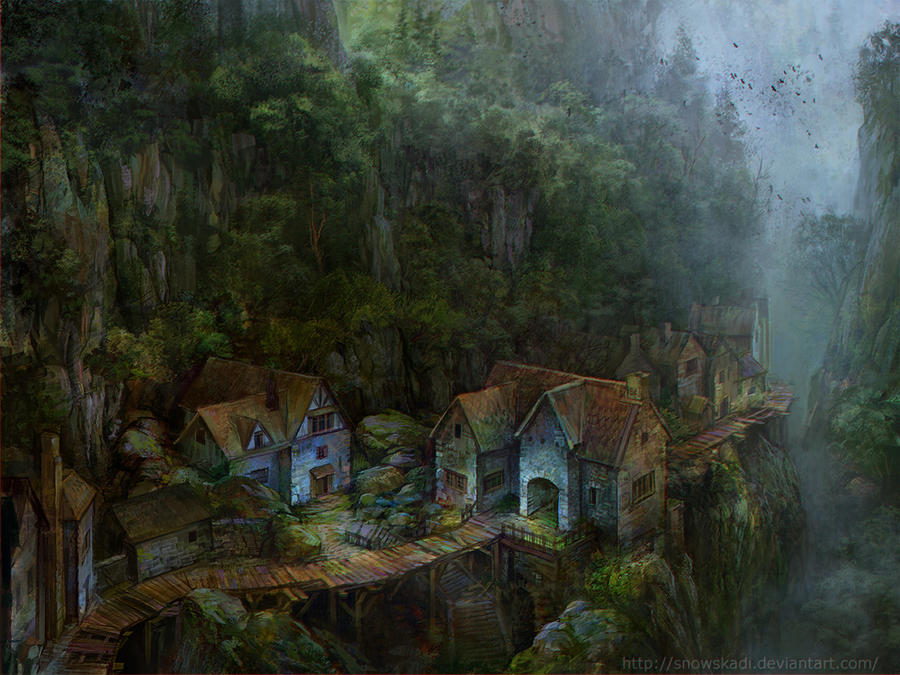
Thankfully he gave me his permission to use his gorgeous work.
So far I've only done some terrain work, but plan to build over this with rocks made in zbrush and maya, and either use speedtree or build my own trees. Here's what I have so far:

And an overlay to see how it relates to the concept:


The mist material I have used, from Chris Albeluhn's site") Ever grateful!
Ever grateful!
I apologise for posting so early, but my problems in the past have come from not getting help from an early stage..
http://snowskadi.deviantart.com/
Thankfully he gave me his permission to use his gorgeous work.
So far I've only done some terrain work, but plan to build over this with rocks made in zbrush and maya, and either use speedtree or build my own trees. Here's what I have so far:
And an overlay to see how it relates to the concept:
The mist material I have used, from Chris Albeluhn's site
I apologise for posting so early, but my problems in the past have come from not getting help from an early stage..
Replies
Currently, the 'start' looks great, but the nasty wall stretching is going to really ruin the scene in the final steps, so I suggest tackling that when you have some time.
Create unique rocks, nice, jagged, big, rocks, kinda like these:
http://www.flickr.com/photos/swazileigh/7033953795/sizes/l/in/photostream/
And place them next to your wall/ground parts, this will help break up the tiling, and give it more life at the same time, and the best part is, by scaling them and rotating them in UDK, they look much more pretty and varied.
So basically, your current walls of the canyon will be kinda your 'back' based color on which you will overlay your separate, unique rock variations.
Use the rocks to also cover 'hard' edges near the rock and the fog parts, those look really unnatural.
@Selaznog Yeah they're just one of UDK's particle system leaf things
@Ace-Angel Thanks for that reference picture its great
It might take me a bit of trial and error to get it right though, I've only used zbrush for one project so far. Hopefully this is the chance to do something great though!
@Back8 Thank you:)
@Dnna1 Thanks!
And also maybe use a "forest" mask on the actual cliff. So that when you get into creating all the trees and bushes you can use the greenish forest background texture to blend stuff and make it look thick and nice. Also notice the rocks at the edges of the village against the cliff, it breaks down from bigger rocks to smaller ones.
Also, remember that a valley like this is usually in shadow, so you really need the sun-position to be in the right place in the end and/or use fill lights or torches to light the small village.
Nice going so far!
Yes i've spent the past few days thinking about the cliffs and came to terms with the fact that I need to make some pretty badass rocks to make it look good. I came up with these below after messing around, wondering what you guys think:
Check my blog for some more things
I know my drawing is a little blockier, but you get the idea. That way you can just copy past and kitbash a cliff. I know other studios/games do it a little different with a single tiled texture.. but i am more preferable with Zbrushing around 6-8 rocks with a few hero pieces thrown in for good detail. That way you will have nice detail to place those plants on.
also remember, these brushes are your best friends. 1. Mallet. 2. Trim Dynamic. 3. Pinch.
Don't forget Mike D's brushes. http://www.polycount.com/forum/showthread.php?t=96425
I'm a big fan of using his chip brushes all over the edges and cracks of my cliffs for that added hyper detail that you can't really sculpt yourself.
That is just the kind of environment i would love to model. Lucky you!
Keep it going, looking good
@SirCalalot Thank you
@walreu I know
Placed some things in the level tonight and played with the lighting. After hours of minecraft on the xbox!
Your rocks also seem to be lacking moss. Are you using any real world reference by any chance? That might help.
Also. What I do..and works pretty well.. is if you have nDo, I create an AO and a Cavity map from my normal map and overlay that in my texture. That way you don't lose your hyperdetail you create in zBrush
I will try what you said with Ndo
Although they used a completely different method to what you and @ErichWK have mentioned (no high-polys), it's worth having a look
At its most basic level, they create a tiling rocky sculpt in ZBrush, create the tiling textures/maps from that and apply it to various modelled low-poly meshes.
I would add that you should make your rocks look less like single fallen rocks stitched together, and more like a cliff face for an environment this big.
You could sculpt a tiling rock cliff texture, and then model rocks like Erich said and apply that tiling texture to them, at varying scale, tile more closer to the player, and less from afar, to create a sense of scale in the distance.
This is the diff/nm I used on my last map for example. You can do pretty much anything any shape of rock with that kind of texture given the proper geometry.
Also, but this is only my opinion on the matter, this would be far more efficient and convicing to a professional than uniquely unwrapped rocks with texture waste.
@SirCalalot That is what I'm going to go for definitely
I didn't get round to doing a diffuse just yet, and I don't really know how to go about it! But I'm glad that I've done this, since now I know how to go about it again if you think I should do it again?
When I create my diffuse from a sculpt, I like to render out the Ambient Occlusion and Cavity maps and combine them with a Polypaint texture for some colour.
Your can get some nice rocky effects using Polypaint by masking by cavity in the 'Masking Controls' tool before applying colour:
I then usually just layer up a Photoshop document in various blending modes and ways. As well as this, I add some more maps from CrazyBump using my originals as a source.
I might also 'Soft Light' blend in a photo-sourced tiling texture too.
Edit: I wrote down the exact process for some boulders in an old project, but I'll have to get that when I'm home
Also what snader posted makes sense, you might want to give a try to cliff face sculpt #3 :P Try to work with more broader shapes, that are more continuous and stratification-like. And you should be fine
Thanks Snader, I think the hardest bit about this has been not finding great reference and that is perfect...I'll try to do a sculpt based off the last one today!
Paroxum, thanks for the advice, I didn't know you could add colour to your AO map. I already do it with the spec as you can see
RIGHT! I am not giving up with these BLASTED rocks! I am going to go away and do another, and not call that last one a failure because I know what I'm doing now.
The difficulty is that the only real way to get what you want is trial, error and experimentation - as I'm sure you know by now
It's really impressive to see how quickly you've developed your skills this far, and it won't be long before you have the look properly nailed down!
More experimenting today, will do more later:
@dustinbrown That thread helped me loads, I'm so grateful. Particularly Orb's works, I think he's got a new #1 fan in me!
There's too much overall contrast in your texture (which now makes your stone look stylised-ish). Especially when you go for white/grey stone, the contrast between all ambient occlusion, cavity stuff and the rest is too much.
Result is then too noisy when tiled and exacerbate the patterns you can find into a texture.
There are other ways to use an ambient occlusion bake into a diffuse texture, you can for example use it as a mask for a moss texture or a slightly darker rock photo. If you did that, consider not using your AO in multiply at all or a very slight opacity, because of the doubled effect.
Now I don't say you need to start again
Also you might want to tone down specularity a bit ingame as well, unless you want your rocks to be wet looking.
If I'm being super dense and over-complicating things, someone please slap me and show me a quicker method.
Also, red and green are proper gash together.
That's the beauty of Polycount.
Edit: Yup, that will save me a lot of time in the future, cheers @S2Engine!
How does this look? Tried to take the contrast down like Paroxum said and use some moss
Your tiling is not perfect I see at some places you have some straight lines cut in the diffuse.
Now maybe you could post some wireframes of this mountain side so we can give pointers.
At the moment it's relying only on your texture to create depth changes, modelling actual deformations that make sense in your mountain side would greatly enhance the aspect.
I started a tree in Zbrush and have contiuned building the cliff faces :
Needed a break from some rocks so I started on the rickety bridge!
Sorry for the slow updates, trying not to rush everything as I want to do my best!
You could bend the planks slightly to get that extra bit of silhouette detail - perhaps with just one edge loop going through the centre of each.
In the concept, there is a lot of moss growing over the wood, so it's probably damp a lot of the time - and with people walking over it regularly the planks would no-doubt warp a bit and dip in the middle.
It's only a tiny detail, but I think it will really help to sell the material.
(Literally clutching at straws here.)
There are still a couple of things that are jumping out to me right now though. First off, the scale on the features of your buildings looks off. In the concept, the large house on the left looks to have at least 3 floors, where yours looks like you cut it down to two. A result of that is the buildings in the concept are helping to convey the scale of the scene much better than yours are doing right now. Also, right in front of that house on the left, your terrain is starting to slope down really quickly. In the concept, there's a pretty flat and level area right in front of the building leading out to the wooden walkway. I'd suggest you try and revise that to closer match the concept or at least put in some sort of stairway leading from the front door to the walkway, for obvious safety reasons. Not sure how much you were willing to deviate from the concept.
Like I said before, I like the revisions you've done with your rock / cliff sculpts already, but I'd also recommend you revise them even more and take them further. One of the assets I see that you have scattered around, particularly near that house I kept bringing up and leading down the canyon on the right, looks a lot like an everlasting gobstopper. You have a lot of really round boulders and rocks in that asset and it makes it look really unnatural. Try sculpting out some different shapes as single pieces and bringing them into the engine and manually place them around more. Some round ones are okay, but also try sculpting out some larger boulders with large flat sides on them, long rectangular ones, etc. Reference, reference, reference. When you're placing them, think about how they would fit together and settle naturally in the environment. I think you'll be able to achieve a better and more natural looking result if you work with it more.
Basically, if you make some more natural looking assets and rework your scale to closer match the original concept, it'll help convey that huge space better and sell the scene.
@SirCalalot Thank you for saying you like it
I agree with you about the extra loop, I'll update soon.
@Reventius Thank you, sure did work on that cliff a lot! :P
I'm still reworking the houses, so I should fix all these problems soon
Thanks so much for the feedback its really helping!
Anyway, I've been working on the trees, which I'm finding quite difficult. This is probably a really common problem, but my leaves look SO bad in UDK its ridiculous. I've changed the alpha so much and I still can't get it to look right. I've made a picture to show my problems, please help.
To remedy this, make a copy of your diffuse layer in Photoshop and place it underneath your original.
Then apply a Gaussian Blur to 'fuzz' the edges.
Press Ctrl+J five or six times to duplicate the layer.
Highlight all of these new, blurred layers and press Ctrl+E to flatten them to a single layer (you can blur this again if your want to get rid of the artefacts, but it isn't too necessary).
That should make a nice amount of padding round your diffuse image that is near the same colour values as the edge pixels.
The 'halo' effect will still happen on your leaves, but you won't notice as it's the same colour as them.
Well I solved that problem, but the trees still look crappy. Does anyone have any pointers about how I can go about making them look better?
With regards to the trees, you probably need more negative space in your texture where there are no leaves.
Each leaf card on the tree is also reading as quite square, so you could try to make the overall shape of the clump a bit rounder and maybe not bring the details all the way up into the corners of your texture.
You could also unify all of the leaf card Vertex Normals too.
3D Motive do a great foliage tutorial if you have membership with them. It shows you how to do the things using 3DS Max, but it's not hard to follow along in Maya instead.
I hope that's helpful!
Edit: This page on the Polycount Wiki also has some useful links.
(ofc darker greens and maybe not this exact one :P)
Concept
(http://fc04.deviantart.net/fs70/i/2011/281/a/e/dismal_by_snowskadi-d4c7zyn.jpg)
Which will help you blend in the trees, and make it a little bit more lush and natural. Ofc you have to try different setting and create something that works
EDIT:
Maybe something like this (quick 5 minute done) end result:
Don't use my example, it's compiled using the above and another copyright photo. :poly124:
@chrisradsby Thanks chrisradsby!! I'll do this next, great stuff. I love your work!
Here's some updates. I'm going to make more rocks so don't worry bout dem gobstopper rocks. Am I updating too much?
It's definitely looking good so far.