k700 tractor model and texture wip
polycounter lvl 10
Hello everyone , my first post here. Thanks for the great artwork shown around here, very inspiring !
I've almost finished a tractor game model for personal study, i'm showing it for feedback and suggestions for improving, mostly on texturing.
It's a russian k700 tractor , modelled and textured in Blender , it's meant as environment prop.
here's some glsl viewport renders :

Normal map and wire :
http://nizuvault.files.wordpress.com/2011/08/k700wire1.jpeg
http://nizuvault.files.wordpress.com/2011/08/k700normal.jpeg
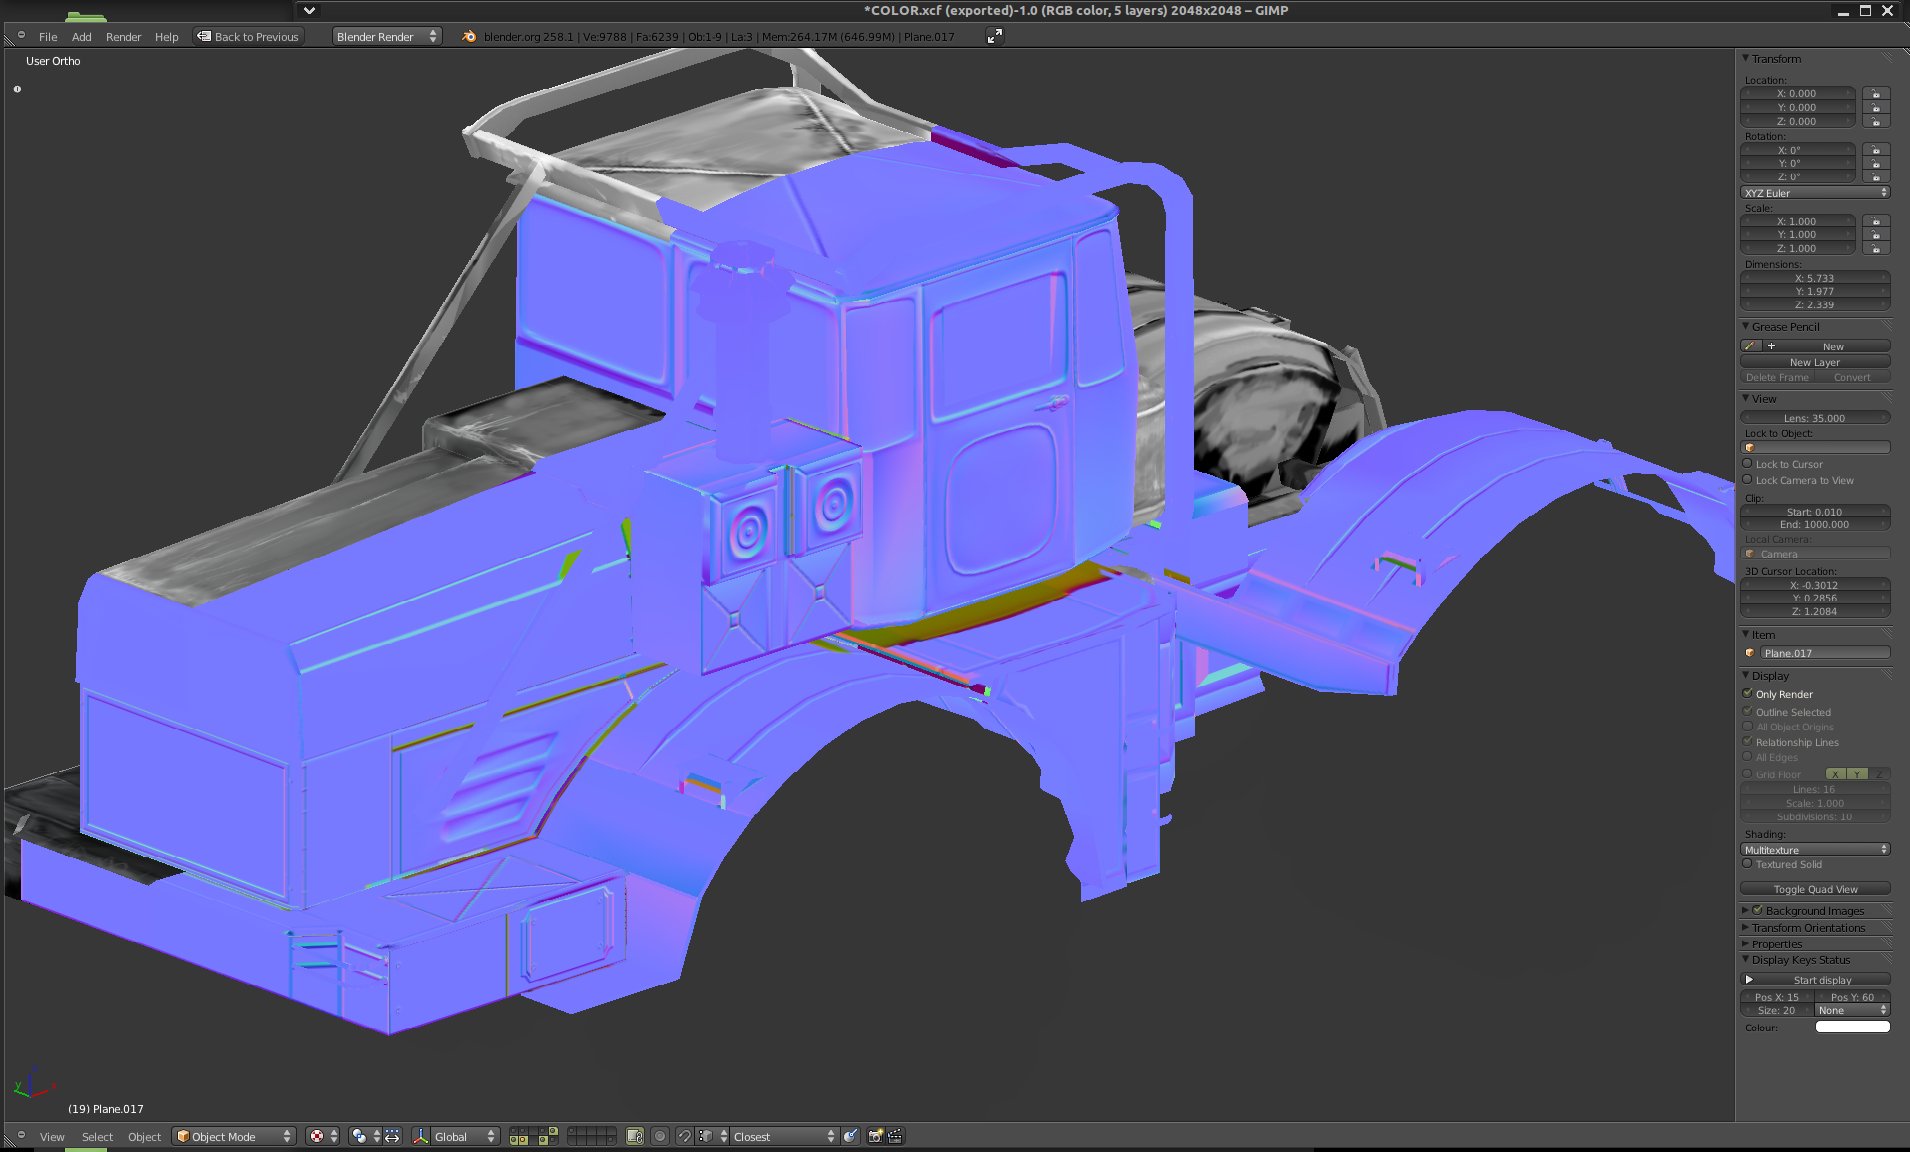
Normals Baked from hipoly model.
As i said i'm looking for general feedback , but i want to share some infos on the texturing method..
The shader is based on a blendmap or controlmap , painted with a tablet in Blender texture paint mode :
It's a greyscale map representing weathering .. Black for recessed areas (mud/rust) grey for base material and white for exposed areas (scratched / worn metal)


http://nizuvault.files.wordpress.com/2011/08/k700base1.jpeg
http://nizuvault.files.wordpress.com/2011/08/k700base.jpeg
This controlmap was passed trough Nodes :

The nodes takes 3 materials that use different tileable photo textures for diffuse and spec plus a common normal map.
The 3 materials are blended based on the controlmap.
For refinement i added 2 secondary materials (so: black=rust , off-black=mud, grey= painted metal , off-white= primer layer , white = naked metal)
The base material (paint) uses another painted color map , very simple with just base colors and a bit of discoloration effect.
Of course this shader can't be used in game (..i think?) but can be baked to simple color/spec/norm maps.
I like this workflow .. Ok, it's not as flexible as just freely painting each channel indipendently (in PS or with a complex texture paint and project app), but it's a bit faster and organized .. seems a good way to produce environment props a bit quicker ..
I've almost finished a tractor game model for personal study, i'm showing it for feedback and suggestions for improving, mostly on texturing.
It's a russian k700 tractor , modelled and textured in Blender , it's meant as environment prop.
here's some glsl viewport renders :

Normal map and wire :
http://nizuvault.files.wordpress.com/2011/08/k700wire1.jpeg
http://nizuvault.files.wordpress.com/2011/08/k700normal.jpeg
Normals Baked from hipoly model.
As i said i'm looking for general feedback , but i want to share some infos on the texturing method..
The shader is based on a blendmap or controlmap , painted with a tablet in Blender texture paint mode :
It's a greyscale map representing weathering .. Black for recessed areas (mud/rust) grey for base material and white for exposed areas (scratched / worn metal)
http://nizuvault.files.wordpress.com/2011/08/k700base1.jpeg
http://nizuvault.files.wordpress.com/2011/08/k700base.jpeg
This controlmap was passed trough Nodes :

The nodes takes 3 materials that use different tileable photo textures for diffuse and spec plus a common normal map.
The 3 materials are blended based on the controlmap.
For refinement i added 2 secondary materials (so: black=rust , off-black=mud, grey= painted metal , off-white= primer layer , white = naked metal)
The base material (paint) uses another painted color map , very simple with just base colors and a bit of discoloration effect.
Of course this shader can't be used in game (..i think?) but can be baked to simple color/spec/norm maps.
I like this workflow .. Ok, it's not as flexible as just freely painting each channel indipendently (in PS or with a complex texture paint and project app), but it's a bit faster and organized .. seems a good way to produce environment props a bit quicker ..
Replies
My refs are the later 701-702 models , but for the color i initially wanted to use a strong red..
But looking at examples of very nice game models and texture paint , i noticed that a light greyish base allows some nice effects of subtle hue and color variations.
So i worked a bit more on the color layer ... which remains blurry , while sharp weathering details remains in the greyscale controlmap.
But i realize , this color layer can still be important and ,if well painted, can make a difference ..
i tried not to paint darker corners .. occlusion is not the point here (can be done with ssao or another layer anyway)
Instead i tried the get those subtle color variations ('discoloration') as i've seen in a very beautiful 1920s tractor game model (by Raul Aparicio, http://raparicio.com)
I really liked that the base color was an indefinite warm grey ..but with tons of variations to yellow or green tones.
Almost done with paining main surfaces .. next weels , the front grill ..
is this for a game, or just a showoff peice and whats up with the tires.
I like the textures but the models needs refinement.
Yes of course the normal map needs work.
As i said , This is for personal study and tires are still to be painted.
(And i'm trying to decide exactly how much detail to put in those tires ..)
Regarding the normalmap errors they're because of proximity of different pieces, initially i had the hi and lowpoly in separate pieces (like cabin , main hull, etc..)
That meant a mostly error free bake , but also takes lot of time .
So i tried to bake all the HP pieces on the complete LP object directly.. And yes, you get all the errors that you see in the map , but they're pretty quick to paint over with a brush and get rid of , i still need to erase a few , but so far seems a quicker way to get the final normalmap ..
EDIT : so, nevermind the errors in the normalmap image , looking at the pic of the model in last update , i only see some errors of projection of the rollcage on the hood , and that's no problem to fix , but if there are more i'm missing .. maybe i could try the proper an longer bake done piece by piece...
Most of the projection errors have been painted over ,
Also i think you were looking mostly at the unwrapped image , right ?
It looks a bit different on the actual model , some of the error it's actually just in the padding or in hidden pieces of a face ..so not a big deal.
As i said i tried a quick and dirty projection .. but what's left to fix is not much and doesn't mess up important details so i can just paint over with the neutral violet..
A bit more worrying are the smoothing artifacts (i.e. cabin front-side ) .. but i'm not sure if they're errors or not ? it's hard to read normalmaps sometimes .. the cabin front-side panel looks weird in the plain map but seems ok in the shaded model.
Another interesting point will be to see the final normals... this image contains only the Hi to Lo poly bake , but in the shader i'm using the controlmap and photo textures to add bump (which is visible in the screenshots of the final model )
Let's see how the final normalmap with both kinds of details looks ...
I also put togheter normals from hipoly and handpainted scratches.
A very bad news is that i couldn't bake this in Blender directly , Seems that the bake tool ignores node materials ( with BI , and Vray has still limits with nodes)...
So.. it's very cool to see those node shaders realtime in painting .. with glsl bump and normals , blendmaps , overlayed images .. But then to optimize it for real-world use in games or any realtime 3d, it must be 'flattened' to simple images )..the classic diffuse/spec/norm )
And i was counting on that being done with a single click. aww..
So i did normals the traditional way ..converting bump to normal and overlayed on the hipoly bake .
I can get the diffuse channel flattened/baked easily , but not specs or normal .. Too bad , this seemed an interesting workflow , and it still is but this makes it slower ..
I've made a new version reducing scratches strenght and blurrying them a little.
But keep in mind that shader is only to spot artifacts , without color the normalmap is bound to look a bit odd , i think
Or do you mean also the final shader had too much weathering (in color) ?
I want this thing to be worn and dirty , but as a working vehicle would be , not as a wreckage or anything postnuclear ..
So it's meant to have mud , and rust. But not muddy (as in noisy , messy..)
So, i've also tweaked the color to reduce and sharpen the mud and scratch areas..
(The whole node thing helps a lot , realtime feedback is great for this)
How's this version ? maybe too smooth ? .. maybe lost details along with some 'noisiness' ?
And it's about weathering and noise , just what i needed.
I'll read it carefully , but i already notice the stuff about real-world noise and dirt : makes me think of the very simple round brushes i used on the controlmap ... even with refinement and using a tablet remains fake ..and could use real-world variation .. from a textured brush or stamp ..interesting.
1) fake looking brush strokes : vs. real world shapes .. indeed a 'scratch' on metal is something more than a 1 pixel brush ..
I painted the control map for dirt using only round brushes (sometimes with jitter) , you couldn't quite spot that in the final shader .. But it still harmed the result.
So i did a pass in Gimp with more complex brushes (shape and dynamics) and i think it really made the dirt patches much more interesting.
At first glance this looks just like the controlmap in 1st post .. but up close in the old map you could see tons of ugly 'blobby' paint strokes .. which i tried to break down into more realistic shapes.
2) Low frequency details : 'shapes' in my texture (stains , patterns) were all basically the same size .. and they shouldn't .
i painted some big patches mostly using sharp rectangular brushes (like patches painted with a roll-brush)
But since i had quite enough damage already , i didn't overlay those to the rest of weathering , instead used that layer as a mask to smooth areas and remove small details and create cleaner patches.
So, this is the current colormap , now i have to redo the spec to really see how it's going..
Seems i always think much more in terms of illustration than photography (for good and for bad..) So yes, i'm always leaning to stylized looks , but not really intentionally...
I used brush shapes for this pass , maybe using some photo-sourced stamps would give more realism .
Anyway .. it should look a bit sharper , maybe it's just technical : a 4K map in viewport , after a bit of unsharp and resizing to 1k should look different.
And also , compared to previous i reduced the contrast between dirt and scratches: i'm trying not to confuse dirt with ambient occlusion .I don't want to 'over shade' the color map.. with normal and spec it should get back the contrast..
Another pass on textures , added spec map.
I stopped using the node shader and worked on the baked textures (not lightbaked . , i just mean baked to a flat image instead of mixing various handpainted and tileable maps using nodes)
For the color channel i just added some big stamps of leaks and scratches from photos to have more low-frequency details , and trying to make it a bit less styilized. For the spec i started baking from node shader and then refined in gimp.
The screenshots are from Blender glsl viewport , in addition to speculars these use a mirrorball reflection (ref. intensity also uses the spec map)
The tutorial suggested by Fonfa was very useful , both for learning new stuff but also for pinpointing the limits of this workflow i'm playing with.
Simple handpainted controlmaps and node shaders : are fast , consistent and help organization ..but it's also limited and not very flexible in exactly the stuff mentioned in that racer445 tutorial.
But that's fine. I can do a final 'traditional' pass in PS or Gimp , or explore more projection paint options to tackle those issues..
My plan for this thing is to make a small diorama type scene : the tractor , with something loaded on back (barrels..) , ground and some rocks and a segment of fence with a concrete pillar. ..basically a bunch of typical env props to practice on.
But first is finishing the tractor :
I think i kept the hull low enough (3500 tris) thinking of current gen fps envs. not a hero-model drivable vehicle , just a env piece.
But the weels .. 1500 tris each ? seems inevitable , the weels of this thing are huge . And from the detail i see on tires in today's games i guess that's normal..
But then if 1,5k tris are ok for wheels , i should probably model a few more details for the hull ? like handles , door hinges , spotlamps .. could improve looks and won't impact much on the total with 4x wheels ..
Also, since i'm finishing and correcting the modelling : an old pic of the hipoly:
The hipoly is a mix of 'floaters' and complete pieces .
it was an experiment but seems that floating geometry works not only for projecting details on a plane but also projecting on a complex shape (as the hood)
I think doing it this way spared me a few projection errors.
(i basically deleted all the big faces of the hull that were already in the lowpoly, leaving only bevels and added floating details )
There were still interferences , as seen in earlier posts , if i really wanted a perfect projection i think it'd require breaking both the high and low in 5-10 pieces and doing them separately to avoid interferences.. But that sounds really time consuming (so i baked to a single lowpoly object in one go , and painted over errors later) ..
EDIT :
Quick fix for the wheel : Ok, maybe 1,5k tris was nonsense.
This is the current wheel with normalmap , 780 tris :
I've seen some quite detailed threads normalmaps around : the wheel mesh was a simple chamfered cylinder ... but normalmaps do miracles for wheels, it seems.
Since these are huge offroad wheels, i'm still using a wopping 48 sided cylinder for the threads (mainly to make the big dents , and get the silhouette right) , and 24 sides for the front of wheels.
This should be much more reasonable i guess.
Added wheels , textures.
Spec might still require tweaking to differentiate rubber shader from metal ..
So far , the 'rules' i found for tire rubber material are: low glossiness (hardness of cooktorr spec. = 5 ) and keeping the spec map blurry .
I've been following a very nice tutorial by Laurens Corijn
http://cg.tutsplus.com/tutorials/autodesk-3d-studio-max/creating-a-next-gen-video-game-hot-rod-the-complete-workflow-day-8/
Lots of useful info , among others the highlight on tires thread edges.. really important to get the right look on tires.
For this 'jerry can' i used the node shader an controlmap method , but also 'traditional' painting and photo sourcing on canvas in Gimp.This time , the clone stamp tool in Blender texture paint was very handy to fix seams : i started applying one of my favourite painted metal tileable photo maps , looked fine but with terrible seams , the clone stamp allowed to paint over those seams quickly and with a good sharp result.
Also that base metal was nice but too uniformely dirty and weathered ... Funny how sometimes it works to literaly 'clean up' textures by quickly painting over by hand with flat colors on an over-grimy texture as if you were cleaning the object (so , leaving more dirt in recessed areas and 'cleaning' bigger , flatter surfaces)
I experimented a bit with pinning UVs to get a good use of uv space : the pinned vertexes are shown in red in the pic.
I unwrapped with the usual lscm (defining edge seams ) then stretched the resulting islands by pinning to get more regular shapes and reduce the space between them .
Works well , but i was curious about possible distortions : pinning stretches faces , and distorts the projection : generally not by much so it isn't a problem.
But if you pin corners , you might be pinning 3 verts of the same quad ..and you quickly end up stretching that quad a lot.
So best to pin the least number of verts possible, especially in corners, and leave the island to auto-relax as much as possible (inside the pinned boundaries you imposed )
Sculpted and painted in Blender + gimp for tweaks , uses a bake of inverted normal Vray dirt as a guide for edge highlight .
I put quite a strong edge highlight in diffuse : i didn't want to make that excessive , a kind of fake lighting , i just wanted dirt and edge scratches ..
Still this doesn't look excessive to me , i guess this makes sense for rock material.
For the sculpt .. i think i got the edges and flat faces look right for rocks .. still maybe the edges (/ridges) could be better , maybe a bit sharper , or crackled..
Btw , great inspiration on this thread here on Polycount : http://www.polycount.com/forum/showthread.php?t=83605
Thanks!
images : full shader / diffuse only / spec + norm only :
Your textures look incredibly muddy and undefined. Can't tell which material this is made of.
I'd say get rid of this dirt mask you painted, think about material quality first and later add dirt on top.
Try this also: http://www.3dmotive.com/training/photoshop/hard-surface-vehicle-texturing/
Alec Moody's textures are great and somewhat simple, actually. He just knows where to put his stuff.
But keep up!
Very interesting , i've seen the intro , and i totally get the point.
In terms of personal taste and style preferences i don't mind a bit of muddiness and i'm not particularly fond of very 'glossy' and ultra clean textures.. (like the apc in the intro)
But i realize the value of those technical and artistic points ..i tend to overlook them, and those make better textures regardless of the personal taste.
Also , well , after seeing Deus Ex HR i'm thinking a lot of clean and even minimal (yet realistic) textures ... And how hard they're to make :poly122: DX maybe isn't my favourite texture style but i sure can see the quality ..
Some tweaks on the spec map , the shader , and started modelling details.
For the diffuse i took some ideas from the Bradley tutorial : i reduced the value contrast for the dirt : hue and saturation are more important for dirt, and in general for the color map ..
That i knew already,(and i think it's a useful principle) But what surprised me -as it's somewhat contrary to that- is that Bradley model looks like it has tons of AO baked in the diffuse .. ok maybe something more refined than pure AO bake , tweaked manually in PS ; But still low freq. detail , very big and smooth shapes and gradients , and there were none in my diffuse... So i added in a pass of ao, and i think it did a good job for the overall look.
(Btw , no SSAO in these shots , the radius of the AO i put in diffuse is much bigger than usual ssao , about 3 meters as the height of the tractor )
I paid attention to the issue of AO in diffuse meant to give low-freq details, as well as painting a layer for pure color (red /beige ) with soft gradients of discoloration for the same reason of having low-freq / big scale details that help reading the volumes and making the model more solid . (..which shouldn't necessary mean 'fake lighting' , i mean it seems to work well even in modern engines with ssao and complex lighting ...)
I also tested making a turntable video : http://www.vimeo.com/28925807
Not at all final : the front grill is temp and final turntable will have a base and more props.
But it already shows better the speculars in motion ... and i like the shader i got now in Blender that uses part point-light speculars and part mirrorball reflection map .. which helps getting the right amount of spec (not too strong and localized )
I tried Marmoset , which kicks Blender's ass in terms of super-sampling , post effects and lots more , but i couldn't yet tweak the spec shader right.
Still for the final turntable i prob. should use some standard tool , to 'prove' the shaders work , maybe UDK ... its node shaders really intrigue me
What seems to me is that your wear/dirt is pretty much random. I add my dirt and wear in passes, after the base material is done. I think about what kind of exposure each part should get.
I wear the edges that would rub against other stuff, chipping off the paint layer(revealing the base metal layer underneath), then I make a dirt layer from the AO, then I add rain stains, rust in places where water builds up, then mud that gets kicked up from the wheels etc. But in a sensitive way, not just randomly throwing things around.
But yeah, it's getting better!
I'm working on that
I try not place dirt randomly and that takes lots of practice and observation of materials , from Racer's tutorials i always remember the rules about paint 'chipping' and not fading and about primer coats .
But it's one of those things where just knowing it doesn't mean applying it correctly : takes practice to paint correct 'chipping' shapes , trying to paint primer coats can really mess up the noise levels in the texture , etc.. tough stuff.
Also , i've seen your works and they really kick ass , i noticed the rust placement on your AK47 and that's a very good example of low frequency details .. that helps the volumes and shapes like AO but also has more physical sense , i'm keeping that in mind.
Or could be just the Blender viewport render which uses 8x aniso but no AA , when i tried this in Marmoset the sharpness was much better.
Updated the turntable video with base and a concrete pillar :
http://www.vimeo.com/28925807
I'll do at least another pass on both , the scrape brush worked well for sculpting broken concrete , but there are some scratches done with crease brush that look too hand-sculpted and fake.
Also , i'm not sure if i got the color variation from inside to outside of concrete right..
and some pics :