Lowpoly projection texturing workflow with zBrush. No polypaint needed.
polycounter lvl 11
I don't know if this is common knowledge or not, but I have tried to google this without finding anything.
Most of us have probably seen slipgatecentral's video on his projection texturing technique: http://vimeo.com/5820395
When I first saw it I tried to hunt down a copy of Deep Paint 3D but quickly found out it wasn't worth the bother. Instead I tried to see if I could do the same thing with zBrush or Mudbox.
See zBrush has this really cool plugin called zApplink that lets you grab a screenshot of your viewport and send it to Photoshop where you can paint on top of it and then send it back to zBrush where it will be applied as a texture. Of course because of zBrush being zBrush it's not that straightforward. The default texturing workflow in zBrush is based around Polypaint which is essentially vertex color. This means that your model needs to be very high poly in order to get a good resolution on your texture.
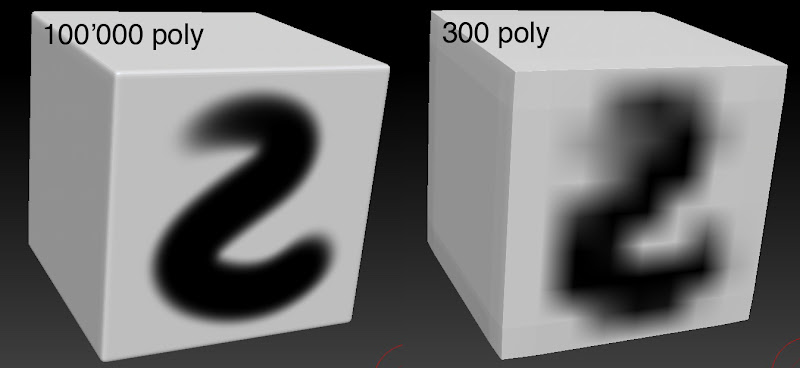
Now this works perfectly fine if you're doing sculpting and such. A possible workaround is that there is an option to subdivide your mesh without smoothing it, but if you want to texture a low poly character or asset where the topology is either triangulated or has edges that are not uniformely spaced you're going to run into a lot of problems.
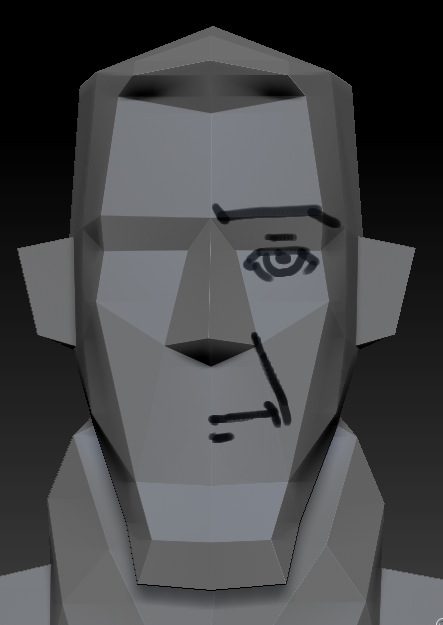
You can see here how the varying density causes resolution issues:

So unless you have prepared your mesh for this workflow then you're probably not gonna have a good time with Polypaint. And the problem here is that zApplink will use Polypaint by default. So what we want to do is to project directly to a texture map rather than to Polypaint. For a while I thought this wasn't possible, but the other day I stumbled upon how to make it work.
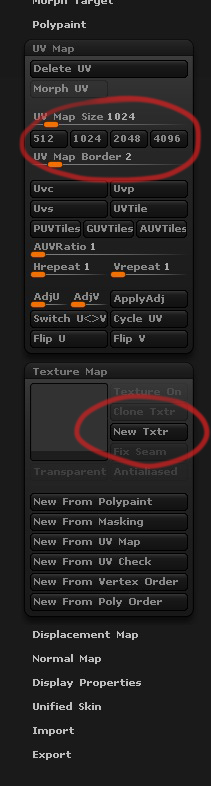
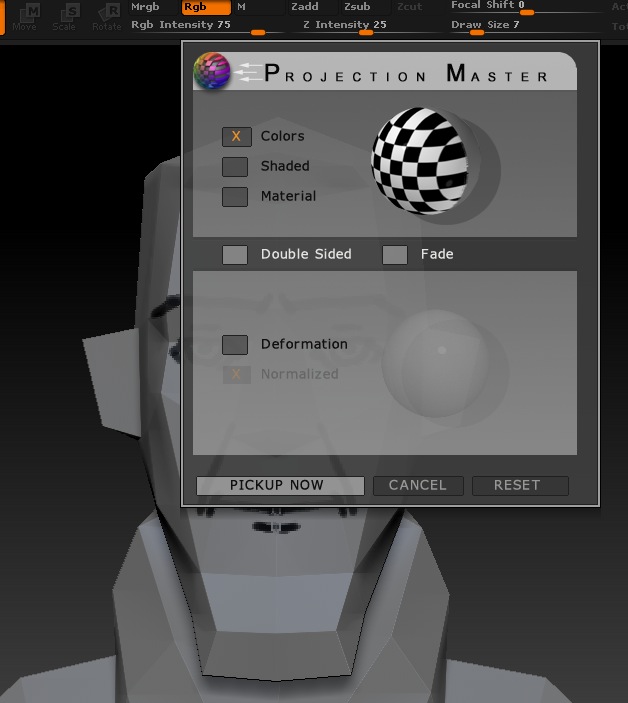
The trick is that you need to use Projection Master, and have a texture map already applied to your mesh.
Go into your Tools tab and navigate down to UV Map and set your texture size first. Then go into Texture Map and click New Txtr to create and apply a clean texture map which is filled with your selected primary color.
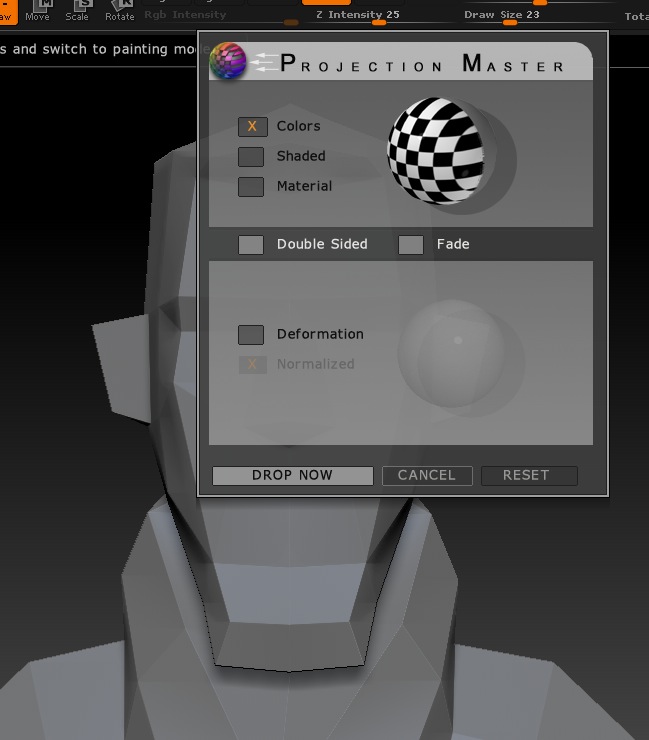
So now if we drop the workspace with Projection Master.
Paint on him a bit. Because my UV is mirrored I only need to paint on one side. If I overlap I end up with this so be careful.
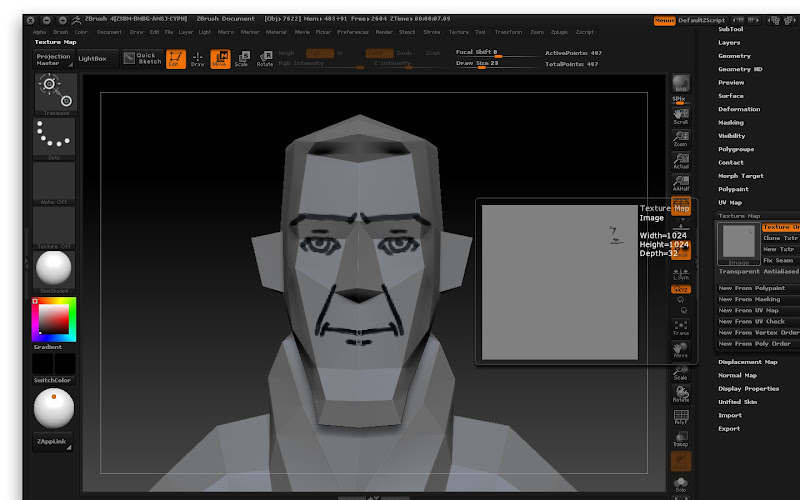
I then pick up my dropped workspace. zBrush will then project what I painted on top of him to the texture map that is applied to him.
And this is what I get. This mesh has not been subdivided at all and is only a total of 524 poly.
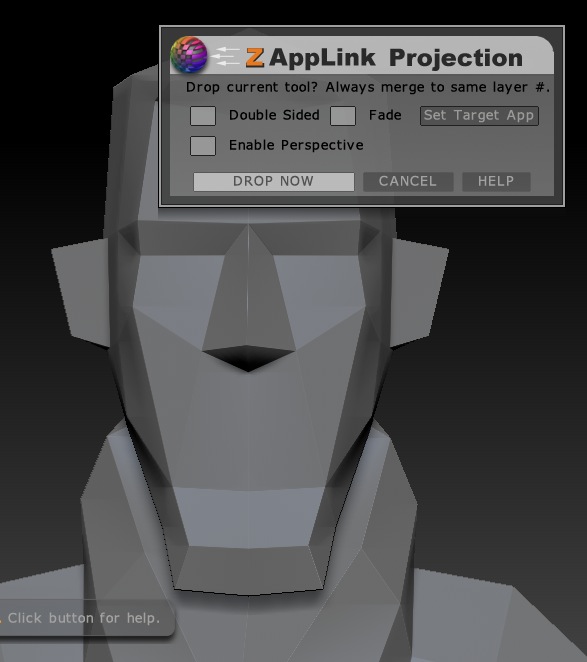
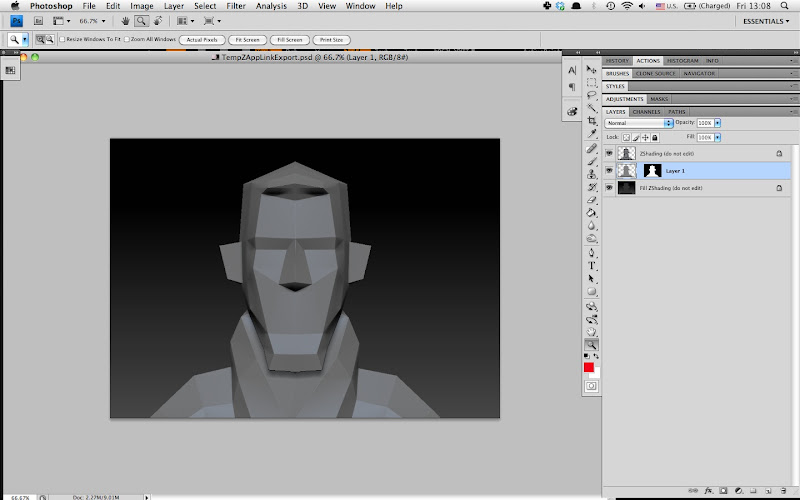
Doing this with zApplink is just as easy. In fact, zApplink is nice enough to automatically drop the workspace in Projection Master for you automatically so all you need to do is to make sure you have a texture applied to your mesh.
Same as before. Drop your workspace.
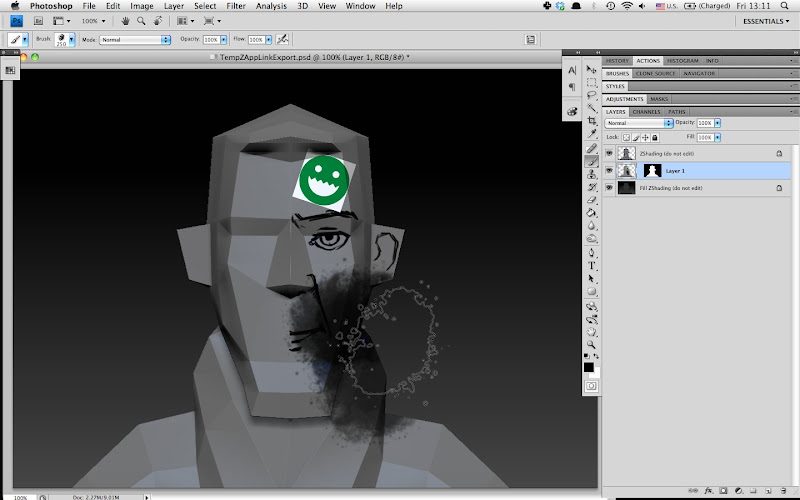
Photoshop will automatically open with your document.
Draw, paint, use custom brushes, overlay textures. Do whatever you'd usually do in photoshop, but remember to merge all your layers to Layer 1 and remember to preserve the layer mask (This is important! Otherwise the pickup will glitch like crazy).
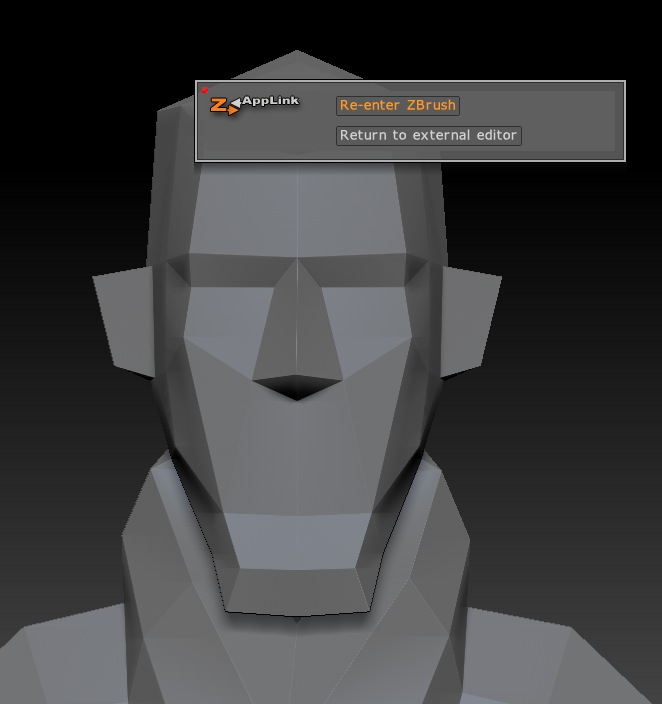
Save the file and return to zBrush. It should automatically detect that the file has changed and give you this dialogue, if not just click the Re-Check button until it does. Simply click the Re-enter zBrush button to transfer the stuff you did in photoshop to the flattened workspace.
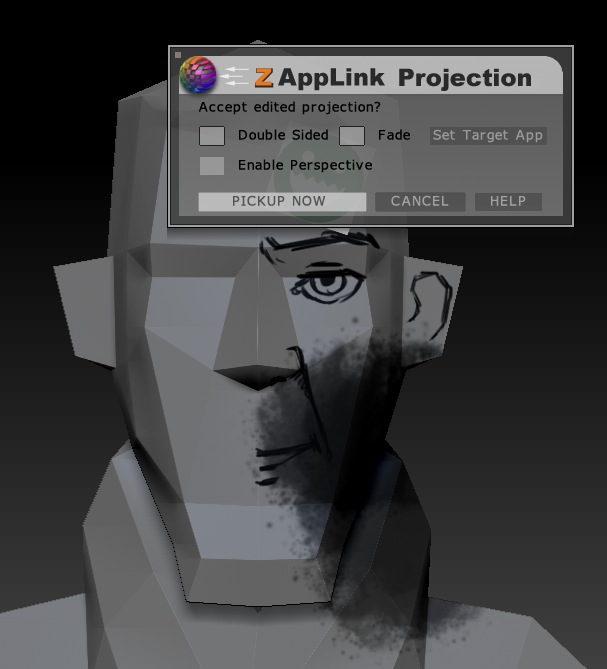
zBrush will then ask you if you want to pick up your workspace again, just as if you'd been painting in Projection Master.
Pick it up and Bob's yer uncle. This is obviously not the prettiest example but it gives you an idea of the process.

Now a little note at the end here. I've experienced that sometimes zApplink ends up glitching and blowing up my texture when it picks it up again. I've discovered that this can sometimes be solved by dropping it with Projection Master and then activating zApplink. There is no difference between this and just activating zApplink, all it does is to just save you that one extra step of activating Projection Master as zApplink needs that to work in the first place anyway.
Now some of you might want to point out that Mudbox has this function too where you can send your viewport to Photoshop and back. And with Mudbox you won't have to fiddle with zBrush's odd texturing solutions, plus Mudbox can actually project from stencils in an active 3D viewport. And I agree. Mudbox is currently way better than zBrush at texturing if you don't use Polypaint, but not everybody has access to both programs. Personally I can't use Mudbox because the OSX client is absolutely atrocious. It's leaky, hogs all my RAM and crashes at the drop of a hat. I'd love to use it but them's the breaks.
I hope this was helpful to some of you, and feel free to ask questions and add to some stuff that I might have forgotten to mention. Actually, if someone would tell me how I can get my edges to display softly in zBrush that would be very nice. Or if it's even possible to use Spotlight in Projection Master because that would be rad.
I hope this is useful for some of you guys. It's helped out my texturing workflow a lot, both low and highpoly.
Most of us have probably seen slipgatecentral's video on his projection texturing technique: http://vimeo.com/5820395
When I first saw it I tried to hunt down a copy of Deep Paint 3D but quickly found out it wasn't worth the bother. Instead I tried to see if I could do the same thing with zBrush or Mudbox.
See zBrush has this really cool plugin called zApplink that lets you grab a screenshot of your viewport and send it to Photoshop where you can paint on top of it and then send it back to zBrush where it will be applied as a texture. Of course because of zBrush being zBrush it's not that straightforward. The default texturing workflow in zBrush is based around Polypaint which is essentially vertex color. This means that your model needs to be very high poly in order to get a good resolution on your texture.
Now this works perfectly fine if you're doing sculpting and such. A possible workaround is that there is an option to subdivide your mesh without smoothing it, but if you want to texture a low poly character or asset where the topology is either triangulated or has edges that are not uniformely spaced you're going to run into a lot of problems.
You can see here how the varying density causes resolution issues:
So unless you have prepared your mesh for this workflow then you're probably not gonna have a good time with Polypaint. And the problem here is that zApplink will use Polypaint by default. So what we want to do is to project directly to a texture map rather than to Polypaint. For a while I thought this wasn't possible, but the other day I stumbled upon how to make it work.
The trick is that you need to use Projection Master, and have a texture map already applied to your mesh.
Go into your Tools tab and navigate down to UV Map and set your texture size first. Then go into Texture Map and click New Txtr to create and apply a clean texture map which is filled with your selected primary color.
So now if we drop the workspace with Projection Master.
Paint on him a bit. Because my UV is mirrored I only need to paint on one side. If I overlap I end up with this so be careful.
I then pick up my dropped workspace. zBrush will then project what I painted on top of him to the texture map that is applied to him.
And this is what I get. This mesh has not been subdivided at all and is only a total of 524 poly.
Doing this with zApplink is just as easy. In fact, zApplink is nice enough to automatically drop the workspace in Projection Master for you automatically so all you need to do is to make sure you have a texture applied to your mesh.
Same as before. Drop your workspace.
Photoshop will automatically open with your document.
Draw, paint, use custom brushes, overlay textures. Do whatever you'd usually do in photoshop, but remember to merge all your layers to Layer 1 and remember to preserve the layer mask (This is important! Otherwise the pickup will glitch like crazy).
Save the file and return to zBrush. It should automatically detect that the file has changed and give you this dialogue, if not just click the Re-Check button until it does. Simply click the Re-enter zBrush button to transfer the stuff you did in photoshop to the flattened workspace.
zBrush will then ask you if you want to pick up your workspace again, just as if you'd been painting in Projection Master.
Pick it up and Bob's yer uncle. This is obviously not the prettiest example but it gives you an idea of the process.
Now a little note at the end here. I've experienced that sometimes zApplink ends up glitching and blowing up my texture when it picks it up again. I've discovered that this can sometimes be solved by dropping it with Projection Master and then activating zApplink. There is no difference between this and just activating zApplink, all it does is to just save you that one extra step of activating Projection Master as zApplink needs that to work in the first place anyway.
Now some of you might want to point out that Mudbox has this function too where you can send your viewport to Photoshop and back. And with Mudbox you won't have to fiddle with zBrush's odd texturing solutions, plus Mudbox can actually project from stencils in an active 3D viewport. And I agree. Mudbox is currently way better than zBrush at texturing if you don't use Polypaint, but not everybody has access to both programs. Personally I can't use Mudbox because the OSX client is absolutely atrocious. It's leaky, hogs all my RAM and crashes at the drop of a hat. I'd love to use it but them's the breaks.
I hope this was helpful to some of you, and feel free to ask questions and add to some stuff that I might have forgotten to mention. Actually, if someone would tell me how I can get my edges to display softly in zBrush that would be very nice. Or if it's even possible to use Spotlight in Projection Master because that would be rad.
I hope this is useful for some of you guys. It's helped out my texturing workflow a lot, both low and highpoly.
Replies
Either way, thanks for the tut for those that don't use the other applications