The BRAWL² Tournament Challenge has been announced!
It starts May 12, and ends Oct 17. Let's see what you got!
https://polycount.com/discussion/237047/the-brawl²-tournament
It starts May 12, and ends Oct 17. Let's see what you got!
https://polycount.com/discussion/237047/the-brawl²-tournament
Viperwolf and Tree nymph (first post, Img heavy)
polycounter lvl 7
this post was created by copying the documentaion of my project directly out of an Unfuddle* notebook, so there are likely lots of random quotations and parathesis, apologies for that. This document spans the duration of an adv seminar class aimed at having students create their own portfolio pieces, so be aware much of the context present in this post is relating to my class.
Would love critiques and feedback, especially on the last 5 or 6 UDK renders a few posts down, as that is where i am currently. Thank you.
While I initially started this class with the hopes of making one major model and then work on animating it, I decided my lack of animation experience would be detrimental to my success. As a result, i opted to create produce two static meshes and compile them in Unreal.
The first of these two objects was to recreate the viperwolf creature from Avatar the movie, as pictured here
**Critique 1**
When i first began this project, my intentions were to create the viperwolf for one of my main works in the class, and then rig/animate it. Following the advise of my professor, I opted to go with a quadreped version of the originally 6-legged creature. Utilizing a mix of dog, wolf, and cheetah references, as well as several of the original concept sketches of the Viperwolf, I began work.
Using the Z-spheres and Z-sketch tools in Zbrush 3.5 R3, i produced this mesh pictured here.

Because Zbrush's "Adaptive skin" tool used to produce this mesh creates poor topology for high-rez sculpting, my next move was to re-topologize the base mesh, which I did in 3D Coat. I then took the mesh back into Zbrush and began working in the primary forms using the move and standard brushes to get the mesh pictured here:

After some considerable work with the clay tubes brush and a few touch-ups with the Dam-Stadard brush, I began developing some of more prominent secondary forms, like the anatomy of the head/skull and the muscles for the front two arms. At this stage, I also added placeholder Eyes and teeth to better allow me to design the anatomy of the face. The mesh pictured here is after two or three passes with clay tubes to get the forms of the skin and protruding bones present in the cheeks and jaw of the creature, as based on its original concepts.
 Secondary forms 1
 Secondary Forms 2
After jumping up a sub-division level or two, i began using the Dam-Standard bursh, clay tubes, and using DragRect with the stadard brush with alphas, I polished up many of the secondary forms, and introduced tertiary details like small wrinkles, pores, and surface noise for the skin. The mesh shown here is the high rez sculpt of my first pass at tertiary forms.
 "TertiaryForms1")
 "TertiaryForms2")
It was at this stage that i began working on my first pass at polypainting the creature's skin. Following the original concept, I opted for a dark, panther-like color shceme, utilizing Red and blue as my primary colors, I used ame="http://www.youtube.com/watch?v=k66iKwJ_iu4"]Scott Spencer's technique, shown here[/ame"SPencerPolypaintTut"). Confused on how to produce decently dark skin using this technique, I expirimented with doing the noodling process with black instaed of white, and then a mix of both, and then white with some large but faint strokes of black across the top. The result was far less than spectacular, and I ended up with far too dark a skin. Additionally, due to my lacking render experience, these early renders were done on a black bnackground, furthering how difficult it is to see. Regardless, pictured here is my first polypaint pass.
 "Painted1")
 "Painted2")
The past 4 renders were amougnst those I displayed at the first crtique. The major feedback I got at this point in the project was that the creature's posture was far too narrow and did not compliment his humanoid front arms. Additionally, some inconsistancies were identified relating to the length of his jaw in regards to the placement of his eyes. As we began progress towards the second critique, my first notion was to apply the feedback i recieved during my critique to my high poly mesh.
**Critique 2**
My first step was his posture. Using Transpose master, I spread his front legs wider apart, and gave his elbows a more push-up like positioning. By dropping down several Sub-D levels and using the Move brush, i pulled the edges of his mouth back to where they should have been according to the concepts i had. Using transpose once more, i changed the angle of his neck and dropped his torso slightly lower to the ground.
pictured here are side by side comparisons of the posture and proportion adjustments
 "comparison1")
 "comparison2")
Listening to the advice of my professor, i deleted my two highest Sub-D levels and restarted working the secondary and tertiary forms. Using the same technique as earlier, i began stacking alphas on top of clay-tubed surfaces and started pulling out the tertiary forms i wanted.
pictured here is some of the work done immedietly after deleting the high level Sub-D.
 "Claytubes")
 "claytubes2")
Would love critiques and feedback, especially on the last 5 or 6 UDK renders a few posts down, as that is where i am currently. Thank you.
While I initially started this class with the hopes of making one major model and then work on animating it, I decided my lack of animation experience would be detrimental to my success. As a result, i opted to create produce two static meshes and compile them in Unreal.
The first of these two objects was to recreate the viperwolf creature from Avatar the movie, as pictured here
**Critique 1**
When i first began this project, my intentions were to create the viperwolf for one of my main works in the class, and then rig/animate it. Following the advise of my professor, I opted to go with a quadreped version of the originally 6-legged creature. Utilizing a mix of dog, wolf, and cheetah references, as well as several of the original concept sketches of the Viperwolf, I began work.
Using the Z-spheres and Z-sketch tools in Zbrush 3.5 R3, i produced this mesh pictured here.
Because Zbrush's "Adaptive skin" tool used to produce this mesh creates poor topology for high-rez sculpting, my next move was to re-topologize the base mesh, which I did in 3D Coat. I then took the mesh back into Zbrush and began working in the primary forms using the move and standard brushes to get the mesh pictured here:
After some considerable work with the clay tubes brush and a few touch-ups with the Dam-Stadard brush, I began developing some of more prominent secondary forms, like the anatomy of the head/skull and the muscles for the front two arms. At this stage, I also added placeholder Eyes and teeth to better allow me to design the anatomy of the face. The mesh pictured here is after two or three passes with clay tubes to get the forms of the skin and protruding bones present in the cheeks and jaw of the creature, as based on its original concepts.
Secondary forms 1 Secondary Forms 2After jumping up a sub-division level or two, i began using the Dam-Standard bursh, clay tubes, and using DragRect with the stadard brush with alphas, I polished up many of the secondary forms, and introduced tertiary details like small wrinkles, pores, and surface noise for the skin. The mesh shown here is the high rez sculpt of my first pass at tertiary forms.
"TertiaryForms1") "TertiaryForms2")It was at this stage that i began working on my first pass at polypainting the creature's skin. Following the original concept, I opted for a dark, panther-like color shceme, utilizing Red and blue as my primary colors, I used ame="http://www.youtube.com/watch?v=k66iKwJ_iu4"]Scott Spencer's technique, shown here[/ame"SPencerPolypaintTut"). Confused on how to produce decently dark skin using this technique, I expirimented with doing the noodling process with black instaed of white, and then a mix of both, and then white with some large but faint strokes of black across the top. The result was far less than spectacular, and I ended up with far too dark a skin. Additionally, due to my lacking render experience, these early renders were done on a black bnackground, furthering how difficult it is to see. Regardless, pictured here is my first polypaint pass.
"Painted1") "Painted2")The past 4 renders were amougnst those I displayed at the first crtique. The major feedback I got at this point in the project was that the creature's posture was far too narrow and did not compliment his humanoid front arms. Additionally, some inconsistancies were identified relating to the length of his jaw in regards to the placement of his eyes. As we began progress towards the second critique, my first notion was to apply the feedback i recieved during my critique to my high poly mesh.
**Critique 2**
My first step was his posture. Using Transpose master, I spread his front legs wider apart, and gave his elbows a more push-up like positioning. By dropping down several Sub-D levels and using the Move brush, i pulled the edges of his mouth back to where they should have been according to the concepts i had. Using transpose once more, i changed the angle of his neck and dropped his torso slightly lower to the ground.
pictured here are side by side comparisons of the posture and proportion adjustments
"comparison1") "comparison2")Listening to the advice of my professor, i deleted my two highest Sub-D levels and restarted working the secondary and tertiary forms. Using the same technique as earlier, i began stacking alphas on top of clay-tubed surfaces and started pulling out the tertiary forms i wanted.
pictured here is some of the work done immedietly after deleting the high level Sub-D.
"Claytubes") "claytubes2")
Replies
pictured here is the body with a few new layers of poly paint applied.
i went with some new aplahs on this one, primarily veins and cracks available on pixologic's website. rather than using black during the noodle'ing process, i went with a more lively blue, and realized that if need be, i could darken it all in photoshop later.
once i was relatively satisfied with my new tertiary details and polypaint, i began creating a new low-poly mesh by bringing a decimated version of my sculpt into 3D coat. the final polycount of my retopolgy of the body was 1711 quads.
Pictured here is the Wireframe and Polycount of the body.
Due to software issues in the lab, I did not have access to 3D coat, so i opted to go with Zbrush's UV master plugin to get my UV layout. The layout i got out of it was less than ideal, but due to time constraints, It was the UV layout present in my second critique presentaion. pictured here are the diffuse and normal maps for this first UV layout.
Due to my lack of experience with lighting in UDK, i opted to throw my mesh into a pre-made UDK level, titled GDC demo, that was made to showcase Unreal's new features at eh GDC convention. As should be expected, the environment itself far surpasses the quality of my piece, but at the very least it allowed me to make the issues with my UV layout exetremely apparent.
pictured here are a few screen grabs from in the UDK level. (throughout much of the duration of the thrid portion of this project, i continued to regularly build new UDK packages and scenes from scratch, expirimenting with different lighting rigs and testing my maps for quality, especially after the texture issues present in these next 3 renders became apparent.)
In this final image, you can see the seam issue that would continue to haunt me through much of the work for the third critique. I later discovered it was due to insufficient edge padding, and was an easy fix.
**Critique 3**
For the final critique, rather than rig and animating the viperwolf, i opted to polish an older piece of mine, a tree nymph based off of this photo
to build this piece, i started with Zspheres and created this skeleton:
I then sculpted it using the move and snake hook brushes to create the mesh pictured here:
realizing that the mesh i created was going to be a nightmare to create a Lowpoly for, I began retopologizing the major portions of it in 3D coat, leaving holes where the small and difficult branches originated.
Pictured here is the mesh i created in 3D coat (note the holes where small branches should be)
I then took the new Low-poly mesh into maya and filled the holes with proper geometry. Then, using maya's extrude tool, i went about creating new branches and limbs for the low poly mesh. The finished result is pictured here.
Once i was satisfied with the branches and topology of the mesh, I brought it into Zbrush and began creating a new high-poly model. Using alphas and Zbrush's "noise" tool, I began giving the bark some texture, and completed my first pass on the polypaint for it. Using beige, green, and gray, i created the painted mesh shown here:
after baking out diffuse and normal maps from this plane, i took the images into photoshop and edited the alpha channel to make it so only the leafs and stems would be visible. By duplicating and arranging planes with these images in their materials, I created the foliage for the tree. Shown here are a few renders out of maya of this first compilation of the tree.
i also played around with some mock environments in maya, as shown here.
These images are renders of where the tree was in regards to completion before I began repolishing it for this class. This is where i picked up the project for my final compilation for this class.
My first step was to revisit the UV's of the lowpoly mesh. I had learned several new techniques of pulling maps from zbrush, and was able to create my own UV layout using 3D coat without encountering serious baking issues. In addition to a new UV layout, I revisited the highpoly mesh and spent some time re-doing the bark surface and also accentuating the human forms of the tree. I utilized the dam standard brush to draw the breasts out more as well as emphasizing the forms of the butt. I played around with adding additional features such as facial forms, through i found the result to be distracting and opted to go without.
shown here is my second pass on the Tree's high-poly sculpt with polypaint applied.
In addition to my new UV layout, this picture shows the new coloration i chose for the bark. I opted for darker colors this time, and speant more time using auto-cavity-masking to create the bark's coloring.
the colors in the empty space of the texture were added later in photoshop. this was to resolve an issue i had with seams appearing when the player moves away from the mesh in UDK.
My next step was to re-do the foliage for the tree. So using the same technique as before, i brought a poly-plane into zbrush, brought it up to about 6-7 levels of sub-D, and sculpted what's pictured here using various alphas that are available on picologics website.
I then polypainted in the leaves, stems and vines and baked out normal, diffuse, and spec maps using xnormal. to create the spec, i cloned the plane and darkened the polypaint by using fill object with black turned to RGB intensity 20% or so. I then went in with brighter colors of green and red to add highlights to the leaves and stems. using Xnormal to bake out targas of these maps, i then took the maps into photo shop and painted custom alpha channels to get the silhouette i desired.
With the Diffuse, spec, and normal maps complete for both the Viperwolf and Treenymph, my next step was to compile it all into one scene. listening to some of the feedback of my second critique, i went about giving my viperwolf a more dynamic pose. To do this, i brought both the low poly tree and viperwolf into zbrush. using the the transpose move tool, i positioned the viperwolf on the major horizontal limb of the tree and went about using transpose master to bend the viperwolf's knees and joints into an active perched pose.
Shown here is the Low poly tree with the lowpoly Viperwolf in place.
due to difficulties with Transpose master, I lost the meshes for the teeth and eyes somewhere along the way, so my next step was to reconstruct these. I did this be creating and positoning low poly meshes in maya, arranging their UV's to fit with the Wolf's UV layout. i then brought them each into Zbrush, sculpted and polypainted them, and baked standalone maps for these which i then added to the maps i had created earlier for the viperwolf. With teeth and eyes in place, I now needed some foliage for my tree.
by duplicating and arranging poly planes with my alpha channel leaf texture applied, i populated the foliage around the posed Viperwolf.
the lowpoly meshes including the foliage are shown here with the wireframe and no materials displayed.
Shown here is the compilation with materials applied in default quaility rendering (no normals, minimal spec)
here is a screen grab from my maya file with a few lights in place and high-quailty rendering on:
using mental ray, i quickly rendered these two frames just to get a feel for what the scene might look like with a decent shader:
i noticed in the second render that my tree's spec was alittle too intense and gave it too shiny a surface, so i opened my spec map in photoshop, adjusted the levels to make it darker, raised the contrast significantly, and added a new layer with photoshop's "Noise" filter applied.
Additionally, it was at this time that i took a little detour and created my first pass at an emmissive map for the viperwolf. I did this by taking my high poly sculpt of the wolf in Zbrush, filling it 100% with black, and then used high RGB intensity blue colors with some interesting alphas in the standard brush to create an emmissive map for the body. Upon completion, i took the viperwolf mesh into UDK and applied all the maps i had for it and had my first look and the emmissive in UDK. My first emmissive pass was mediocre at best, so i scrapped it in the meantime.
With my meshes in place and my materials (with the exception of the emmissive) completed, my next step was to bring this up-to-date compilation into UDK and build a scene. Though my knowledge of UDK is minimal, i was able to construct a box within which to construct my scene. Using the AXmesh plugin for maya, i exported an ASE format file of the trunk, the leaves, and the viperwolf. After building a package with these static meshes imported, i brought in my maps and created individual materials for the 3 meshes. I then placed each mesh in my scene at 0,0,0. Because they had been lined up in maya and were already properly positioned, when i placed the meshes, no tweaking was necessary to get all the pieces into position. after applying the materials to the meshes, i experimented with a standard 3-point lighting rig with different positions, colors, and intensities until i got something i found acceptable.
With my scene constucted and my familiarity with UDK rising, I went about painting a new emmissive map in Zbrush, using the same technique as earlier. Using a fully black base coat, I used various alphas with 100% RGB intensity with both blue and red to create the polypaint shown here:
Using Xnormal to bake out a targa of this, I imported this into UDK and added it to the emmissive channel in my Viperwolf material.
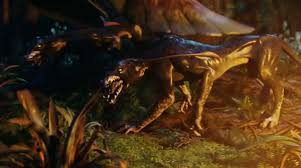
After that, i went about rendering out shots of the viperwolf by itself, in the tree, in the dark, ect.
These following images are pulled directly out of UDK using the "tiledshot 4" command. I then took the enormous renders into photo shop and scaled them down drastically.
And thus, here are the renders from my final UDK scene:
tree and wolf compiled 01
tree and wolf compiled 02
tree and wolf compiled 03
tree and wolf compiled 04
tree and wolf compiled 05
just the viperwolf
just the viperwolf's emmissive
tree standalone 01
tree standalone 02