Render To Texture -Alpha Issues?
polycounter lvl 18
Hey guys, bear with me, there's some backstory here.
I'm working on a bush, which I have built fairly high poly in Max, and want to render out to be used as a Billboard. I also want to be able to render out the Normals of the polygons to be used as a Normal Map for the Billboard.
The Bush is constructed of many leaf cards, mapped with an Alpha leaf texture.
I tried rendering from an orthogonal view, and that's great for the diffuse, but I can't render out the normals from there.
I have Ben Cloward's Normal DX9 Shader for Max, which works great in viewport, but doesn't render . . .
So, I've ended up making a plane, behind my bush, which I'm projecting the bush onto, and then Rendering to texture. This does what I want, I can render out the diffuse, and the normal at the same time, from the same view, and it looks great.
Except. . . Render To Texture is not using the alpha map on the leaf cards. Or rather, it is and isn't.
Below is an image, on the left is the straight up render of a view of the bush. On the right, is the Render to Texture.
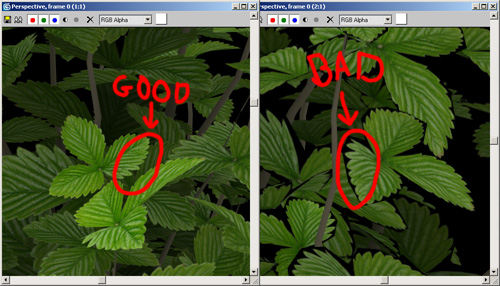
The regular render, draws my leaf cards with proper alpha, so that the edges are transparent.
On the render to texture, all of the areas on my leaf cards that would normally be transparent, are rendered black. So it's like it's not seeing the alpha map. However, the area outside my actual leaf area on my texture, is green, so the only way it would be rendering black, is if it DID see the alpha map.
Does anyone have any idea what's going on here? Is there some "use alpha maps properly" checkbox that I've somehow missed in the pages and pages of render settings? Am I an idiot and have my map in the wrong channel? Is there a better way to go about doing this in the first place?
Thanks in advance for any help you can provide.
I'm working on a bush, which I have built fairly high poly in Max, and want to render out to be used as a Billboard. I also want to be able to render out the Normals of the polygons to be used as a Normal Map for the Billboard.
The Bush is constructed of many leaf cards, mapped with an Alpha leaf texture.
I tried rendering from an orthogonal view, and that's great for the diffuse, but I can't render out the normals from there.
I have Ben Cloward's Normal DX9 Shader for Max, which works great in viewport, but doesn't render . . .
So, I've ended up making a plane, behind my bush, which I'm projecting the bush onto, and then Rendering to texture. This does what I want, I can render out the diffuse, and the normal at the same time, from the same view, and it looks great.
Except. . . Render To Texture is not using the alpha map on the leaf cards. Or rather, it is and isn't.
Below is an image, on the left is the straight up render of a view of the bush. On the right, is the Render to Texture.
The regular render, draws my leaf cards with proper alpha, so that the edges are transparent.
On the render to texture, all of the areas on my leaf cards that would normally be transparent, are rendered black. So it's like it's not seeing the alpha map. However, the area outside my actual leaf area on my texture, is green, so the only way it would be rendering black, is if it DID see the alpha map.
Does anyone have any idea what's going on here? Is there some "use alpha maps properly" checkbox that I've somehow missed in the pages and pages of render settings? Am I an idiot and have my map in the wrong channel? Is there a better way to go about doing this in the first place?
Thanks in advance for any help you can provide.
Replies
When I had to do some foliage like this, I ended up setting up a top-down camera and just rendering it out of the viewport, and using a special light setup to get a matching normal-map.
You won't be able to get it looking right with Render to Texture, I'm afraid.
The lighting setup I used for the normalmap, is described by Ben Cloward here:
http://www.bencloward.com/tutorials_normal_maps11.shtml
See the "Creating A Normal Map Right In Your 3D App" section.
I ended up using an instanced camera, and instanced geometry with a plain material (including alpha channel and bump map) applied to the normalmapped version, and the diffuse/alpha applied to the other one.
Thanks though.
Alex
may sets
in rtt
1. have max output both alphamap and normalmap
2. set the baking option to raytrace instead of cage
I wonder if it's the raytrace thing that's making the difference here.
The edges are shitty on the leaf but I imagine it's the way the alpha was made. I did this to make sure it was not a fluke with the gradient map.
results with a leaf type alpha.
result
Alex
Alex
It seems like it should be very simple to just render normals instead of the regular image. . .
Oh well, thanks for all the help.
Alex
Make a free cam pointing at your object, and set it to be "orthographic"
Then set up 5 directional Lights:
1 from camera angle - 127, 127, 255, intensity = 1, "overshoot"
1 from camera left- 255, 0, 0, intensity = 1, "overshoot"
1 from camera Right- 255, 0, 0, intensity = -1, "overshoot"
1 from camera Up- 0, 255, 0, intensity = 1, "overshoot"
1 from camera Down- 0, 255, 0, intensity = -1, "overshoot"
Then goto rendering>Environment, and set the background color to 127, 127, 255
Oh, and give you model a white texture (but in my case, still using the alpha of the original model)