Roach3D - Artworks & Improvement (low poly, handpainted, and physical)

polycounter lvl 5
I wanted to start a thread where I could put my past, present, and future works all in one place. Critiques are of course welcomed, as I am here to improve! (and hopefully get some work too)
I want to get all the older stuff up and out of the dusty corners of my HD so I can move onto new projects
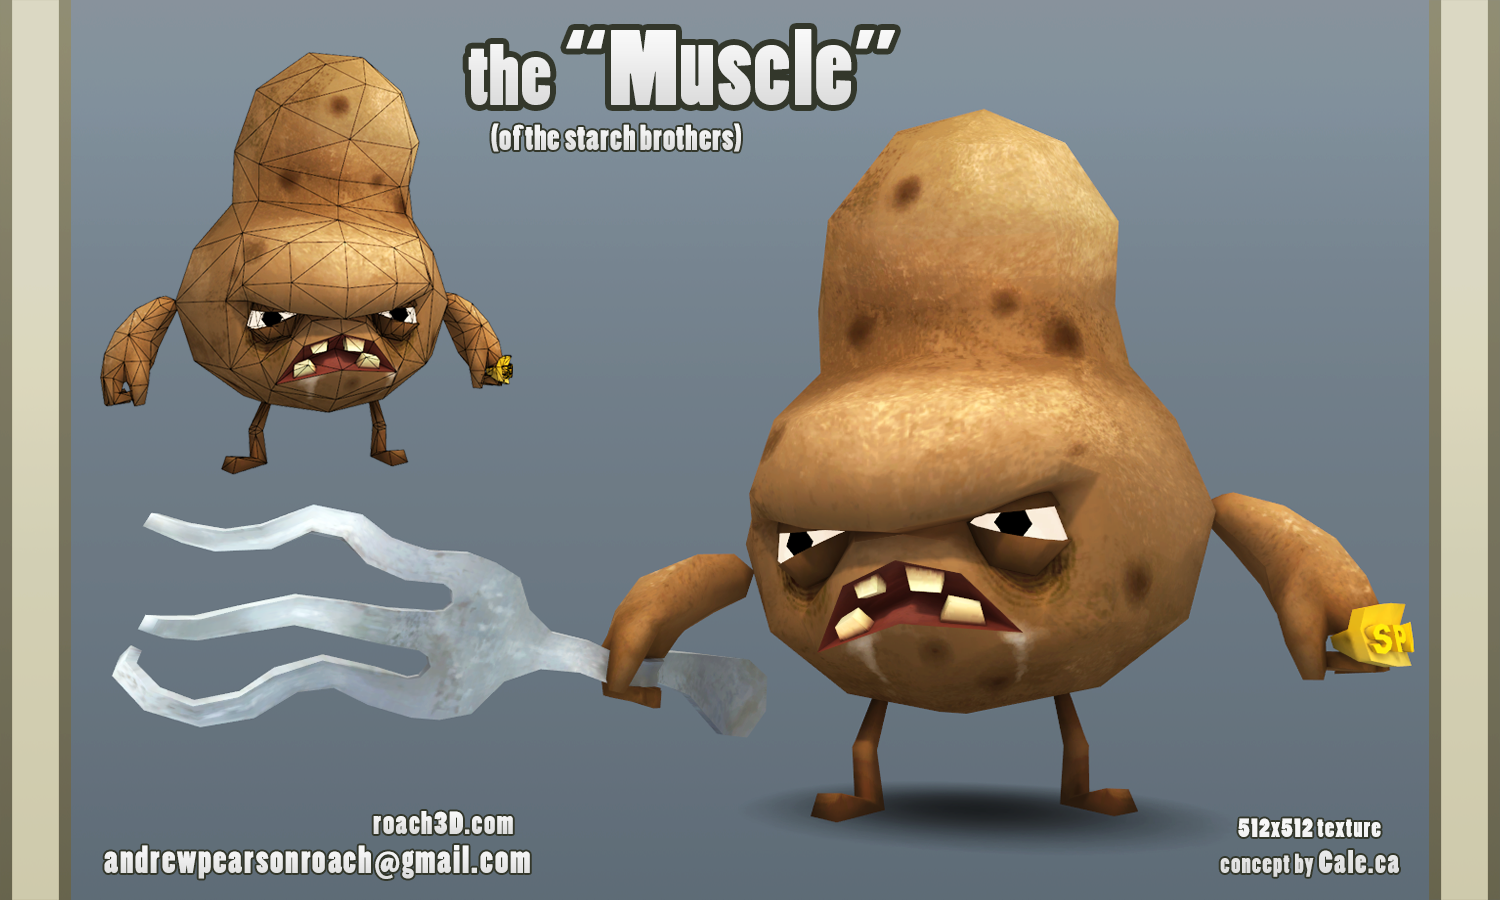
A friend and myself had fun coming up with some vegetable characters: Here's one of them!
Unity Web Player

I want to get all the older stuff up and out of the dusty corners of my HD so I can move onto new projects
A friend and myself had fun coming up with some vegetable characters: Here's one of them!
Unity Web Player
Replies
Unity Web Player
Unity Web Player
I should do a group shot for fun, I think that's what's missing!
Were they created for a game?
Thanks! That was the original idea but we never got around to making the game. It also sort of worked out that we were designing a game for these characters that already exist, we found that to be quite a challenge :poly141:
Thanks haha.
Next up is the Professor(he's from old russia):
Unity Web Player
I'm finding that some of the pictures look different on different screens so contrasts might be off a bit, oh well.
My bandwith ran out so I had to get some more.. hopefully everything is working again.
Here is Cheeks, he is the sidekick to a special detective.
Unity Web Player
Mr. Magic's Caravan:
Unity Web Player
Beauty shot:
Concept(by my friend Cale):
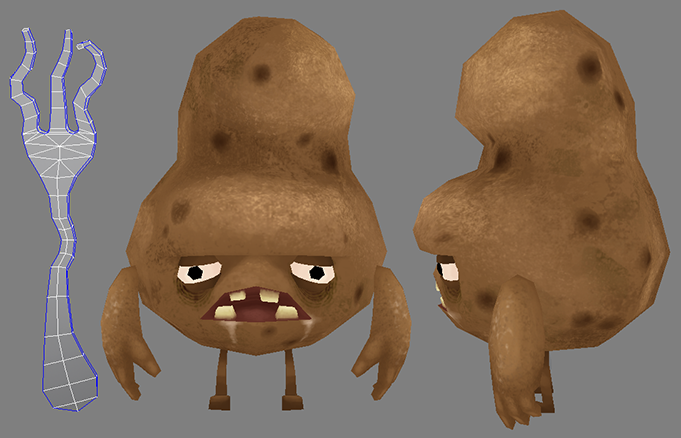
Construction shots:
Reduced texture: (the big blank spot was originally going to be for something that didn't get used in the end)
Due to the limited budget, it was only built to be viewed at one angle. That's why in the web player you can't fly around because half of its missing! I built it up so it was a complete piece and then went to town on deleting everything you didn't see and reduced/optimized everything until I got it down to the right number for the triangle budget.
I hope you like it!
Some Gravity Falls fun
Unity Web Player
and a wire shot:
I really enjoyed this one! Thanks for looking.
@Crappuccino:
First off, thanks! The vegetables and caravan ideas/concepts were done by a friend I used to work with, you can see the caravan concept above but the vegetables were only just tiny sketches and not really finished. Anyway, the image(s) and idea was enough for me to go on and create the characters. Generally I finished them first try(one by one) and then we discussed what they could be doing, so they end up posed differently all from each other with different props. As for the Gravity Falls piece(I'm not sure if you meant just this one or not), first I made Dipper(a while ago now), then Mabel, Waddles(oh and then the book), and then eventually the scene because it ended up to be a good place for them to all fit together. The scene I concepted(roughly haha) to incorporate a variety of the elements you see in the opening of the show and then just other show type stuff to try and get the same sort of "mystery" vibe. I really love the show so I ended up putting quite a bit of time into the over all feel to try and capture as much of it as I could in there! I would still really like to make Soos and Grunkle Stan, and when I watch episodes again I want to make it all haha.
I hope this answered your question, thanks again guys
the sugarcube painting deserves a prize or something
i tried not to say that it's sweeeeeeeet
This is something I've been working on for at least a few weeks on and off now, I have since made more progress but I wanted to post these up. I hope to get the latest posted next week. I think you guys can figure out who it is
Loved your style!
Ack I gotta get a new picture up of that sculpture, it's so dated now!
Here is this mornings practice, since I have been busy with the sculpture I haven't done much computer work lately.
This is the concept I am using, it is from The Art of Alice : Madness Returns book(I enjoyed the game too).
Sorry about the various levels of contrast and such, but you can still make most stuff out.
Now to make a picture of him assembled...
He stands at 12" tall(with the stand), made with Super Sculpey and a lot of my time. The stand was random stuff I welded together in the shop. It was fun and I learned a lot, which I hope to apply to my next project which is a big one! I hope you enjoy my amateur photography
Thanks Sandman! The technique I used to achieve the smoothness was something I came up with on a previous project. Make the shapes as clean as you can, bake it, and then tool it(sand, file, knife, etc.). After that I would add more material and repeat the entire process until I finished.
As for the video.. well.. haha. It would of probably been tremendously long and something I wouldn't want to edit! It's a good idea for the future though. At least I got some pictures
I have been trying to learn zbrush lately.. it's slow going but I'll get there. I did make this stone type texture that I liked! I also want to keep posting whatever I make so I can see the progress. I still have a great deal to learn!
Okay.. so I have been busy with a few projects but this one has been the primary one for the past few months.
So the local art gallery was doing another show that I wanted to enter(this is number 3). The show theme is "Superheroes and Supervillains". I thought about this one long and hard as to what medium I want to use and what character I could go with.. should I go with a mainstream character or someone off the grid? Anyway, I wanted a sculpture because I enjoy working with my hands and not being in front of the computer all damn day. I decided on Bane because I really enjoyed the original concept from Arkham Asylum(I believe) and so I went ahead with that. I really liked the composition of the character, the colour palette and overall the different iteration on Bane where he has become more of a science experiment.
Concept(not mine):
Okay, so, once I figured out the character I was like hmm, what should be his pose? What would be a good solid pose to represent the character? Questions like this would lead me to trying different poses and seeking references.
Here are the poses I tried, I made a rough 3D character so I could get an idea of the proportions and the way his body would work:
I went with #2 because I really liked the smash and I got over ambitious about being able to make all the effects to sell it(I found this fact out later). The pose also lended itself to being more manageable than others(so I thought). Please keep in mind that this is only the 3rd thing I've ever made with sculpey, and the most serious. First was Pinky and the Brain(see that on my website), and the next was the Mad Hatter - shown previously.
Now for this, I didn't have all the materials at the beginning and I definitely had to acquire more as I went on. I did however have everything in my shop to make the base, the armature, and some leftover sculpey to get started. Okay! So I started by tracing out the 3D pose I picked onto paper(to scale), like literally putting paper on my monitor and tracing the different views out. I did this for the skeleton, proportions and the base. This gave me enough information to get started making an accurate armature.
Using the paper plans I made, I got my threaded rod(existing material lying around and robust enough to hold the sculpey) out and started bending it to match the plans, more bending and some welding later I had a solid armature. Although during this process I had it as one entire piece and as I thought into the future.. that was looking like a BAD idea, so I cut it in half and made sort of a peg and hole system to join the top and bottom halves respectively. This ended up being an excellent decision on my part.
After the armature was done, I made the base from layers of plywood which I screwed and glued together. I then cut out the area that would hold the PVC pipe's, and cut the pipes to size and attached them to the base. I then drilled holes where the armature would go into the base and also holes for the electrical wire to pass through the base into the character. Once the armature was sitting on the base I was able to figure out where to put the battery pack in, thankfully the layers of plywood were thick enough to create a good hiding place(pictured shortly).
The base:
The mesh I used for the base proved to be too thick(the gaps) which resulted in more sculpey being used but it still worked out. Once everything was ready, I padded up the skeleton with a bit of tinfoil so I didn't have to use all sculpey. So, I got out all the muscle reference I could and started blocking in everything. I wanted to do this so I would have a correctly proportioned character(as close as I could get that is). I found that building all the muscles first and then adding everything on top of that would yield the best results. Also keep in mind that my anatomy knowledge at this point is pretty minimal. So I did a lot of research and used as much reference as I could.
More muscle work and the battery pack is pictured:
Continual refinement:
Here I am happy with the structure of the legs and foot so I started on the pants(please note that I haven't really done much of any cloth work before and I mainly used my own jeans as reference):
Got the other foot done(at that very tough angle) and started on the remainder of the pants:
Here I have baked the legs. I wanted to get these done first because I found that every time I placed the top half onto the lower half, thing's would move and squish and change when I didn't want them to. By finishing the lower half I could work on the top without any changes happening at all.. so that was the goal:
So now I wanted to get the belt done, the straps, and everything else on the legs. In order for me to get all the details on the legs done I baked them multiple times. All of the metal brackets are real wire that I bent to shape. Also you can see that I have spent a lot more time on the torso anatomy but I couldn't progress without finishing the legs.
Here, the lower half has been completed and the details in the belt all worked out(including the led light in the belt. You can also see the very beginning of the backpack, I did some basic drawings to get my head around the design and how to tackle it.. please note that this is no ordinary backpack, as you will see soon.
I should also note that after every bake I do of the sculpey I generally sand/file it so I can get the surface smoothed out or the way I want it to look. This is a very time consuming process but I was able to do get very good results by doing this. Of course you can't do it to everything so it is subjective but it was a helpful process.
Much more to come...
Here are some more:
Also please keep in mind that these pictures are a very accelerated process and the actual time taken on the backpack for instance was well over a week to complete.
The backpack was a big challenge and so I did it piece by piece almost, meaning I would make a section, bake it, tool it, add more to the backpack, and repeat. I did this because it's a metal surface and everything has to be smooth with crisp edges:
At this point the outside of the backpack is pretty much complete. However, the inside has a long way to go, and how am I suppose to make it stay on his back? Before that though I have to hollow it out for a very important purpose and be very careful to keep it structurally sound without removing too much material:
Here you can see all the holes running into the backpack for the hoses. Once I found EL wire I KNEW I had to do Bane. It was too perfect an opportunity! Although.. that is a lot of wire in the backpack.. how am I suppose to keep all of it hidden? And how am I going to connect it to the battery pack in the base? More challenges and obstacles to overcome.
Okay. So, once I had figured out that all the wiring was pretty well going to fit I had to make the backpack stay on his back some how.. I did this by creating some pins that were secured into the backpack that would poke into his back. He also has a collar piece and 3 straps that hold on the backpack.. so then how am I suppose to make all these pieces and make them stay? If you look at the backpack you can see some shiny metal, those are magnets. I also made the collar with wire in the center and then put magnets into the metal buckle things that attach to it. This was not an easy process but I managed to get it figured out and it worked out very well. I also made the strap core with wire so that the backpack magnet would snap to it easy and then the magnet would snap to the collar. Okay, I got it figured out.. now to do it:
Here you can see the collar is pretty well finished and the straps have yet to be done. The torso has also made a lot of progress and is near to the point of baking. You can also see the two holes on his lower traps where the backpack goes in and other material removed for the wires to fit(hopefully!):
Here I am testing the length of the straps from the collar to the backpack(now that it stays on). I had also worked on the base because I needed it to be solid, you can't really see but I spent a day or so on it and baked it(shown later).
In the top half of this picture where he is shiny that was before baking. I was happy enough with the anatomy to do the bake and make more progress on the torso. After the bake I marked out where I wanted all the hose fittings to go in his body. I then used a dremel to make big enough holes to put the fittings(made ahead of time) into and fill it with tissue/scars to represent the surgery it would have taken.
Here I have made a lot of progress since the last shot. I figured out the length of the straps to the backpack and got those soldered and ready for sculpey. I did his arm fittings/straps, and I made a spinal cover for his lower back to cover up the wiring that would pass through to the base.
Next was to tackle the hands.. this was very intimidating because, well, they are.. and I have never made a hand this way before. I had thought about him having his left hand in a different position but it would have complicated things and not have really added to the composition and emotion of the character. I had some reference but I mainly used my own hands because there is nothing better. I was also very happy with the outcome.. only there was still another hand to make!
More to come!
Okay, some more.. of course.
Here I have pretty well put everything I've made together to see how it's looking. I also made some paper templates for the bracers so I can start on those once I finish the hands. I feel it's really starting to come together at this point! The deadline is also looming though and I am reminded of that daily.. time is ticking to get the piece done and I still have a lot to go and painting to tackle too.
This is the right hand, I managed to get that done and baked so I could start on the bracers. You can see the right bracer started, I also did this in layers because it's metal and I could only get the sculpey so smooth(while it's soft), thus I tooled it after it was hard to get the best result.
You can see the progress of the bracer in this picture, although it's not quite done yet it is nearly there. There is also the bracer on the other side to do as well..
Okay so I managed to finish the bracers(not pictured). Time at this point is running out and so pictures from this point start to dwindle. After that I started to work on the backpack, the lower area had to house 2 x 5mm hoses that would connect to the rest of the hosing but go the opposite way.. the 5mm wire is also very kink resistant so I would have to do something to hold it securely into place. I also have to hide the wire because you can see this area of the backpack when you look at him with it on. The skull I made was so that I could get a close-to-accurate representation, this would help me figure out where the neck muscles go and such too.
Okay so.. after I made that first skull I put it in place and it was too big. It made Bane just look like a normal guy, so I had to make another because that wasn't what I wanted. I made another skull and eyeballs that would fit into the sockets, this allowed me to create the area around the eyes(lids, brow, etc.) easier because I wasn't pushing in the eyeball or damaging it. Once I had the features of his face done I baked it and then started on his mask. I did this by flattening out some sculpey and putting it on top of his face and baked them together so I had a perfect match. The tooling of the mask was very difficult because it wasn't very thick and was pretty well breaking in my hands as I worked on.. so I had to be very careful!
Okay.. so once the face was done I still had to put it on the body, but how? I have to be able to take his collar off to paint it and paint his neck area.. so I had to make the head removable. This was very challenging because I had to cut the existing neck to shape and then match the skull to it. This was done by cutting the neck area down and then using the neck as sort of a mold to match the head to. Once they were matched I put in the pins. These pins had to be quite strong because the hoses go into his head and I didn't want there to be any gap around his neck. Please note that the head isn't finished here, I still had to add hose fittings and such. You can also see the current status of the base here.. I started making the pieces for the ground area that was smashed:
Once the head was removable this made it a lot easier! It was also a tremendous relief for him to finally have a face and the problem solved. After that I was able to finish the neck muscles and any other area touch-ups to do one final bake on the torso.
The project is nearly there, but like I said due to time crunching on me I wasn't able to take pictures of everything as it went along. I would have liked to but getting thing's done was more important.
More to come.
Okay onto the last batch:
Here I am trying to figure out where the ground pieces should go.. I wasn't able to spend as much time on this as I liked but any extra time I spent on the last minute sculpting took time directly away from painting. It still worked out though.
Okay like I said there was a gap in pictures haha. Here you can see all 15 parts laid out. The white sort of "wash" on the parts is a layer of gesso I did before painting. You can also sort of see how the pieces ended up and get an idea of how he goes together.
A closer shot of the head, mask, straps, backpack, collar and such:
Another shot at the rest:
The first layers of paint going on!! This was a huge deal for me because at this point I had been sculpting for so long I felt I would never get here. Also, I should mention that I haven't really ever painted anything like this before, and that my painting experience is limited to a few walls of the house. This was going to be a big challenge for me.. I wanted to compliment the areas I spent so long sculpting while not covering details up and such. I also wanted to stay close to the coloring of the concept as that was my guide. So I went and got all the paints I thought I might need, along with brushes and I got to work.
Here the pants are pretty well finished and covered so I don't paint them any more by accident and I have started working skin tones and color values into the chest/head, and started on the bracers too. This is also the last shot I have of the painting process. The challenging with taking pictures like that is it is quite incremental. I spent a lot of time blending in colors and never using black. If there were dark areas I wanted rich color and not black, this was very important to me. All the painting too around 10-11 days.
Okay so I've really fast-forwarded at this point as the backpack painting is done and I am putting in all the wiring and starting to get it all hooked up. As you can see it is a lot to go into a little space but I had to do it. I had to make this work, this was going to be what I felt pulled everything together!
And here you can see pretty much the final wiring. It took a lot of time because I had to wire everything together in the smallest space I could! Geez I hope it all works when I plug it in..
Okay so there is a big visual gap here but what was going on was that as I was finishing the painting on each piece I would just start work on the next and so on. The time to delivery at this point was within a day or so and I really had to get him assembled or all would be for naught! I would have liked to take pictures as I assembled but it was a big rush. I also had to make sure that all the wiring was hooked up as I did this and once everything was together and working I started to trim the hoses to size and make sure they stayed put. Oh and I also covered everything with a liquitex matte and gloss clear coat to protect the paint. From there I just made sure there were no touch-ups to do and dropped him off!
I started the project at the end of September and finish on January 25. While I wasn't working on just him for this duration I did spend a good solid 2 months of time because I was learning as I went and also correcting issues and solving many problems and obstacles to overcome. It was fun! and stressful.. but mostly fun.
This was the gallery opening(Jan 30, 2015), you can sort of see Bane there. It was a successful event and I am glad I participated and finished my piece!
A good friend of mine offered to take some beauty pictures of him and so we did that just recently, I want to get those posted soon as I think they turned out very cool. It was also fun because both of us hadn't done anything like that before and just experimented.
Stay tuned for some cool pics! I will also make a separate thread with just those in it so they are easy to find. Thanks to everyone who has come to check out my thread, if anyone has any questions please ask. I learned a lot, and also a lot I can apply to my next piece.. for when I start that, that is.
Thanks man! I have no experience with molding so I never really considered it, I also never had time to do it but it would have been pretty cool. I will definitely keep it in mind for next time though.
Thank you LRoy.
This is a very intense picture page haha. Oh well! Here are the beauties, I can't post all of them so if you want to see more just head to my website:
I want to point out too that Bane is FOR SALE so please contact me by email or pm if you're interested! Also, please keep in mind that this is a one-of-a-kind piece of art, completely made by hand and the price will reflect that. Perhaps if you're not interested you may know someone who would be, feel free to pass around the images and help a fellow artist out! Thank you for looking.
Now what to make next..
Thank you very much man! I appreciate it a lot.
Also to answer your question, I don't know the scale factor, but he measures to 12" x 12" x 12" (it's not exactly this but very close to). Thank you for the help too, that's tremendous of you to offer to help me out.
Oh I also wanted to mention that I did this all in my kitchen :poly142: I can't wait to get a real work space one day haha
Something I found out by surprise was that Bane was featured on Kotaku, I thought that was super super cool and a big thanks to the guy who posted it as well.
Kotaku link for those interested! (there are some funny comments too)