[UE3] "Remember Me" Lighting breakdown
polycounter lvl 8
Hi polycounters,
I have been working as a lighting artist on the game Remember Me published by capcom and released in june this year, and I was willing to share to screenshots showing the different passes that compose an image in our game.
We don't see much pure lighting threads on the forum and I think it is kind of usefull for everybody to have a few lighting notions to present your work.
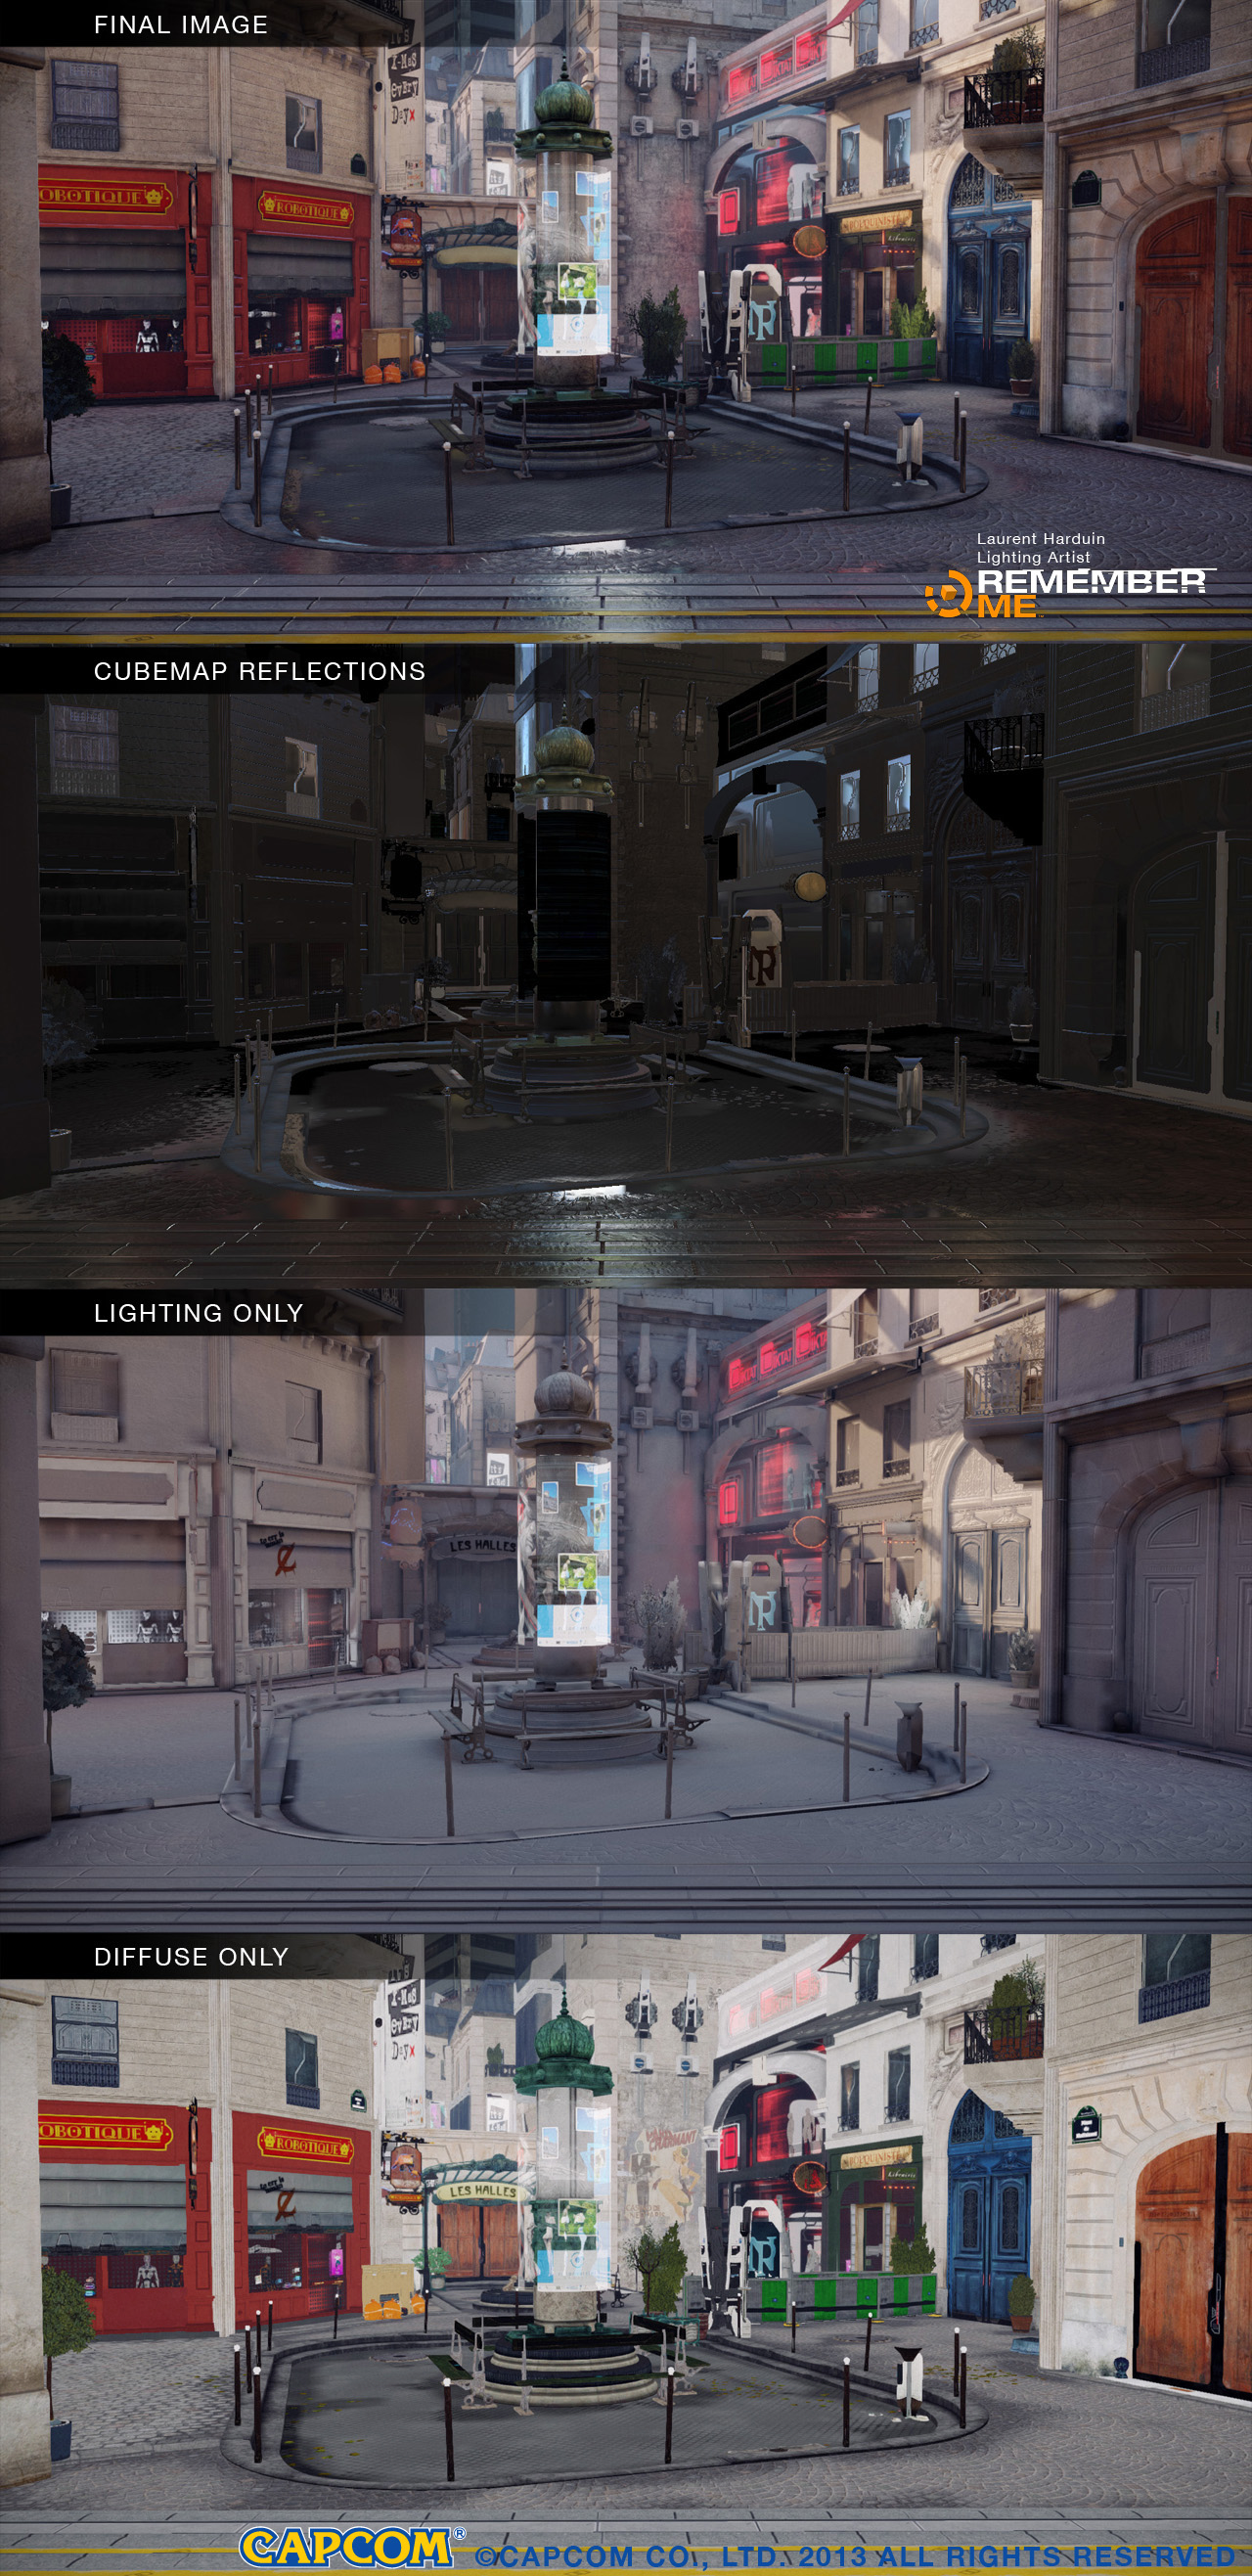
So these pictures below show a few passes composing the lighting of Remember Me's environments.
Unfortunately I didn't cover the whole game, only the episode 2, but I might add some more pictures in the future.
The lighting is done in Unreal engine 3 with lightmass and a very nice local cubemap system added by Dontnod's dev team (with our system we had between 150 and 200 cubemaps per big level).
Globally in the episode 2, we have a lot of light coming from the sky so the first basis was made by the lightmass environment color, which was a moderately saturated blue, with an environment color multiplier set to 3 with 5 light bounces (I was actually impressed to see that 5 bounces was not much longer to process than 3 and it produced more interesting results in narrow streets).
For interior rooms and the bottom of the streets, we had to block the lightmass environment lighting by putting black boxes (hidden in the game) all around the environment, otherwise we had blue bounces everywhere (even with the option "cast shadow as two sided), mostly around the contact between modules.
I added then manually a lot of lights to produce additionnal light bounces of the sky and sun. For static light bounces it was usefull to increase the "light source size" so that the light source doesn't seem too obvious and directionnal.
On top of that we had a dominant directionnal light simulating the sun light for almost the whole episode 2. I only cheated the direction in the "canopy" (2nd screenshot with the statues) and put a dominant spotlight instead to have more light on the walls.
By default we had 32x32px lightmaps everywhere and we increased by hand the resolution on the critical path (going up to 128x128px for complex objects or very big modules).
On thing that is pretty cool when using cubemap reflections : all the very reflective objects don't need big lightmaps since the diffuse part of the lighting won't be very visible, only the specular/reflective lighting is important.
So the lighting passes are quite classic to every one who knows Unreal or UDK. The cubemap refflections pass shows the contribution of the reflection system added to the whole picture. You can see that it influences all the objects, only in a few scenes we had to optimize, I could apply a simplified shader on objects that were not much affected by cubemap reflections (for example balconies on the first screenshot are black in the cubemap pass because they had this optimized shader).
You can see on the lighting only pass that we couldn't get rid of all the lightmaps artifacts, for example we still have a few unnatural bounces coming from under the ground, or dark UV seams due to a shadow bleeding on the next UV chart (good example is the dark seam between the doors at the end of the corridor on the 3rd screenshot, but it's not noticeable on the final picture). I would say you can't have perfect lightmaps everywhere and the important thing is to concentrate on the important parts of the picture.
You can also see on the lighting only pass some very bright objects like the plants in the fountain on the second screenshot. This is due the diffuse texture of these assets that was too dark (too bad it's almost completely hidden by the capcom logo) and so I had to put extra lights for these objects only.


I hope you found this interesting. Don't hesitate to give feedback and ask for specific questions or screenshots.
Edit : as it has been pointed in the comments, the first picture is missing the decals on the "final image" version but they are present in the other passes (the sign "les halles" for example). On all the lighting only passes you can see decals (the "AD" on the ground from the third screenshot for example) but I wouldn't say decals are relevant to lighting and so this can be a little bit confusing.
I have been working as a lighting artist on the game Remember Me published by capcom and released in june this year, and I was willing to share to screenshots showing the different passes that compose an image in our game.
We don't see much pure lighting threads on the forum and I think it is kind of usefull for everybody to have a few lighting notions to present your work.
So these pictures below show a few passes composing the lighting of Remember Me's environments.
Unfortunately I didn't cover the whole game, only the episode 2, but I might add some more pictures in the future.
The lighting is done in Unreal engine 3 with lightmass and a very nice local cubemap system added by Dontnod's dev team (with our system we had between 150 and 200 cubemaps per big level).
Globally in the episode 2, we have a lot of light coming from the sky so the first basis was made by the lightmass environment color, which was a moderately saturated blue, with an environment color multiplier set to 3 with 5 light bounces (I was actually impressed to see that 5 bounces was not much longer to process than 3 and it produced more interesting results in narrow streets).
For interior rooms and the bottom of the streets, we had to block the lightmass environment lighting by putting black boxes (hidden in the game) all around the environment, otherwise we had blue bounces everywhere (even with the option "cast shadow as two sided), mostly around the contact between modules.
I added then manually a lot of lights to produce additionnal light bounces of the sky and sun. For static light bounces it was usefull to increase the "light source size" so that the light source doesn't seem too obvious and directionnal.
On top of that we had a dominant directionnal light simulating the sun light for almost the whole episode 2. I only cheated the direction in the "canopy" (2nd screenshot with the statues) and put a dominant spotlight instead to have more light on the walls.
By default we had 32x32px lightmaps everywhere and we increased by hand the resolution on the critical path (going up to 128x128px for complex objects or very big modules).
On thing that is pretty cool when using cubemap reflections : all the very reflective objects don't need big lightmaps since the diffuse part of the lighting won't be very visible, only the specular/reflective lighting is important.
So the lighting passes are quite classic to every one who knows Unreal or UDK. The cubemap refflections pass shows the contribution of the reflection system added to the whole picture. You can see that it influences all the objects, only in a few scenes we had to optimize, I could apply a simplified shader on objects that were not much affected by cubemap reflections (for example balconies on the first screenshot are black in the cubemap pass because they had this optimized shader).
You can see on the lighting only pass that we couldn't get rid of all the lightmaps artifacts, for example we still have a few unnatural bounces coming from under the ground, or dark UV seams due to a shadow bleeding on the next UV chart (good example is the dark seam between the doors at the end of the corridor on the 3rd screenshot, but it's not noticeable on the final picture). I would say you can't have perfect lightmaps everywhere and the important thing is to concentrate on the important parts of the picture.
You can also see on the lighting only pass some very bright objects like the plants in the fountain on the second screenshot. This is due the diffuse texture of these assets that was too dark (too bad it's almost completely hidden by the capcom logo) and so I had to put extra lights for these objects only.
I hope you found this interesting. Don't hesitate to give feedback and ask for specific questions or screenshots.
Edit : as it has been pointed in the comments, the first picture is missing the decals on the "final image" version but they are present in the other passes (the sign "les halles" for example). On all the lighting only passes you can see decals (the "AD" on the ground from the third screenshot for example) but I wouldn't say decals are relevant to lighting and so this can be a little bit confusing.
Replies
I must add that I have been driven by a wonderfull lead lighting artist whose name is Frederic Cros. He did a marvelous job lighting episodes 1,3,5,8 and all the memory remixes (which were a lot more technical) while I have been working on episodes 0,2,4,6,7.
edit :
I had actually wanted to show these at GDCE but we were running out of time :poly005:... covering two subjects in 50 minutes was interesting but in the end we had to cut a lot of slides.
Very interesting rendering approach, and a lot to learn from you!
I have a couple questions, bear with me as I'm still pretty new to UE3 and light mapping.
I noticed in the first image in the diffuse and light passes the words "Les Halles" are printed above the double doorway in the very far back of the scene. However, it looks like the words didn't make it into the final pass. There are a few other things, maybe decals, that are in other passes but not in the final pass. Why is that?
I really like the shadows coming from the windows in the ceiling in the third image. What resolution did you use on the objects to get those nice shadows? The 32x32px default?
Even without the slides I was still able to learn a lot.
First, even though it's not really lighting, the decals seem to appear on the "detailed lighting" view mode, so this can be a little confusing
Second, sometimes the decals don't show up in the editor, so I guess my "final image" screenshot is missing the decals... In our version of unreal pressing E is a shortcut to refresh the decals, I should have done that.
The other question about the shadows :
These are dominant light shadows and they are not stored directly in the lightmaps. Dominant lights use some kind of "vector" (not sure it's the right term) shadow map. Adding more resolution to this shadow map would be like having a bezier curve with more points. Additionnaly, Unreal can blur this "vector" shadow map depending on the light source radius/angle to have shadows that are not too sharp. So in the end even with a low resolution of lightmap you can have sharp (or a little bit blurred) shadows without any pixel artifact.
Thank you for posting these, I would be very interested to see some of your lightmap UV's for the more curved/complicated static meshes you have in your scenes. Don't worry if you cant as its much appreciated that you already went to this much trouble
Remember Me is a very pretty game, great work!
Anyway, thanks a lot for the breakdown ! I strongly loved the lighting in Remember Me.
I would rather not publish screenshots of the lightmaps UV because I was not doing them myself, only doing some tests and giving advice to environment artists.
I recommended them to read this interesting page from worldofleveldesign.com :
http://www.worldofleveldesign.com/categories/udk/udk-lightmaps-02-uv-techniques-and-how-to-create-second-uv-channel-in-maya.php
The most usefull trick in this page is to always work on a checker with as many squares as the number of pixels in your lightmap.
For complex objects I also recommend the artists to pack UV charts by "cavity" : cavity faces in the same area of the lightmap and faces that emerge in another area so that the shadow bleeding affects faces that are in the shadow most of the time.
Froyok your are totally right, it's distance field shadows
How did you light dynamic objects in your scene? Does vanilla Unreal support SH lightprobes now?
Hi o2car, does vanilla designate a perticular version of Unreal ?
Unreal 3 and UDK now support SH lightprobes, I think it came with the lightmass integration. It works well, I just would have liked to have more control on the lighting it generates, especially on it's directionality : in some cases the direction of the SH lighting is too strong when the character is in indirect lighting, it doesn't look natural. I tried to balance that with additionnal light sources but I couldn't do it everywhere.
When working with Unreal in the past we have been using middle ware solutions for lighting. Such as Beast and Enlighten, so I was just curious. For Mirrors Edge 1 (illuminate labs Beast) we had no lightprobes, but we got it for the second before it was moved over to Frostbite. The only Lightmass game I worked on was a mobile game for Square Enix but I dont think we set up lightprobe volumes for it.
Is there any documentation on SH light probes in UE3? IIRC this was something Sebastien was working on. I would be super interested in any information you could provide on that.
Phenomenal work btw!
Lightmass and character lighting :
http://udn.epicgames.com/Three/Lightmass.html#Character lighting
(little squares on the picture represent SH lightprobes)
Light environment :
http://udn.epicgames.com/Three/LightEnvironments.html
This is the system that reads the SH lights and interpret it along with other parameters to deduce character lighting
If you want deep technical details about lightmass (and thus SH) there was also a page named "Lightmass Technical Guide" but it looks like you now need to login to have access...
maybe you can find a cached version through google...
thank you for your support
Remember Me had a very interesting approach to the materials and lighting. I recall a video explaining the albedo, roughness, cube-mapping, etc. It was such a different approach and I'm wondering if you could elaborate more on how this process effected you as a lighter? Mainly, I'm curious about the cube-mapped reflections and the effects it had on your work. This is the first game (that I know of) that relied so heavily on the reflectivity of surfaces.
Looking at your lighting only shots, the drama and higher contrast (at times) tends to get filled in by some of the indirect areas and reflections. It's very apparent in the 4th image. Your lighting only has great mood and contrast but when it's combined with the surfacing it looks slightly less dramatic in the end result. Is this the impact of the indirect lighting and reflectivity bumping up your low values?
Just curious about the challenges you faced with this workflow. Obviously, we're lighting for the end result but I'm wondering how much you had to compromise your lighting only work to balance it to the final image after all the unique mapping techniques that the team used.
Thanks very much for sharing, fantastic work!
-Jon
Very inspiring and really useful to see the breakdowns.
Thank you very much for sharing your work with us.
you're right, our approach to materials and lighting is a bit different but it was not really new to me since before Remember Me I was mainly working in offline CG and doing rendering with Vray which is a bit similar to what we wanted to achieve.
For the lighting it changed :
the specular highlights, which were different from the default unreal ones, and they were affected by the "roughness" texture (we could also alter the shape of the highlights to simulate bigger than punctual light sources)
the responsability to hand place cubemaps, parallax volumes (for the parallax correction of the cubemaps), and optionnaly image proxies (a feature very similar to unreal's billboard reflections, but for DX9). Like you wrote, our visual relies a lot on reflectivity, and we had a bunch of options in our image proxies that allowed us to really control the look of the reflections.
and also we tried to help the artists understand the new pipeline. While doing the lighting we could clearly see the materials that were not responding very well to light, track what was wrong with them, and give precise feedback to the artists to have them correct the textures.
If all the textures were right, the material would respond very naturally to light, under any lighting condition.
About your observation when comparing the "lighting only" pass and the final image, I also often had the same feeling that the picture was better with only the lighting pass but this is not a true thing because you do want to have the colour and material information. It is just a lot easier to understand the volume and the mood on this pass, and it's my job to try attaining the same level of "readability" on the final image with diffuse and reflections.
In order to preserve the lighting, you also need to be careful about diffuse textures, and make sure they are not too contrasted, nor too bright or dark (see the diffuse albedo chart in the physically based rendering thread from the technical talk forum).
About reflections removing contrast, I think it actually adds a lot of credibility to the picture because you rarely see pure black in shadows in reality, and the secondary specular brings a lot of subtle details in the shadows. I think it's better to start with that base and if you really want to have very dark shadows you can add a color grading on top of that but it will keep the little details brought by indirect specular. I could try to put a picture with cubemap reflections and without, and you would see that without them the pure black in the shadows brings an "old school 3D" look (at least that's what I think).
Also I have seen the breakdown on your blog, I will ask you a few questions about that in a near future
I admit it reduces the contrast, but this is a daylight level so I guess it's kind of justified...
(Sorry for necro, just wanted to search through before I made a thread on this