[UDK] Asian Corner Store
polycounter lvl 8
Hello friends!
It's been a long time since I've worked on a personal piece and while I'm admittedly bad (and impatient) with modeling, I want to strengthen my sculpting and texturing skills while also giving myself a new environment to light. Things are a little crunchy at work, so I don't expect this piece to move at light speed. Long story short - I'd like to light a new piece while getting some Zbrush and texturing practice in. Let's go!
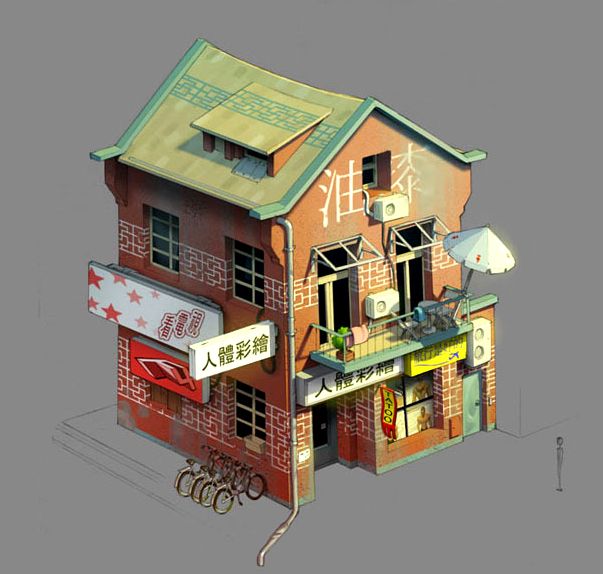
The piece I chose is a concept by Gray Shuko: http://cghub.com/images/view/100721/. It's the one in the upper right, the quaint little corner store with asian flair. Simple shapes with nice color and charm. I've isolated it below:
I don't plan on hitting this as an exact replica, but I do plan on following pretty closely. My goal here is to end up with textures and materials that aren't overloaded with extreme fine detail. In my student days, I went wild with high frequency noise and this time I'd like to pull that back a little bit. I'm aiming to have textures land somewhere between Dishonored and the great work of Airborn: Pino's Journey. I've also been looking at a lot of Ghibli films. Don't get me wrong, this won't be a WoW style hand-paint but rather a more calculated approach to detail as seen in the references I listed.
Here's a look at some inspiration/reference:
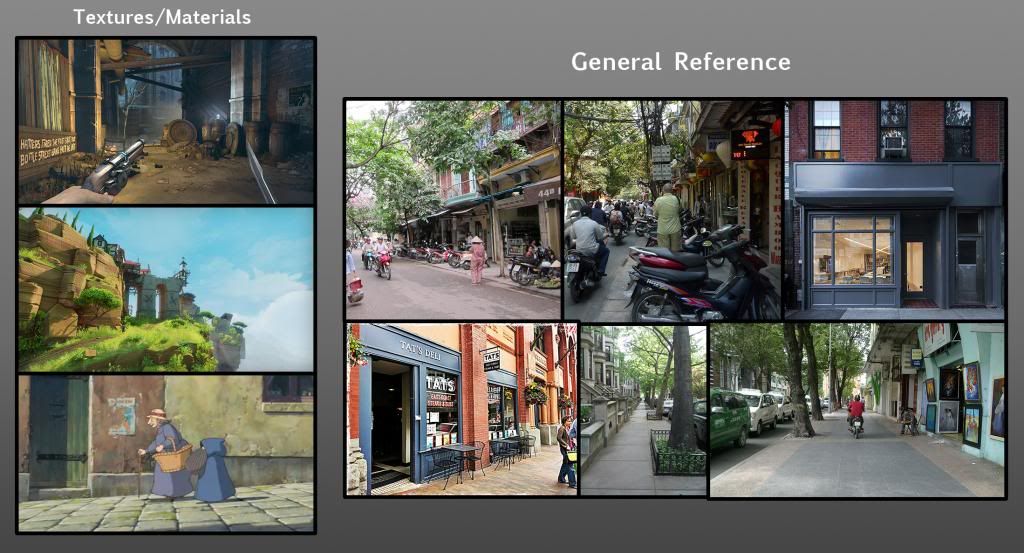
No big deal or anything, just awesome reference that I'll probably fail very miserably and publicly at trying to emulate.
I blocked this in a long time ago and want to return to it to stay true to my desire to follow through better. Here's a blockout AO render in Maya:

As I create better low poly models for bakes I'll fix some of the issues that the blockout has. Right now, some of the models are a little thin and need some more bulk. The tree is paint effects so I'll replace it but for now it gets the point across. Not sure how I'll handle two trees because I'd like good visibility on the building, but I'd like to have the sidewalk trees. I'd like to add a few more bits or breakup, maybe a sidewalk sign or trashcan on the front street. I also plan to have leaves gathering around the base of the building.
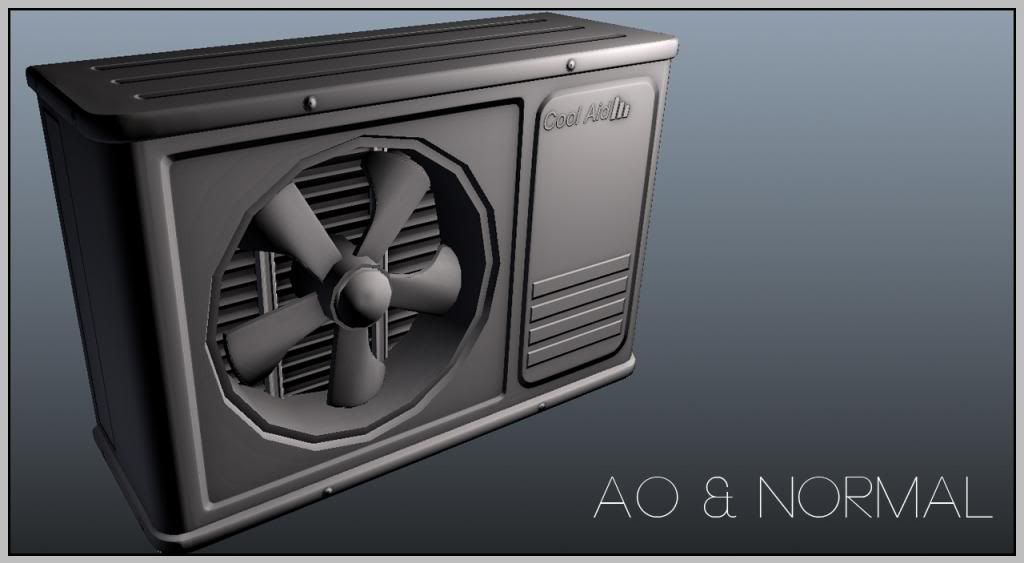
A pretty boring AC Unit:
And the front door of the store:
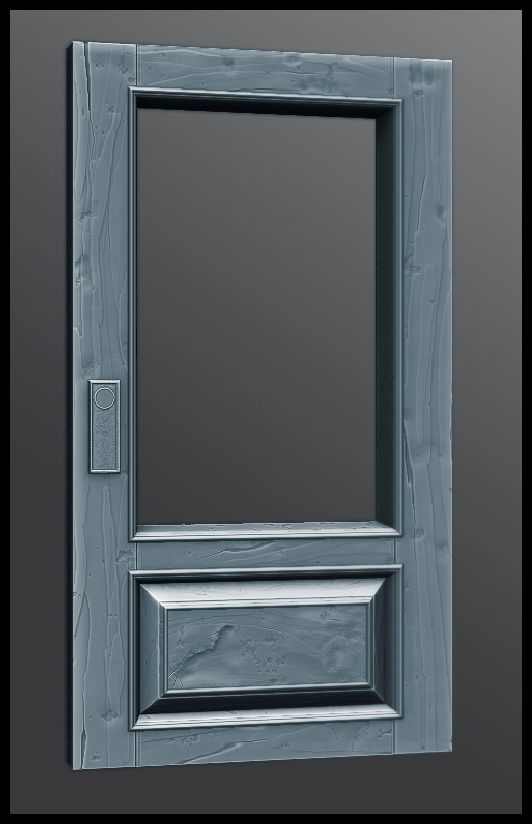
I tried to sculpt big shapes with the door and keep a lot of the noise out, the diffuse won't reflect as much of the worn wood so I'm hoping it'll be a good mix.
Hoping to get this set up in UDK soon and get working on a few more props/tileable sculpts. Let me know if you have any thoughts or ideas on how I could make things sweeter.
Love always,
Jon
It's been a long time since I've worked on a personal piece and while I'm admittedly bad (and impatient) with modeling, I want to strengthen my sculpting and texturing skills while also giving myself a new environment to light. Things are a little crunchy at work, so I don't expect this piece to move at light speed. Long story short - I'd like to light a new piece while getting some Zbrush and texturing practice in. Let's go!
The piece I chose is a concept by Gray Shuko: http://cghub.com/images/view/100721/. It's the one in the upper right, the quaint little corner store with asian flair. Simple shapes with nice color and charm. I've isolated it below:
I don't plan on hitting this as an exact replica, but I do plan on following pretty closely. My goal here is to end up with textures and materials that aren't overloaded with extreme fine detail. In my student days, I went wild with high frequency noise and this time I'd like to pull that back a little bit. I'm aiming to have textures land somewhere between Dishonored and the great work of Airborn: Pino's Journey. I've also been looking at a lot of Ghibli films. Don't get me wrong, this won't be a WoW style hand-paint but rather a more calculated approach to detail as seen in the references I listed.
Here's a look at some inspiration/reference:
No big deal or anything, just awesome reference that I'll probably fail very miserably and publicly at trying to emulate.
I blocked this in a long time ago and want to return to it to stay true to my desire to follow through better. Here's a blockout AO render in Maya:
As I create better low poly models for bakes I'll fix some of the issues that the blockout has. Right now, some of the models are a little thin and need some more bulk. The tree is paint effects so I'll replace it but for now it gets the point across. Not sure how I'll handle two trees because I'd like good visibility on the building, but I'd like to have the sidewalk trees. I'd like to add a few more bits or breakup, maybe a sidewalk sign or trashcan on the front street. I also plan to have leaves gathering around the base of the building.
A pretty boring AC Unit:
And the front door of the store:
I tried to sculpt big shapes with the door and keep a lot of the noise out, the diffuse won't reflect as much of the worn wood so I'm hoping it'll be a good mix.
Hoping to get this set up in UDK soon and get working on a few more props/tileable sculpts. Let me know if you have any thoughts or ideas on how I could make things sweeter.
Love always,
Jon
Replies
Things got a little naughty at work and this project had to fall by the wayside until crunch was over. Now I've got a bit more free time on my hands to return to this little guy. Even though I'm inspired to move elsewhere, I think it's going to be very beneficial that I finish.
I don't have anything major to report just yet, but I'm currently running into an issue in UDK that I'm not sure how to solve. I have assets that will need to have multiple materials assigned to them. When I create a new material and reference the mesh (for the preview) it never fails that the material goes to the wrong subsection. For instance the AC body diffuse, goes to the circular grating section.
Here's a WIP of the texture I'm working on:
And here's the UDK shenanigans:
Is there a way in the material editor that I can denote which material section I'd like to work with? If I create a test material and assign it to the mesh properly, it'll show up in the material editor with the change but any additional changes or tweaks only happen to the original material section. This is pretty annoying and is making it very hard to tweak materials. Anyone else run into anything like this?
Hopefully once I get past some of these issues I'll have a bigger update soon.
Thanks,
-Jon
I'm not sure what you mean. Like only applying a material to a certain part of a mesh or only modifying one part of the material in the material editor? For the first one, that requires multiple material IDs. Just export your model with separate materials applied to it on the different faces(lambert 1 on the back, lambert 2 on the front, lambert 3 in the inside, etc). For the latter, you just have to use masks that work with the UV layout. Save a black and white image of the fan blades if you just want to edit those in the editor, for example. Hope one of these helps
Thanks Leleuxart! This is exactly how I've exported my mesh from Maya, with multiple materials assigned. In the content browser, the mesh reflects this with multiple material slots. The problem comes down to the material editor. The main AC body is in slot 2 and the AC vent cover is in slot 1. If I create a new material for the AC body and use the mesh in the preview, it assigns to the vent (as shown in the above image).
I can save the material and assign it correctly in the mesh properties and when I go back to the material editor it shows up correctly. Only problem is, making any change only happens on the vent and I'd have to reassign to see what it actually looks like on the body. I just want to tweak and massage the material in real time and not have to guess.
So I guess my question would be - Can I tell the material editor to assign the material to different sections of the model?
Thanks again everyone. Hope to have some more props to show soon.
Love,
-Jon