Dock Explosion - Sherlock Holmes VFX
So for one of my final year uni projects I have to make a scene from a movie. I chose this scene from the 2009 Sherlock Holmes film.
I intend to make the full scene up untill the last explosion at 1:22, with all the explosion FX's, smoke debris etc. Breaking up the barrels, walls and various other props using a mixture of baked simulations and particle effects.
[ame="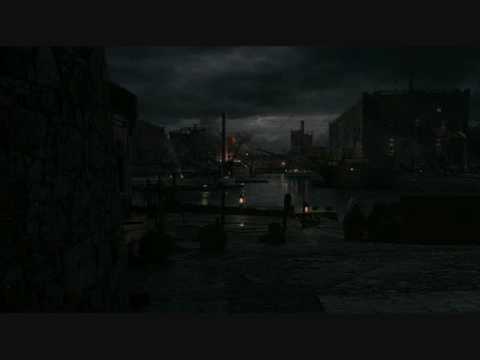 https://www.youtube.com/watch?v=moGumedJXt4"]Sherlock Homes (Movie 2010) - The Docks - YouTube[/ame]
I initially started work on the block out a few weeks ago, Placing all the props, getting a feel for scale, basic lighting and sorting the matinee out to trigger lights and fx's when I needed them.
[ame="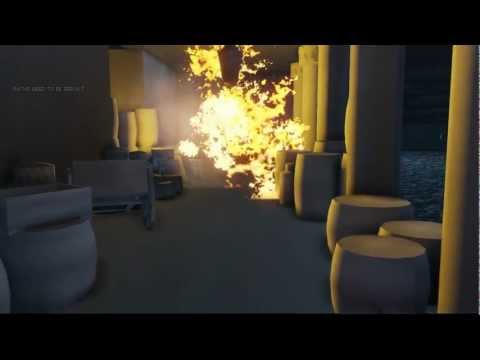 https://www.youtube.com/watch?v=v6SDU6kjMUk"]VFX Blockout - Sherlock Holmes Dock Explosion - YouTube[/ame]
I have progressed since I made the blockout video and have modelled various props, but only doing a normal and AO pass on them so far (this is my prefered workflow). The Explosion Fx's are still placeholder but I will edit them to be a bit more bespoke.
Personally the main challenge to this scene is to get the explosions and smoke to not look flat and feel like they have depth to them. This causes the worst problem of a hell of a lot of alpha overdraw


I intend to make the full scene up untill the last explosion at 1:22, with all the explosion FX's, smoke debris etc. Breaking up the barrels, walls and various other props using a mixture of baked simulations and particle effects.
[ame="
https://www.youtube.com/watch?v=moGumedJXt4"]Sherlock Homes (Movie 2010) - The Docks - YouTube[/ame]I initially started work on the block out a few weeks ago, Placing all the props, getting a feel for scale, basic lighting and sorting the matinee out to trigger lights and fx's when I needed them.
[ame="
https://www.youtube.com/watch?v=v6SDU6kjMUk"]VFX Blockout - Sherlock Holmes Dock Explosion - YouTube[/ame]I have progressed since I made the blockout video and have modelled various props, but only doing a normal and AO pass on them so far (this is my prefered workflow). The Explosion Fx's are still placeholder but I will edit them to be a bit more bespoke.
Personally the main challenge to this scene is to get the explosions and smoke to not look flat and feel like they have depth to them. This causes the worst problem of a hell of a lot of alpha overdraw
Replies
I have mainly been creating more high poly assets and texturing the environment. I went about this by using tiling textures overlayed on top of the High poly AO and Normal maps. This has been done by utilizing 2 UV sets and merging the result together in the shaders in UDK. I understand that this is by far a more expensive route to take to texture the scene; drawing on more texture lookups in the shaders, more textures and sometimes more draw calls.
Here is the set up in Maya:
I prefer to get the props looking good in Maya with Viewport 2, this assures me that by the time I get to UDK the textures and going to be pretty close to what I want to achieve.
Here is the UDK setup:
I have set it all up to use Material Instances to make the iterations for all materials quick and this also allows me to keep my art style quite closely aligned.
Finally the updated Scene:
Please give me some criticisms, always looking to improve!
[ame="
I have been working on the FX's as well as simulating the barrels reaction to all the explosions. The explosions all need an interesting feature that will help sell the effect, currently the whole composition can become quite boring.
Once I get the rest of the FX's in I will start polishing the explosions, which still need some work.
I'm welcome to criticisms.
In the last video I posted I had updated with a load of explosions, some debris and some rigid body destruction.
But the final video is here:
[ame="
I had experimented with a few different ways of creating the fire. After trying thresholding and a static sprite I found that this looked too cartooney and did not reflect what I wanted. So I tried using heavy distortion on the sprite texture and using bump offset to fake another layer of fire in the sprite. This gave the sprite a very dynamic element with the bump offset adding a volumetric feel to the sprite. This worked very well so I used this shader for the secondry fiery smoke sprite. The secondry sprite is a dark cloud with some residual fire flames inside it, this worked really well and helped sell the fire effect.
I also added more gibs, I started with particle meshes but moved onto using UDK's PhysX particles as these have better dynamic dollision and also work better with a larger number of junk. These meshes weren't naturally lit by the environment so to make them look like they bitted in I faked some half lambert lighting giving the meshes a top down light and multiplying a vector parameter of the scene colour into the final diffuse output to fake the scene lighting.
I also used some custom post processing to help achieve the look I wanted. I set up my own camera controls to control the scene brightness and contrast as a post processing material effect. This allowed me to fake HDR by manipulating the overall scene levels when the explosions start. I also used a custom depth fog post materaial effect to help give the feel of residual smoke hanging around the scene. This effect is triggered towards the end where I also trigger another smoke particle to add movement.
I've been using a lot of baked rigid body simulations on the static props that break apart. These rigid bodys are baked into an animation. To achieve this I set up a simulation using a simplified version of the scene collision and a simple shatter mesh, attached rigid bodies to these and used a script which I wrote to rig a duplicate of the shatter mesh and then bake the sim down to the rigs bones. The script saved a lot of time as the process of rigging 40 meshes would have taken a very long time. I will hopefully post this up sometime.
If you are interested in any of the methods or have any criticisms please post.
Thanks.
The only thing that I don't care for would be the smoke trail on the debris that comes up close to the camera at 0:20-0:21. Touching that up a little would help, I think.
Overall great job though. The assets look great.
Do you know if there is a limit to how many UV sets a mesh can have in UDK?
Also with your Maya tiling metal shader, are you tiling it with the Place 2D node? The texture swatch looks tiled. Wouldn't it be better to scale up your UVs for that portion and leave the UV tiling 1x1? That way if you have other assets that use metal you can just scale up or down their UVs to get the tiling you want. With that in mind in UDK you could have alot of re usability of textures without changing the UV coord per asset. Maybe thats what you did, but in Maya it looks like you tiled the metal via place2D node.
Scene is looking great! I love seeing these technical shader breakdowns and such, so much potential in maya and UDK to get creative with multiple UV sets and textures. Keep it up!
I do admit that the smoke trail on the debris is the worse effect in the scene, it's one I definitely want to improve on (without a bad performance hit). I was thinking possibly ribbons??? Who knows
As for coots7 questions about the UV coords, I know raw HLSL handles about 7 fine, there is an upper limit but it all depends on how UDK is packing the other shader data for lighting. I personally guess it's about 4 different sets, just based on the static mesh browsers drop down that only has 4 (but this is off memory I haven't tested anything).
I didn't worry too much about having too many materials in my scene in the end I think there was maybe 20 for the static props. I was using lots of material instances so there really was about 2-3 master shaders. I used Maya to preview my work, due to the ability to easily edit meshes if I had to, and I was confident I could replicate the look in UDK. So for the different scales I just created another Mat Instance and tiled it there.