The BRAWL² Tournament Challenge has been announced!
It starts May 12, and ends Oct 17. Let's see what you got!
https://polycount.com/discussion/237047/the-brawl²-tournament
It starts May 12, and ends Oct 17. Let's see what you got!
https://polycount.com/discussion/237047/the-brawl²-tournament
Sci-Fi grenade game asset WIP
polycounter lvl 6
So I'm on break from school and need to really get my low-poly/high-poly workflow up to speed. I have decided to do a small, not so complex object to start my training. Since Sci-Fi is almost always prevalent in people's portfolios, I decided to do a string of my own props. I am super noob to the whole workflow, especially the baking/texturing part so I'll probably be asking a lot of questions. Anyhow, below is a small reference sheet and some silhouettes to get the ball rolling. Please let me know which ones look the best and/or which I can combine maybe to move into a final concept. The first one is pretty lame so I'm sure it won't get picked. Thanks Polycounter's.:poly121:
Ref sheet
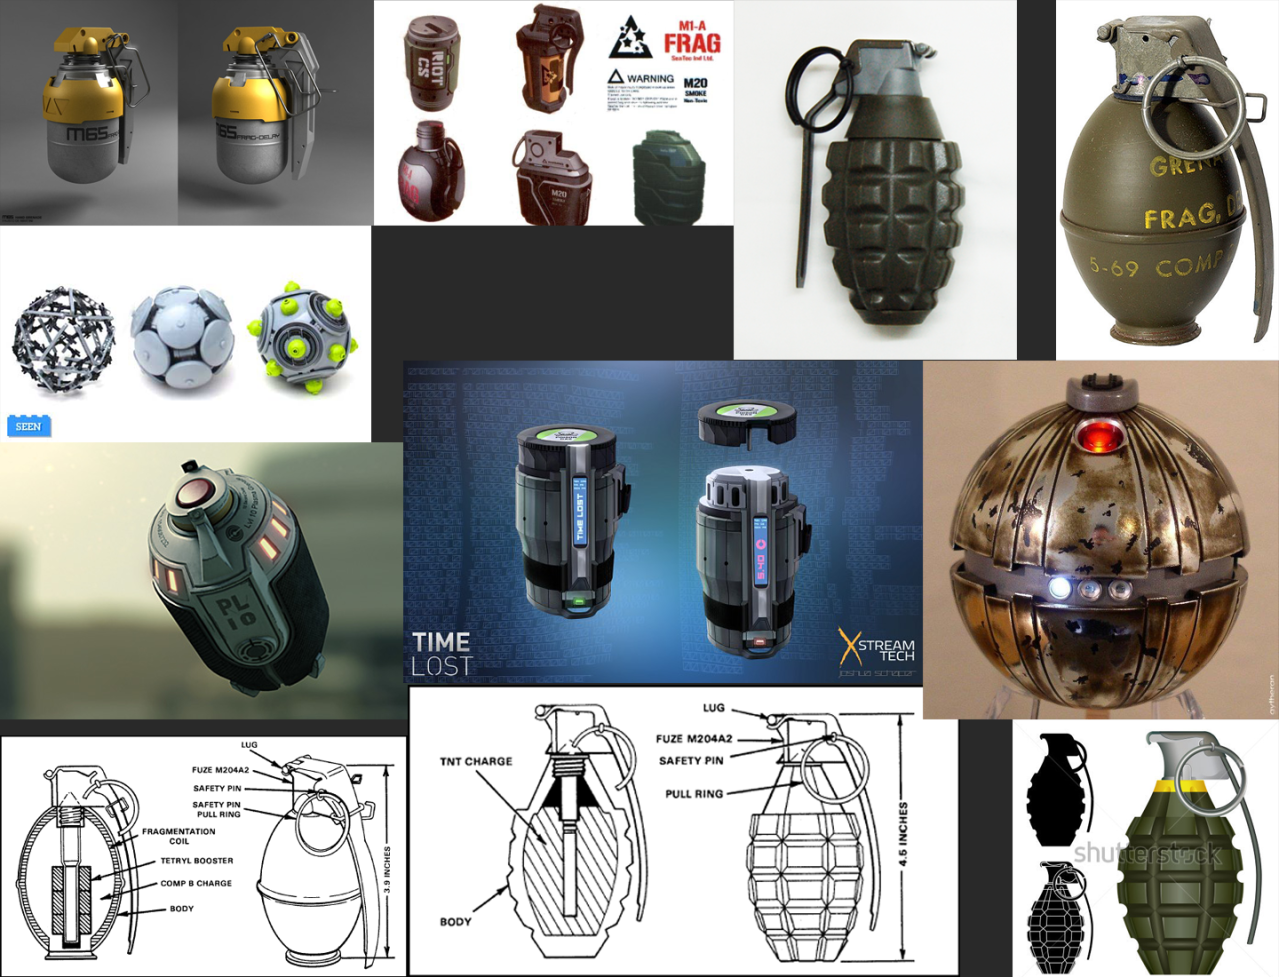
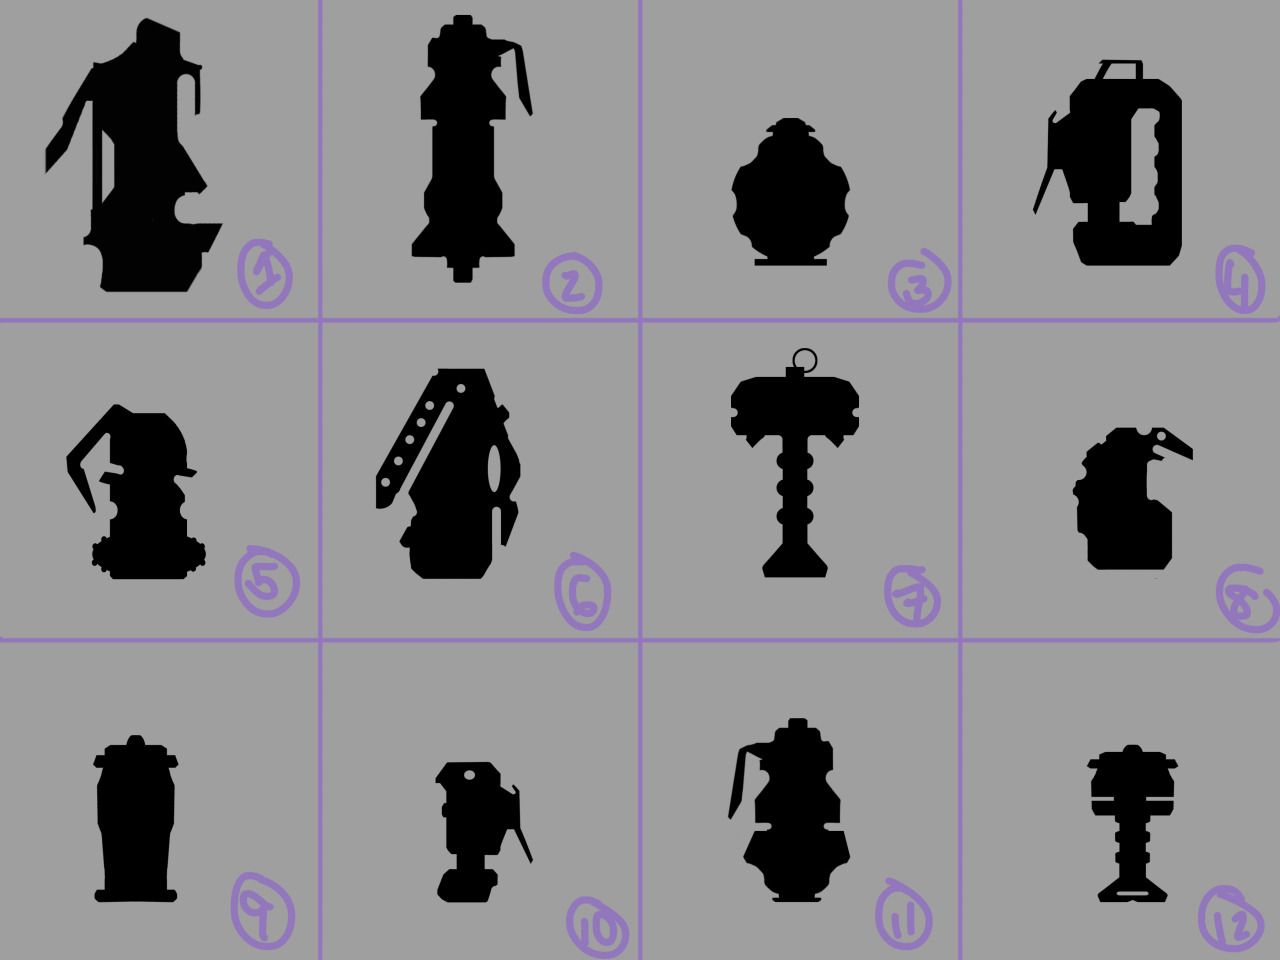
Silhouette sheet
Ref sheet
Silhouette sheet
Replies
Personally my fav is 6, also quite like 8,9,10 and 11 though.
2 or 11 please and thank you XD
I personally think most of the silhouettes are kind of noisy making a lot of them look more like remote detonators than actual grenades. The function seems to be lost on some of them, there seems to be a lot of extra forms that indicate more purpose than tossing and going boom, clips and molded finger grips, levers and pins that can snag on things or get bent?
A study not just on catchy looks but on function would help guide the forms. Often just by looking at a grenade you can tell what it will do. Which is important in games, players don't want to sit through lengthy tutorials or read grenade manuals. The easier it is for them to see an item and know what it does before they pick it up the better the game is going to go. No one wants to spend their inventory slots picking up smoke grenades when they thought they where frags. Tossing a remote detonator into a crowd of enimes only to have them pick it up, push the button and watch as the the 8lbs of C4 on your back explode, is hillarious... if you're not that guy.
Why is a pineapple grenade bumpy like a turtle?
Because the thinner parts break and the thicker parts become shrapnel.
Why aren't gas grenades built like this?
The focus is on dispensing gas not shrapnel.
Why did Germans in WW2 put sticks on the bottom of their grenades?
It made them easier to toss longer distances.
So thinking about the function of your grenades and coming up with interesting ways to trigger it and time it will help drive the shapes that it will take. Maybe instead of a pin or a leaver you hit the base and it slides up into the explosive triggering a timing mechanism (common technique used in warheads).
If your grenade packs a big explosive punch maybe it should look less like a water bottle(9) or axe hilt(7) and more like a fat explosive device(3).
If your grenade is actually a signal for an air strike, it needs to indicate that in some way.
If your grenade should stick to things like metal maybe it needs some kind of magnetic shell, how do you keep it from sticking to other things before you use it? Electron magnate, what does that trigger look like and how does it work?
Or maybe it looks like fishing bait that swallowed C4 and sticks like wacky wall walker?
Or spikes to stick in concrete or enimes (gears of war style)? Maybe your grenade has some other kind of purpose that no one has ever thought of?
I'm not saying you need to go way outside of the norm but I do have trouble telling what type of grenade a lot of those silhouettes are, and players need to know how to interact with objects and the silhouette is a big part of that.
At a first glance, the grenades look like (to me):
1.) Looks like an orbital artillery laser device, (push the button, paint the target, kaboom!) like SOL from Akira
2.) looks like a trip mine, you place 2 on the ground and a wire between, when someone trips the wire, they explode. (the bottom cylinder looks like it expands and you can push it into the ground.
3.) traditional concussive grenade
4.) Looks like a remote detonation device.
5 and 6 don't really feel like grenades to me much 8(
7.) looks like a potato smasher grenade, the kind the Russian's used mostly in WWI and WWII
8.) Another type of concussive/frag grenade
9.) looks like a bouncing betty, step too close to it and it springs up and explodes your face off.
10.) actually looks more like some sort of ammo clip for an alien weapon, something like in mass effect, where the bottom comes out of the casing and plugged into the gun.
11 and 12 look like chemical warfare grenades, like they expel gas and kill peeps that way.
This is what I thought by looking at them at first glance, I like the shapes, but if there's something specifically you're looking for, then maybe you should do what Mike said and try and iron out functionality and then figure out WHY the functionality works that way.
Can't wait to see more!
@Mark- I didn't really give too much thought on what kind of grenade it would be besides maybe a frag or "plasma" type grenade. You've given me much to think about given the shapes, and what a player might think it would do at first glance. I'll certainly solidify the grenades function with the shape in the next round. Thanks!
@Grag- Those explanations are funny as #%$@! I am definitely going to put together a couple more iterations, and what they might be used for. Thanks.
Okay, so let me tally these up, and get to work on the final few silhouettes.
Thanks to all for the feedback!
1. Do I need to cut the holes in the mesh for the block out before moving on? I know on the HP I will use the 6 sided circle technique, but this will have to be different on the LP due to no sub-d going on right??
2. Slightly raised and sunken surfaces don't need to be modeled on the LP due to a normal map bake, correct??
3. That ring around the tube I see as being some kind of power-band with sunken bevels, and some ring type lights on the sides. How do I go about this as I know from past tries that when I would model holes in a curved surface, the sub-d edge supports results would flatten those areas out while the rest of the curved surface looks good. What is the trick to that???
4. Once I clean up this block out a little, should I make a copy of it as a LP base before moving into the HP modeling?? I know I will need to clean it up still a little afterwards.
5. The poly count is around 2000 before clean up. I was shooting for around 1200 maybe for the LP. Is that too high or to low??? For a piece this size, what would you shoot for??
Anyhow, here is just a screen grab I did with some notes
try something like this instead
also the edges are too tight to show up well on the normal map
1. Do I need to cut the holes in the mesh for the block out before moving on? I know on the HP I will use the 6 sided circle technique, but this will have to be different on the LP due to no sub-d going on right??
-Yes, you need more geometry to maintain roundness in a lowpoly. On a LP you use smoothing angles and other things (depends on what modeling program you're using) to help achieve roundness and avoid baking errors.
2. Slightly raised and sunken surfaces don't need to be modeled on the LP due to a normal map bake, correct??
-Yup, but it really depends on what u want things to look like. In general you want to keep the silhouette of your LP as similar as the silhouette of your HP as possible and crunch poly's everywhere else, that's what helps create the illusion.
3. That ring around the tube I see as being some kind of power-band with sunken bevels, and some ring type lights on the sides. How do I go about this as I know from past tries that when I would model holes in a curved surface, the sub-d edge supports results would flatten those areas out while the rest of the curved surface looks good. What is the trick to that???
-I'm not 100% what your question is here, I've modeled holes and intricate shapes on curved surfaces before and baked them without problems. What issues are you having?
4. Once I clean up this block out a little, should I make a copy of it as a LP base before moving into the HP modeling?? I know I will need to clean it up still a little afterwards.
-I generally build my HP and then build a LP. I suppouse you could reuse what you have now, but really I'd just start your LP from scratch with simple geometry.
5. The poly count is around 2000 before clean up. I was shooting for around 1200 maybe for the LP. Is that too high or to low??? For a piece this size, what would you shoot for??
-Idk this should be a pretty low poly piece considering it is a small item, 1,200 seems a bit high to me, but the main thing is to make sure your bake and low poly look good. I would build the LP from scratch and just use simple geometry and bake a great deal of the details into the lowpoly. For example those light holes you've modeled into it above would not need to be modeled into the LP they would simply be baked on.
You might want to read up on sub-d techniques, take a look at this thread: http://www.polycount.com/forum/showthread.php?t=56014
Generally speaking use edge loops rather than bevels so you have more control later on over edge smoothness.
@Stephanie- thanks for all those tips. I don't know how I'm going to make a really LP piece out of this. This is where I suck.
@Bek- As far as the tight edges are you still referring to the ring piece only? The rest of the model is just primitives with no sub-d or edge work done yet.
http://www.polycount.com/forum/showthread.php?t=56014&page=107
If you click through the thread there are heaps of examples of this problem. There's one on this page: http://www.polycount.com/forum/showthread.php?t=56014&page=35