Home Dota 2

Haftoof's Workshop - Newbie Artist :3

1
polycounter lvl 4
Offline / Send Message
Haftoof polycounter lvl 4
Anyways I'm following Sith Happen's workflow... Decided I wanted to do a dual-sided polearm similar to Guan-Yu's in style.

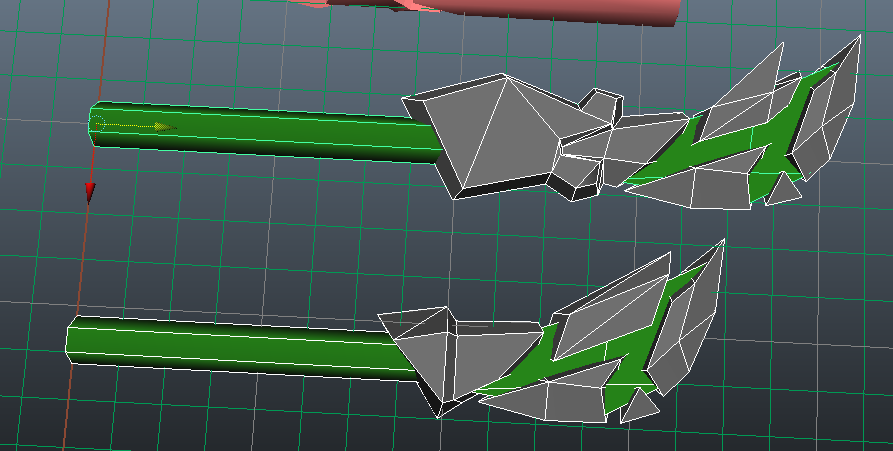
Here's the Shattered General Guan Do... 300 poly's is such a pain to work with! Here's the Low-Poly... Upper-half will have a dragon's head.

ec6ed67e75c42772b3309f0b965b1c38.png

Replies

  • Baddcog
    Options
    Offline / Send Message
    Baddcog polycounter lvl 9
    Well you can probably save a few polys to make it one mesh and allow the normal map to bring out the details.
    Even if it costs you a few polys it'll give you much better texture usage, and if you think the polycount is tough the texture sizes are even worse ;)
  • Haftoof
    Options
    Offline / Send Message
    Haftoof polycounter lvl 4
    Technically it has to be two meshes... Per earth spirit guidelines... because of earth spirits animations.
  • Shock
    Options
    Offline / Send Message
    Shock polycounter lvl 5
    i think baddcog was actualy talking about the blades itself and not about the handle :)
  • Haftoof
    Options
    Offline / Send Message
    Haftoof polycounter lvl 4
    Hmmmmmm you'll have to explain. I tried to think out how the blades would have to be designed. The green section of each blade is actually a whole separate mesh that's as low poly as possible (I think it's something like 8 or 16 poly total?)

    Are you suggesting making the blade one connected panel then using normal/transparency mapping to separate out the individual pieces?

    At this point I'm like 6 poly's under the budget for the level of detail, but I'm more than willing to listen to ideas. I was fighting to get the count under 300 for the whole piece with the back-end losing some detail and both sides losing some detail on the back-side of the blades.

    I think I could probably pull back on the indentation for the mouth of the dragon on the main blades base to earn some poly's (16 total I think) which could earn me 1-2 other objects depending... I kind of feel like the handle itself might need a little something more...


    Edit: Anyone having trouble seeing my image?
  • Baddcog
    Options
    Offline / Send Message
    Baddcog polycounter lvl 9
    Basically if you keep the bade almost one flat mesh and only give a little cutout along the edges for silhouette you can show the details on the blade with the bakes.

    You'll use more tris along the edge, but fewer on the blade face.
    es_staff%20copy.jpg

    If you don't 'float' geometry like you are doing, your uv's will take up the space shown in blue.
    If you DO float geometry like it is currently the pink shows how much wasted uv space you have. With a 256x256 texture you can't afford that much to get good resolution, it's basically the amount of the entire blade.
    es_staff_uvs.jpg

    Floating the staff (the cylinder) is fine because you can basically waste 0 pixels of texture to do that, but you'll save a lot of polys combining it.
    ==========
    I'd also suggest removing the shape of the mouth and using those polys to shape out the silhouette of the head more.
  • Haftoof
    Options
    Offline / Send Message
    Haftoof polycounter lvl 4
    I see what you mean, I'm still a little bit iffy on how far you can go with normal mapping and still get the effect you are looking for. I guess it doesn't matter much since essentially I could just dig into the "paddle", texture the giant shattered cracks green, and use the glow mask to cover essentially what I'm doing right now with separated pieces.

    I still have the basic shape that I chopped up.

    Any thoughts on the silhouette? where does it need more?

    I'll post a follow-up pic to see if I understand what you are getting at right.
  • Baddcog
    Options
    Offline / Send Message
    Baddcog polycounter lvl 9
    Well, Valve does say in their design docs that normal maps have a minimal effect in game due to lighting.
    However it's the AO, bent, lightmap bakes that really will make those details pop. The normal will mostly pop in the specular and rim lighting masks.

    But even with geo like you have in game you're only going to see a line of a pixel width on those edges, so normal or not they will be minimal.

    Best go with more resolution so those details are sharp in the color/lighting maps.
  • Haftoof
    Options
    Offline / Send Message
    Haftoof polycounter lvl 4
    54c044eaf5f461dc24156ce084e0cffb.png

    So more like what's on the right, but modify it to achieve the silhoutte, then sculpt the detail on the left and bake it down.


    So just need to add all the silhouette detail to the lower poly version... which drastically reduces my poly count from what I can tell.


    And the followup...

    1faf9b101aefee87bfeb7c58f8d26fdb.png
  • Haftoof
    Options
    Offline / Send Message
    Haftoof polycounter lvl 4
    Going to review the animations a bit before I continue. I'm not sure if I want to mirror the blades across the two halves or not. I think leaving them unmirror'd would produce a much more appealing silhouette so I would need to figure out what I want to do with the two halves. The other problem is I'm currently over budget so I need to figure out changes to the back-half to garner poly's.

    d5fdda8924a267b8b0c0b63c055f16a0.png
  • Haftoof
    Options
    Offline / Send Message
    Haftoof polycounter lvl 4
    First Pass UV Mapping...

    bb2897788ecd801f3f75bef49a2e80f7.png
  • Baddcog
    Options
    Offline / Send Message
    Baddcog polycounter lvl 9
    That shape should do pretty good.

    Is that hexagon up there the end cap on the handle? you can get rid of that. If a cap on each side that's 12 tris.

    You can also mirror the 6 sided handle for better tex space. (only need 3 rectangles on map).

    Not mirroring the blades is fine I think.

    1- You have good uv usage, and if you mirror the blades you'll just end up with empty space anyway .
    2- The dragon head side uses more polys (it seems) so mirroring it would make that situation worse too.

    Looks like the handle won't get (and really doesn't need) much uv space,so keep the details on it pretty simple and it should be fine.
  • Haftoof
    Options
    Offline / Send Message
    Haftoof polycounter lvl 4
    Thanks for the comments, the feedback is super helpful to me.

    the hex is the end-cap of the handle at the break... I didn't want to get rid of it because its on the original model where they split the handle for animations.

    I'll figure out what I want to do with the extra poly's I might just do some simple shattered floating pieces (4 poly chunks).

    Gonna work on the mid-poly topology next to bring into zbrush, I'll post more once I have progress on the high detail sections of the blade.
  • Haftoof
    Options
    Offline / Send Message
    Haftoof polycounter lvl 4
    Started on the high poly... I'm still kind of new to zbrush, but working with the flatten, trim, planar and orbs to get that shattered stone look. I am pretty sure I need to go broader on the detail so I'm reworking some of the stone faces.

    722a141a72d96682ef4d62b69edb60b3.png
  • Swaggernaut
    Options
    Offline / Send Message
    Swaggernaut polycounter lvl 2
    Also try to use a different matcap. The default one looks really bad imo and it doesn't tell you the true depth of your mesh. I would recommend using a matcap called zbro_Modelling_Clay
  • Haftoof
    Options
    Offline / Send Message
    Haftoof polycounter lvl 4
    Little bit more work, also I found the matcap you mentioned, it's got a slight difference but I agree on the depth. I want to try and finish roughing out the stone faces tonight or tomorrow and get started on the basic dragon head, then I'll "rough up" the whole thing with battle damage and worn edges.


    afc0f3d1e021b59e9220820f70e1c8ff.png
  • Nekhro
    Options
    Offline / Send Message
    Nekhro polycounter lvl 5
    The edge comes along nicely. Looks stone-ish imho. :)
  • Haftoof
    Options
    Offline / Send Message
    Haftoof polycounter lvl 4
    Wanted to post an update... While I need to make some of the shapes bigger, its coming along nicely. I wanted to keep the rocky roughly hewn features with the dragon's head, so that's coming along nicely. Let me know if anyone has any suggestions...

    6c4d7cb69d641012014202d8cd23632a.png
  • Haftoof
    Options
    Offline / Send Message
    Haftoof polycounter lvl 4
    Finished main-blade. I like how the head sculpt turned out, I have much to learn I'm sure but I picked up a lot of cool skills with it. I want to get this baked out to a basic normal map so I can see how it looks on the low poly then go back in and do detail/cleanup.

    c9789ec7ea6cbe1f7d84be9d047bfe22.png
  • putka
    Options
    Offline / Send Message
    putka polycounter lvl 6
    The dragon looks awesome, I liked the previous blade a bit more, this one seems too bulky.

    I wanted to comment on the normals of your low poly blade. Be careful with using hard edges. If you have a hard edge (vertex split), you also need a UV split there, otherwise the normal bake will be fu***d. With the way your UV islands are set up, I'd only use a hard edge on the bottom edge of the blade (the middle).
  • Haftoof
    Options
    Offline / Send Message
    Haftoof polycounter lvl 4
    I'm still rather new to things, but I think I understand what you are saying. I think right now nothing but the "edge" of the blade is a hard edge set normal in maya.
  • putka
    Options
    Offline / Send Message
    putka polycounter lvl 6
    Yeah that should be good :)
  • Haftoof
    Options
    Offline / Send Message
    Haftoof polycounter lvl 4
    Finished blade sculpt. Gonna go back and deepen some of the shadows in the cracks but otherwise done.

    2f50341e9b89724ae549b4f769e12da1.png
    04c826bcc4d9dd82bba009bbbe3d2d0f.pnghttp:
  • Haftoof
    Options
    Offline / Send Message
    Haftoof polycounter lvl 4
    Poly Painting in zbrush before baking to a diffuse... Feels exactly like painting a miniature but then I can overlay different maps in photoshop so excited to see how all the computer generated light shadow and highlights works out.

    4a004861e0490706e523915720cbb9a9.png
  • Swaggernaut
    Options
    Offline / Send Message
    Swaggernaut polycounter lvl 2
    cool tingz coming up soon
  • Haftoof
    Options
    Offline / Send Message
    Haftoof polycounter lvl 4
    Layering highlights and such on now, hopefully I'll be done with the basic diffuse by the end of the day.

    I'm not sure if I want to change any colors on the head... Perhaps the teeth to extend the gold layering or modify the teeth to "jade".

    any thoughts?

    daf3e6e0eace9093bba207a0bdb388d4.png
  • Haftoof
    Options
    Offline / Send Message
    Haftoof polycounter lvl 4
    So I finished up the staff, and after playing with a few different designs on the lower section of the weapon decided to try and figure out a way to mirror the main blade.

    Anyways after fighting the poly-gone count I got there and kept the look I wanted once I baked out the normals... gonna finish baking up the staff and then take all of this into quixel (ndo) and get some materials going to meet my needs (Another learning experience).

    Additionally I finished up the staff using a custom brush alpha I made of a sculpted scale.

    e590200e1c7026c3c6295869bd8d944c.png

    I might look at this again because I'm not sure how I feel about how the scales match up with the look of the stone-head dragon. Any thoughts?
  • Haftoof
    Options
    Offline / Send Message
    Haftoof polycounter lvl 4
    Starting to play with all the different features in dDo though I can't for the life of me figure out how to turn down or figure the specular/gloss, I'll have to figure it out at some point it's probably material based.

    Anyways here's the texture coming along...

    68dd4204d9227f144eb2c055bdc822eb.png
  • Haftoof
    Options
    Offline / Send Message
    Haftoof polycounter lvl 4
    Just need to actually resize the tetures correctly and need to get a decent shot but here's the first shot of the imported model...

    11247498_10103948917838841_6539763983322288811_n.jpg?oh=539b19250142b64bec75268187f2ef67&oe=55F4BE04


    Edit: Took a couple of seconds and apparently quixel is awesome and I just needed to downsize the % with a sharpen modifier out of quixel's exporter.

    11065890_10103948943841731_112796738815614720_n.jpg?oh=90274b178718bf2048a5874f985a82e8&oe=55C71594
  • Shock
    Options
    Offline / Send Message
    Shock polycounter lvl 5
    hey mate, the contrast value is a little low compared to es hisself. its hard to see those details like the dragons colored horns, teeth and also the green texture in the middle of the flame. my advise is try to bring out a little more contrast into these points. make the green on the flame more bright and give it some nice selfilumination (mask1 alpha channel)
  • Haftoof
    Options
    Offline / Send Message
    Haftoof polycounter lvl 4
    I'll jack up the contrast and brightness values and post an update later today... really appreciate it, I'm still a little timid on brightness though it seems like any tablet-top miniature at birds eye view your contrast matters alot.
  • Haftoof
    Options
    Offline / Send Message
    Haftoof polycounter lvl 4
    Fixed some of the hue and improved some things about the texture... One question I do have, is should I angle the weapon so that the blade is angled at about 45 degrees between straight up down for better visibility from the top down view without destroying the close up view?

    db5ce90af858ef2f6f829161bad684cd.png
  • Shock
    Options
    Offline / Send Message
    Shock polycounter lvl 5
    when i said u need more contrast i didnt mean saturation :) i liked the less saturated gold from the previous version more. when u change the contrast in photoshop it allways also changes the saturation, so in most of the cases u have to lower the saturation right after u improved the contrast to fix the color value.

    about ur materials:
    -ur stone material is looking good so far. keep that.
    -a problem is still that green part between the stones - it should
    more or less look like the one he has on his arm. just do urself a favour
    and look into volvos base texture and mask.
    - the handle is ok too.
    - on the dragonhead i dont know about those textures. i feel they are anyhow not fitting to es. maybe u should try to use any color from his base body and make it more harmonic.. dno
  • Haftoof
    Options
    Offline / Send Message
    Haftoof polycounter lvl 4
    volvo's base texture and mask? Not sure I follow. Edit: If you meant valve, I'll go back and look at his base texture. I'm working heavily in quixel because I want to be able to take some of the basic texture definitions I use and make them into smart materials for later use on other pieces of equipment.

    For the green glow I can try and shift the color a bit, looks more like a pastel green almost. I tried to keep the green more muted as the cracks are much smaller on the blade than on his arm.

    I took the metal off my shading layers because it seemed so washed out... In truth his actual texture is rather dark gold, it's the shine that makes it so bright on the section on his head. I'll look into shifting the gold back saturation wise.

    I took the base color for the texture off him... Forgive me but for the stone I used:

    Blue-grey for the stone base,
    Dark green for shadowing
    light teal for the highlights
    some light purple was put in at the very top.

    I think terms of contrast you want the color to pop more, which means I need to boost the highlights and then put in a corrective layer over top of that to mute the middle-colors a little. I'll try some stuff to see if I can correct it.
  • Haftoof
    Options
    Offline / Send Message
    Haftoof polycounter lvl 4
    So apparently... Earth Spirit has a detail map... Which is his glowing green shattered cracks... so added that... much better. Derp.

    Fixed the gold, resolved the green, tried to improve the contrast on the stone sections a bit more. I'm still not sure how to bring his detail map into line with the cracks in his body, I looked at the original model and the weapons detail map is slightly different colored, I think it also pulls from the colors applied to the region.

    6a629835faefa055939a4c236ee8afc6.gif

    eae0ac6d4b8dc903338f530805243c75.gif
  • Haftoof
    Options
    Offline / Send Message
    Haftoof polycounter lvl 4
    Update with some sculpting work I'm doing for a Queen of Pain Set Collab with Stirnir.


    822b0c27e936d3d474e8e6c21b371af7.png

    930392698583418b3220dc80b1529280.png
    6931a4553f158747964c1bd382bf036e.png

    Just getting started on the hair, layering down some shapes before I start working up the detail. I'm still playing with the layout of the ponytail and how the hair flows properly. I might go back to the base and restart some of the flow so that the hair towards the front flows downward and is not pulled back into the ponytail, while the hair towards the back is. I also think I added a little to much volume to the hair... hmmmmm

    Love any feedback given <3
  • Haftoof
    Options
    Offline / Send Message
    Haftoof polycounter lvl 4
    Another thing I think I need to do is do very basic shapes and detail under symmetry then go back and sculpt along the center line without to achieve the asymmetry and to improve the overall product. I'll restart it tonight with some of the new information from videos and ideas I have.
  • Haftoof
    Options
    Offline / Send Message
    Haftoof polycounter lvl 4
    Here's the finished hair, still not sure on the horns, I may revisit them later on.
    (Strnr's concept)

    8add05d5cd5fed7e877398f61f689f1c.png

    4f8fcf63dc164bfdc61580359acab562.png931a27e40138b63ad89685e6b6481d82.png
  • Swaggernaut
    Options
    Offline / Send Message
    Swaggernaut polycounter lvl 2
    Hair Is very scrawgly, when you were laying down your base strips, do fast strokes. It seems like you kind of took your time with each strip, therefore making it look a bit squigly. Weapon is perfect at sculpting tho for sure!
  • Haftoof
    Options
    Offline / Send Message
    Haftoof polycounter lvl 4
    Yeah, I did take a bit of time with my stroke, I'll keep that in mind in the future. Either way a bit of wavey hair isn't to bad. Overall does the hair sculpt look bad? IE do I need to redo it and go back to clean up the original issues? I figure a lot of the detail issues will be just fall away at a distance.

    My first hair sculpt.
  • Swaggernaut
    Options
    Offline / Send Message
    Swaggernaut polycounter lvl 2
    Well, as a first sculpt it isn't very bad at all, and you should try to preview it from the in-game/ portrait view, since that is what most player's perspectives of your works are going to be like. Another thing to keep in mind is that you have crevices in your hair, meaning that I feel the gaps between the strands seem too deep. you shouldn't have too much relief on hair honestly. Other than that, it really just takes lots of practice to go through with it. Do I think you should go back and re-do it? Probably not, since I don't think it will read that badly when in-game. Keep up the good progress!
  • Haftoof
    Options
    Offline / Send Message
    Haftoof polycounter lvl 4
    Yeah the original sculpt didn't have as deep of crevasses in the hair, I actually deepened the crevasses between strands based on feedback from SithHappens (live workshop) to improve the bakes and break up the strands a bit more from view size. I've done some zooming, I'll get the bakes together once I finish up the rest and post those. Working on the wings now.

    I truly appreciate the feedback as the sculpting for DOTA isn't the only work I want to work on. We'll see as we go forward, thanks again swag.
  • Haftoof
    Options
    Offline / Send Message
    Haftoof polycounter lvl 4
    Small update on the wings, finished up the ribs and here's a barrage of pictures. While the flaps aren't finalized any critique on them would be good, the original design was rather simple on the flaps and I probably should go back and soften them.

    Beyond that I'll be working on the neck/shoulders coming up with a low/mid-poly tonight.

    12109979_10104354788371041_6912951761471861877_o.jpg

    12065724_10104373758240271_3939731757722760132_n.jpg?oh=53d55d08843db7685ca7bfbf77bc2583&oe=56C0E7AD
  • Haftoof
    Options
    Offline / Send Message
    Haftoof polycounter lvl 4
    Going back after some discussion with the concept artist and giving the flaps a bit of calming down.   I found after some polishing that the wings look good, I'll post an update tonight.   Beyond that the silhouette looks good.   Fighting to find the time! 
  • Haftoof
    Options
    Offline / Send Message
    Haftoof polycounter lvl 4
    Re-did the hair...  Finished up the shoulderpads.  Finalized the wings... Damage and polish pass then done.   Mirroring the flap UV's. 


  • Swaggernaut
    Options
    Offline / Send Message
    Swaggernaut polycounter lvl 2
    Yesssssssss mannn!! Hair loos a lot better now! Just need to give it that ending point a bit better and add those cracks on the wings from the concept
  • Haftoof
    Options
    Offline / Send Message
    Haftoof polycounter lvl 4
    Thanks swag, yea I'll do a bit more work on it but gonna start putting together the low poly retopo. 
  • Haftoof
    Options
    Offline / Send Message
    Haftoof polycounter lvl 4
    Lots of trial and error...  Here's the AO and Normals for the hair.  I had a lot of trouble figuring out the low-poly and cage for the horns.  learned a bit about how custom cages work and did some very light manual edits on the normals (smoothing out some areas that had normal bake errors).

    Starting retopo work on the shoulders next. 


  • Haftoof
    Options
    Offline / Send Message
    Haftoof polycounter lvl 4
    Been out of work and dealing with a lot of crap, but here's the finished bakes, gonna move everything into quixel to start texturing...  Once I have the basic materials and colors down gonna transfer them across the pieces then go back and do paint layers for specific highlights and details.  

    Here's the current dagger with the textures I have so far... 


    And below are the baked up other pieces... 


  • Swaggernaut
    Options
    Offline / Send Message
    Swaggernaut polycounter lvl 2
    They all look really great!
  • Haftoof
    Options
    Offline / Send Message
    Haftoof polycounter lvl 4
    Thanks swag, I realize I might need to do some work on the wings, I think I am using the UV space really inefficiently because I didn't plan in any form of mirror'ing and my current UV's are well to be honest inefficient in general.  I might re-do the wings once I finish up the other sections.  

    I've applied the Materials I have across all the pieces, saved them up and starting to work on the other parts now.  
1
Sign In or Register to comment.