Home 3D Art Showcase & Critiques

Likeness - Looking but no seeing

Adam1313
polycounter lvl 3
Offline / Send Message
Adam1313 polycounter lvl 3
Hi,

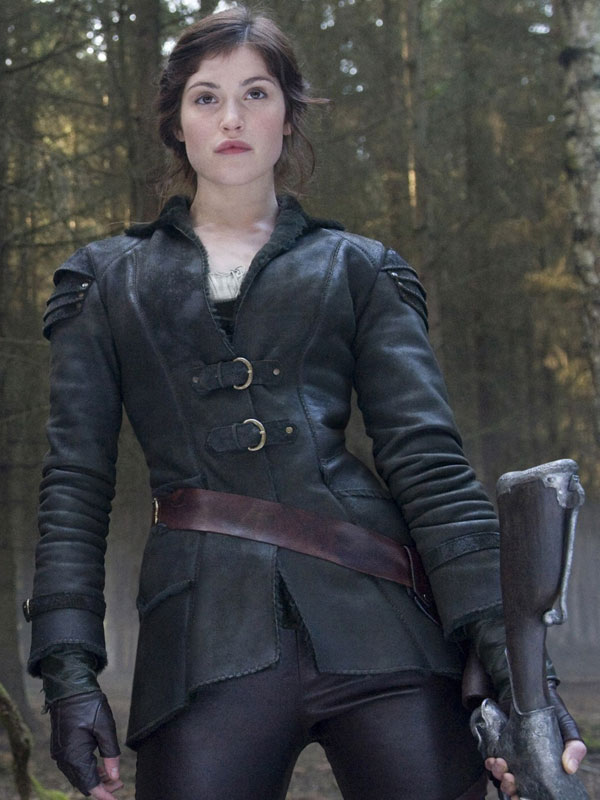
Would you happen to know how to do likeness well?

I've been fighting this project, trying to achieve likeness and it just doesn't feel right. Something is missing, but I don't see it. And to be honest I reached a point where the more I mess with it the less fitting it gets.

Can you help me out? Any tips? Pointers? Something you noticed I missed?

Any feedback will be appreciated.

Thank you!

The current state:
de301u.jpg ( http://oi58.tinypic.com/de301u.jpg )

* The hair planes are just "place holders", I'll probably changed them to match her default hair style more.

Reference:
HG-00330.jpg
NEW_GEMMA_ARTERTON_HANSEL_AND_GRETEL_COAT__58533_zoom.jpg

Replies

  • xxroxx
    Options
    Offline / Send Message
    xxroxx polycounter lvl 3
    Well, it isn't exactly my area but I'd say her lower lip shoud be thicker and that her nose tip is fatter/goes deeper. Right now her nostrils are defined too much into the tip, when it should be the other way around.
    The overall shape of her face seems to match, though I'd change that material to something more visible.
  • Adam1313
    Options
    Offline / Send Message
    Adam1313 polycounter lvl 3
    xxroxx wrote: »
    Well, it isn't exactly my area but I'd say her lower lip shoud be thicker and that her nose tip is fatter/goes deeper. Right now her nostrils are defined too much into the tip, when it should be the other way around.
    The overall shape of her face seems to match, though I'd change that material to something more visible.

    Thank you for the reply. I'll be starting to try and implement your observations.

    Just one thing, what did you mean by "nostrils are defined too much into the tip"? No enough difference between the two parts and their intersection or is it something about their shape?
  • Texelion
    Options
    Offline / Send Message
    Texelion polycounter lvl 8
    That's from Hansel and Gretel Witch Hunters right ( Gemma Arterton ) ? Did you take other references outside the movie ?

    I don't know how you compare your sculpt with the model, but there is something I do : take some screens of your sculpt ( check if the fov isn't too high or it will be deformed ), draw the outlines and overlay them with the photo. Like this you'll be able to check the proportions in perspective and the shapes.

    Then, it's sometimes hard to see the likeness on a white or gray sculpt, compared to a textured and colored photo. Unless your model has really specific shapes and details in the sculpt ( and this works better with men and old people, young women generally have clean skin and makeup ), it will be hard to see the likeness without some painting. So I suggest painting your sculpt a bit, or even project a photo if you can.

    Anyway about the sculpt itself I'd say that your character looks older than the model. I thought she was at least 50, Gemma is only 29 this year. It may be because the lighting shows too much volumes ( under the eyes, around the mouth ), or the shader. Or because you exagerated those traits too much.
  • pior
    Options
    Offline / Send Message
    pior grand marshal polycounter
    - Look at raw 3d scans of various people on Ten24 to get a feel for what the human face actually looks like when there is no complex material interaction involved (translucency, variation in local colors, and so on). Pictures of performers wearing opaque, white makeup are interesting too.

    - Teach yourself photography, to understand how different lenses can strongly affect the look of a person's face. Can you tell what kind of lens was used in the reference photos you are using ? If not, chances are you will not be able to recreate the face since you will be missing an important piece of data.

    - Get your model out of Zbrush as often as possible, since the program cannot handle real 3d representation of models.

    - Try to work in an non-linear way, working on the texture at the same time as the sculpt. It will allow you to spot issues faster.
  • Adam1313
    Options
    Offline / Send Message
    Adam1313 polycounter lvl 3
    Texelion wrote: »
    That's from Hansel and Gretel Witch Hunters right ( Gemma Arterton ) ? Did you take other references outside the movie ?

    I don't know how you compare your sculpt with the model, but there is something I do : take some screens of your sculpt ( check if the fov isn't too high or it will be deformed ), draw the outlines and overlay them with the photo. Like this you'll be able to check the proportions in perspective and the shapes.

    Then, it's sometimes hard to see the likeness on a white or gray sculpt, compared to a textured and colored photo. Unless your model has really specific shapes and details in the sculpt ( and this works better with men and old people, young women generally have clean skin and makeup ), it will be hard to see the likeness without some painting. So I suggest painting your sculpt a bit, or even project a photo if you can.

    Anyway about the sculpt itself I'd say that your character looks older than the model. I thought she was at least 50, Gemma is only 29 this year. It may be because the lighting shows too much volumes ( under the eyes, around the mouth ), or the shader. Or because you exagerated those traits too much.

    Thank you for the feedback.

    Yes it is Gemma, and yes I did collect reference outside the movie. Thing is she looks way different, like a different person entirely. No idea why... (sometimes in the movie itself she looks quite different) maybe it's the lens that Pior mentioned.

    Old huh? Didn't occur to me. Thou I usually do sculpt "too hard" because normal maps doesn't translate detail as sharply as I like them to (Maybe I'm baking them wrong), anyway I'll keep it in mind.
    pior wrote: »
    - Look at raw 3d scans of various people on Ten24 to get a feel for what the human face actually looks like when there is no complex material interaction involved (translucency, variation in local colors, and so on). Pictures of performers wearing opaque, white makeup are interesting too.

    - Teach yourself photography, to understand how different lenses can strongly affect the look of a person's face. Can you tell what kind of lens was used in the reference photos you are using ? If not, chances are you will not be able to recreate the face since you will be missing an important piece of data.

    - Get your model out of Zbrush as often as possible, since the program cannot handle real 3d representation of models.

    - Try to work in an non-linear way, working on the texture at the same time as the sculpt. It will allow you to spot issues faster.

    Thank you for the feedback!

    The photography angle is something that never crossed my mind, interesting - thank you.

    Outside of ZBrush is quite broad. What kind of program should I move it to? is Blender/Maya ok? Or am I looking for a renderer like Keyshot/Toolbag/UE4 - whatever I'm going to use for final presentation?

    The non-linear tip is a bit ambiguous for me, it certainly interesting - I'll try to find ways to implement it.
  • pior
    Options
    Offline / Send Message
    pior grand marshal polycounter
    On the subject of lenses, here is a very obvious example :
    http://oneslidephotography.com/wp-content/uploads/2012/07/Best-Lens-for-Portrait-.jpeg

    And another example, showing how lenses vary throughout a movie :
    https://vimeo.com/95194792

    Regarding Zbrush : The Zbrush viewport is not 3d at all, so unless you are working from orthogrphics (= telephoto), nothing is going to look like real life. Now thankfully enough, portrait photography is usually made with long lenses so you should be able to find good reference of that kind. But as soon as your are working in perspective view in Zbrush, all bets are off, and you will need to export your model to more standard 3d programs to really get a feel of what you are working with. It doesn't matter if it is keyshot or Maya, as long as you have access to proper camera control. This is precisely why I believe that starting a model from scratch in Zbrush is a waste of time, as it requires way too many adjustments later down the line because of the inherent limitations of the programs when it comes to faithfully displaying models in perspective.

    As for working non-linearly : I just mean that you if you don't play with textures early on (that is to say : simulating eyelashes, skin tones, makeup, the colors of lips, and so on) you will not have any solid grounds for comparaison with your references. It can be as simple as projecting one of your reference pictures straight onto your model using Spotlight.
  • Adam1313
    Options
    Offline / Send Message
    Adam1313 polycounter lvl 3
    pior wrote: »
    On the subject of lenses, here is a very obvious example :
    http://oneslidephotography.com/wp-content/uploads/2012/07/Best-Lens-for-Portrait-.jpeg

    And another example, showing how lenses vary throughout a movie :
    https://vimeo.com/95194792

    Regarding Zbrush : The Zbrush viewport is not 3d at all, so unless you are working from orthogrphics (= telephoto), nothing is going to look like real life. Now thankfully enough, portrait photography is usually made with long lenses so you should be able to find good reference of that kind. But as soon as your are working in perspective view in Zbrush, all bets are off, and you will need to export your model to more standard 3d programs to really get a feel of what you are working with. It doesn't matter if it is keyshot or Maya, as long as you have access to proper camera control. This is precisely why I believe that starting a model from scratch in Zbrush is a waste of time, as it requires way too many adjustments later down the line because of the inherent limitations of the programs when it comes to faithfully displaying models in perspective.

    As for working non-linearly : I just mean that you if you don't play with textures early on (that is to say : simulating eyelashes, skin tones, makeup, the colors of lips, and so on) you will not have any solid grounds for comparaison with your references. It can be as simple as projecting one of your reference pictures straight onto your model using Spotlight.

    Wow first image is scary!

    Is ZBrush that bad? I did several characters and props with ZBrush already and I didn't notice any huge deviations between what I sculpted to what it turned out to be in the final presentation (except in Normal map sharpness) - Sculpted them all mainly with perspective view too.

    Thanks for the clarifications!
  • Micaki
    Options
    Offline / Send Message
    Micaki polycounter lvl 3
    im struggling with likeness too, here is what i learned
    The way someone looks is our's brain interpretation, and that interpratation can be changed by stimulating part of a brain.(someone will look completely different for us, then earlier). Recognizing faces and emotions was key to survival long ago. Even if your model is anatomically correct it may not look like the person you sculpt. To create good likeness you need to learn how brain will interpret changes on your model (practise,practise and practise).
    First of all create heads with only big shapes (no eyes, mouth or ears only a little bit of nose) likeness should be already visible(some shapes need to be exaggerated but if for brain it looks good its good) Google Philippe Faraut
    Never sculpt directly from the images, after sculpting what you know about head,sculpt what you see. There is exception for closeups. I think photos with 80-100 mm lens are best for sculpting portraits.
    When creating face, start from nose and this can be your landmark for eyes, mouth etc
    Look at other sculpts made by Donatello, Giovanni Lorenzo Bernini etc. Watch and analyse
    Sorry for any mistakes, hope that helps

    edit: also create better material and watch your sculpt with different lightning setup. Read about lowkey lightning(its best to see al that big and small shapes)
    make your reference photos grey and adjust levels so you can see different shapes better
  • Texelion
    Options
    Offline / Send Message
    Texelion polycounter lvl 8
    Last time I started in Zbrush from scratch everything looked strange, then I realized that the default fov was at 90...

    50 is a better value, you shouldn't have a lot of difference with other soft. the fov can be changed in the DRAW menu.
  • Micaki
    Options
    Offline / Send Message
    Micaki polycounter lvl 3
    I would even say fov 30 is a good start with align to object turned on
  • Adam1313
    Options
    Offline / Send Message
    Adam1313 polycounter lvl 3
    Micaki wrote: »
    im struggling with likeness too, here is what i learned
    The way someone looks is our's brain interpretation, and that interpratation can be changed by stimulating part of a brain.(someone will look completely different for us, then earlier). Recognizing faces and emotions was key to survival long ago. Even if your model is anatomically correct it may not look like the person you sculpt. To create good likeness you need to learn how brain will interpret changes on your model (practise,practise and practise).
    First of all create heads with only big shapes (no eyes, mouth or ears only a little bit of nose) likeness should be already visible(some shapes need to be exaggerated but if for brain it looks good its good) Google Philippe Faraut
    Never sculpt directly from the images, after sculpting what you know about head,sculpt what you see. There is exception for closeups. I think photos with 80-100 mm lens are best for sculpting portraits.
    When creating face, start from nose and this can be your landmark for eyes, mouth etc
    Look at other sculpts made by Donatello, Giovanni Lorenzo Bernini etc. Watch and analyse
    Sorry for any mistakes, hope that helps

    edit: also create better material and watch your sculpt with different lightning setup. Read about lowkey lightning(its best to see al that big and small shapes)
    make your reference photos grey and adjust levels so you can see different shapes better

    Thanks for the feedback I'll check out the artists you've recommended. And graying out reference images sounds useful actually, I'll try it out.
    Texelion wrote: »
    Last time I started in Zbrush from scratch everything looked strange, then I realized that the default fov was at 90...

    50 is a better value, you shouldn't have a lot of difference with other soft. the fov can be changed in the DRAW menu.

    Now that I think about it, ZBrush is defaulted at 45 for me... maybe that's why I didn't see that many problems with it.
  • pior
    Options
    Offline / Send Message
    pior grand marshal polycounter
    No matter what the Zbrush FOV number say, Zbrush still is only 2.5D. On top of that the Zbrush materials have a natural tendency to hide surfacing issues, which later becomes obvious when doing the final renders in another program. I would highly recommend you to not wait much longer and export your model in its current state into another environment to see it for yourself :)
  • DireWolf
    Options
    Offline / Send Message
    Looking at beauty shots from film is not the best source Im afraid. There's soft light that softens everything, there's color grading, and there's also make ups that seriously fakes tons of shadows/hi light on the face.

    If you're learning you're better off picking pictures made for portrait drawing studies. These will be light in a way to give you the cleareat form and no make ups
  • Adam1313
    Options
    Offline / Send Message
    Adam1313 polycounter lvl 3
    pior wrote: »
    No matter what the Zbrush FOV number say, Zbrush still is only 2.5D. On top of that the Zbrush materials have a natural tendency to hide surfacing issues, which later becomes obvious when doing the final renders in another program. I would highly recommend you to not wait much longer and export your model in its current state into another environment to see it for yourself :)

    2.5D, right. I will keep that in mind! thanks.
    DireWolf wrote: »
    Looking at beauty shots from film is not the best source Im afraid. There's soft light that softens everything, there's color grading, and there's also make ups that seriously fakes tons of shadows/hi light on the face.

    If you're learning you're better off picking pictures made for portrait drawing studies. These will be light in a way to give you the cleareat form and no make ups

    I'm always learning. :)

    And the target is to create a game-character out of the Gemma's character from the movie, and I'll have to use her images from the movie to do that.
  • Neox
    Options
    Offline / Send Message
    Neox veteran polycounter
    Texelion wrote: »
    Last time I started in Zbrush from scratch everything looked strange, then I realized that the default fov was at 90...

    50 is a better value, you shouldn't have a lot of difference with other soft. the fov can be changed in the DRAW menu.

    but zbrush has no perspective, thats the whole issue. those values are also kinda pointless depending the dimensions of your model, what might work okay on the might end weird on a full body. very uneven propotions, say a long necked dino, being very long but not that high or wide, will cause a lot of distortion.

    so better check your work in 3d, early and often
    And the target is to create a game-character out of the Gemma's character from the movie, and I'll have to use her images from the movie to do that.

    you need pictures of her, but not neccessarily from that movie.
  • Adam1313
    Options
    Offline / Send Message
    Adam1313 polycounter lvl 3
    Neox wrote: »
    you need pictures of her, but not neccessarily from that movie.

    Yeah, I get it and I got them.

    Yet a problem remains - she looks quite different - and the target is her character and not "her-herself", so I'll need to imitate the make-up and "touch-ups" more than what she looks like in reality. Or am I thinking about this wrong?
  • Neox
    Options
    Offline / Send Message
    Neox veteran polycounter
    Adam1313 wrote: »
    Yeah, I get it and I got them.

    Yet a problem remains - she looks quite different - and the target is her character and not "her-herself", so I'll need to imitate the make-up and "touch-ups" more than what she looks like in reality. Or am I thinking about this wrong?

    to do the postwork you need the base, makeup and touchups are always added on top ofthe person, they usually do not change it
Sign In or Register to comment.