Home 3D Art Showcase & Critiques

Polar Science Facility - UDK

13
Latest Video:

[ame]http://www.youtube.com/watch?v=bwKaYq4agws[/ame]


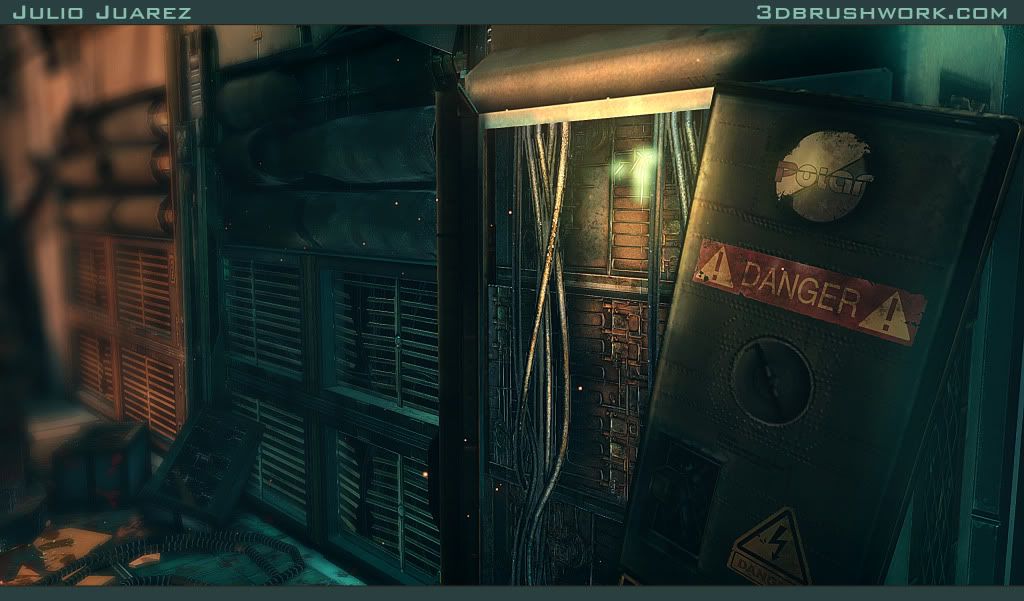
This is my latest WIP tiled 'Polar Science Facility'. My goal is for the screen shots to tell the story of what took place.

I'll create video when the project is complete; because there are some dynamic objects and particles, I feel a video format would be the best way to show the environment.


PolarScienceFacility-JuarezJulio.jpg

PolarScienceFacility-02JuarezJulio.jpg

PolarScienceFacility-03JuarezJulio.jpg

PolarScienceFacility-05JuarezJulio.jpg

PolarScienceFacility-06JuarezJulio.jpg

Constructive feedback is appreciated.

Replies

  • BARDLER
    Options
    Offline / Send Message
    BARDLER polycounter lvl 12
    Looks amazing, my only complaint is the tubes of what I am assuming is some type of liquid with zombies inside should be a little more transparent. That way I can more easily see the thing inside, because right now it looks more like a reflection.
  • Limewax
    Options
    Offline / Send Message
    Limewax polycounter lvl 6
    I somewhat agree with the post above me in regards to the fact that the glass texture (possibly the material, possibly both) needs to be revisited. In the 3rd picture we kind of want to imagine what creepy thing is lurking inside of the tubes (maybe some eggs, or an unknown creature). In the 2nd to last picture, you have a lot of tangent issues going on... the glass material edges are lost with the parallel lines of the background (I may have to do a draw over in order for you to see what I am seeing). Basically I think if you add a rimlight effect to that glass material (at least on the broken one) it will help hammer it home.

    (I also used brackets too much in this reply, probably cause im running on 2 hrs sleep)
  • riddlaz
    Options
    Offline / Send Message
    Bardler, you brought up a good point on the material. I toned the bubbles down, and decreased their size because they looked to strong, almost like its reflecting light source. Yet, the reason why I didn't make the liquid very thin, is because I didn't want to completely reveal what is inside...

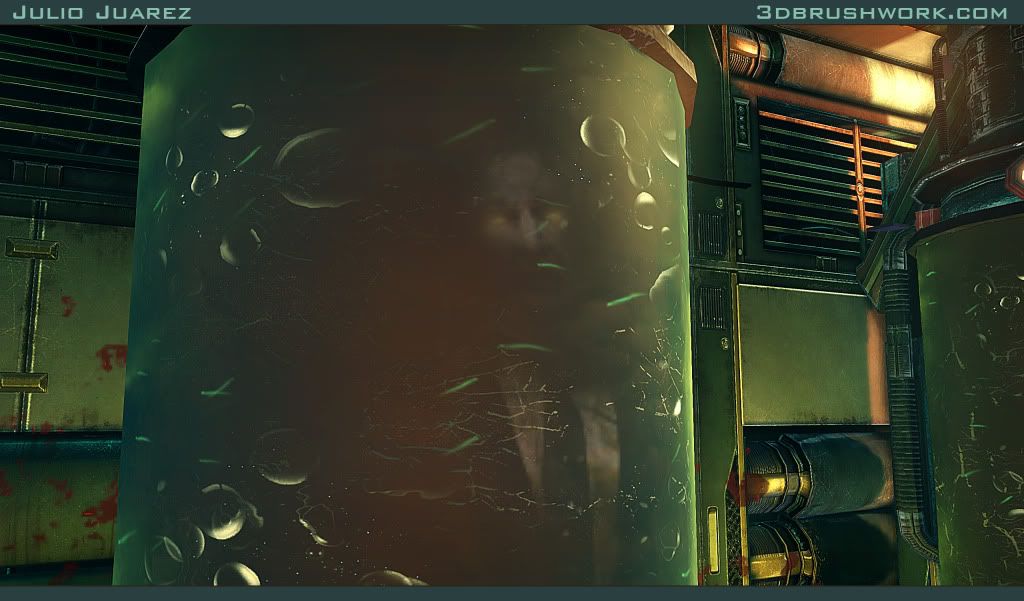
    Limewax, the intention is to make the creatures reveal only briefly to retain the mysterious element. If what lurks inside the tubes is obvious, then I'll tweak the parameters to fix that. In regards to the broken glass tangent issues. I've been having some problems with that, I'll give it another round to fix it up!

    Thanks for the feedback.

    Edit: Misread one of the replies and corrected my response when I took notice.
  • riddlaz
  • adam
    Options
    Offline / Send Message
    adam polycounter lvl 19
    That video was great. I hadn't realized you were dropped in the level so when you walked, it was especially enjoyable :D

    Also: Science-purpose fishies, yus!

    I'd love to see simple breakdowns of any techniques you used. Are you blending material on the ground near the escape? Blending + decals?

    If you have any high-res models that you've rendered out, we'd love to see those pictures too!

    EDIT: Scrolled to the top after writing this and remembered something: The DOF in that first shot: Besides making things look miniature, it can also focus the scene deliberately to the point of being obnoxious. Can we see it without the DOF?
  • shawnell3d
    Options
    Offline / Send Message
    love the FX really brings this scene to life and the art is just as good
  • riddlaz
    Options
    Offline / Send Message
    Adam, the materials on the ground are indeed decals. These are water patterns, blood stains, and footprints with both water/blood in them. They all use the same shader that the tank is using. The shader is highly customizable, and it uses switches to turn functions on and off. This way the shader can be around 200 instructions with all its functions, or around 60 instructions with essential water functions.

    Ill post some hi poly's soon, for now I'll post the picture without DOF as you requested. Cheers!

    PolarScienceFacility-JuarezJulio-NoDOF.jpg


    Shawnell, thanks! Glad to know you liked my work. I was looking at you're port and I like you're pieces as well. Keep it up!
  • riddlaz
    Options
    Offline / Send Message
    Juarez-Breakdown01.jpg

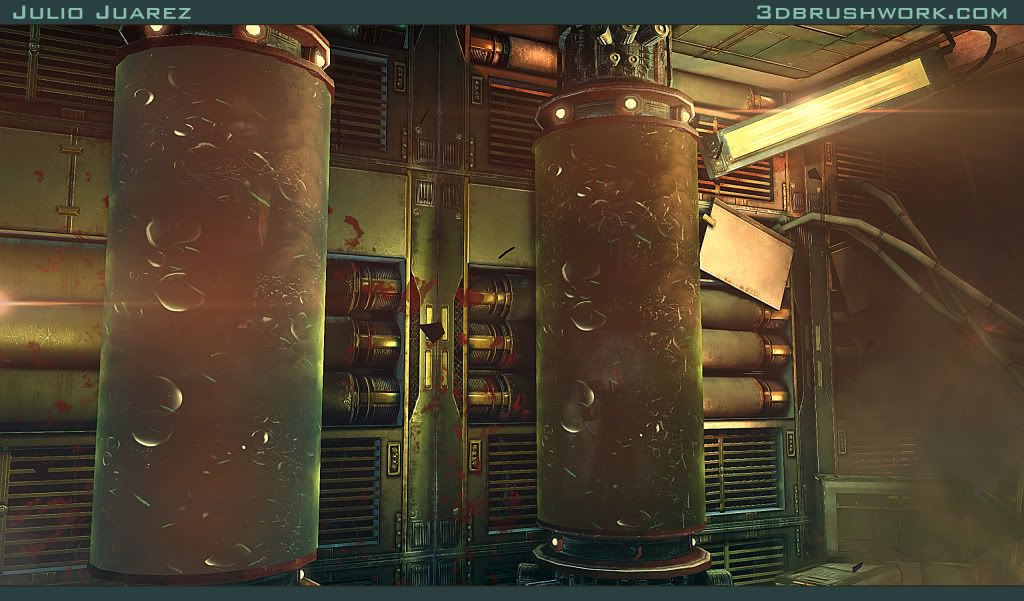
    Models share the same textures, it was one of the most challenging parts of putting these scene together. It only has 4 major textures in the interior. The rest are supporting textures such as decals, fire, snow, glass, water, etc..

    Please feel free to ask, if you want to see something in the scene with more detail.

    Best Regards,
    Julio Juarez
  • Ryan Smith
    Options
    Offline / Send Message
    Ryan Smith polycounter lvl 11
    Wow just wanted to personally say that this is great inspiring work. You're execution of the bodies in the tanks was truly impressive. Congrats on starting work at Bioware. I'm sure you'll be a valued asset to their art dept.
  • IxenonI
    Options
    Offline / Send Message
    IxenonI interpolator
    very nice, glad you added some of the stuff we talked about..
  • BARDLER
    Options
    Offline / Send Message
    BARDLER polycounter lvl 12
    Oh I just noticed your sig... when you start working at Bioware can you please ask them how they messed up Dragon Age 2 so bad?? I am curious to know :p
  • [HP]
    Options
    Offline / Send Message
    [HP] polycounter lvl 13
    The video turned out really nice, and those high polies are great, but I think the final presentation on those screenshots are a bit too noisy without center pieces of center of focus on them.

    Other than that, top notch.
  • riddlaz
    Options
    Offline / Send Message
    Virtuosic, thank for the kind words :). I spent all Saturday afternoon making that shader and I'm very happy with the result. I designed it to be very adaptable, meaning that all the effects can be turned on/off thus producing a simpler or more complex material. Here is an example of the type of liquids that where created from the same material using instances. Then with a few tweaks it can be used as a decals also.

    LiquidShader.jpg

    I want to make video tutorial of this in the near future. I'm currently looking for a high quality usb microphone to record my voice. Had bad luck with some Logitech models I've purchased.
  • riddlaz
    Options
    Offline / Send Message
    [HP] wrote: »
    The video turned out really nice, and those high polies are great, but I think the final presentation on those screenshots are a bit too noisy without center pieces of center of focus on them.

    Other than that, top notch.

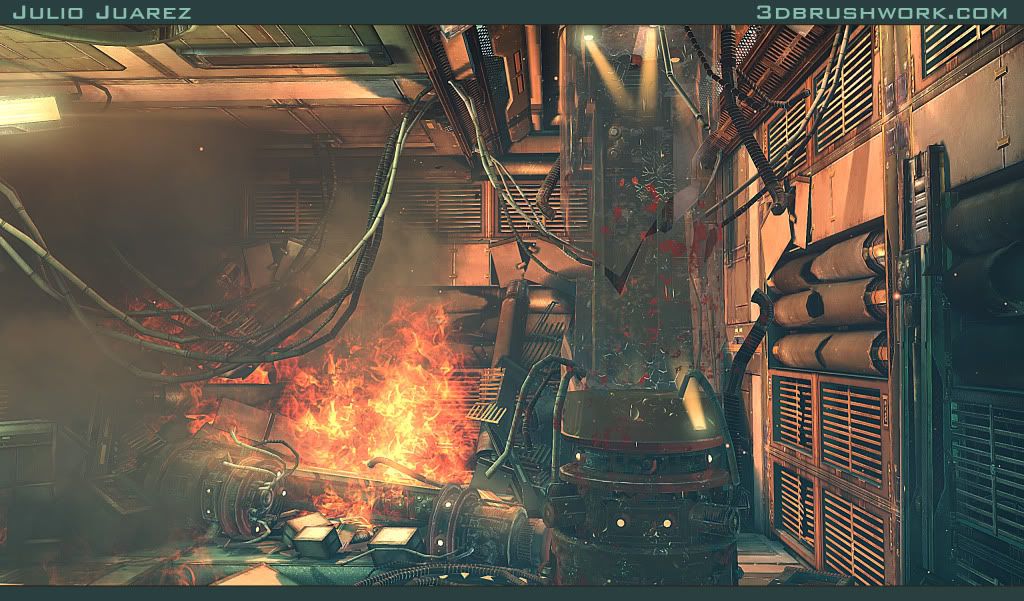
    Thanks for the input, I agree that area has allot of things going on. For the final portfolio images, I'll be sure to frame the center pieces and balance out excess details. Currently this is the 'chaotic' area of the environment, the other areas are much more organized and hopefully can balance this one out. I'll post more screenshot in a few minutes :).
  • riddlaz
    Options
    Offline / Send Message
    IxenonI wrote: »
    very nice, glad you added some of the stuff we talked about..

    Yeah :) . I appreciate that conversation we had. The environment also has more signage and subtle details to contribute to the storytelling such as footprints and blood/water stains. I'll post more screens in a few minutes.
  • riddlaz
    Options
    Offline / Send Message
    This is the area that shows what the creature did afterwards.

    PolarScienceFacility-07JuarezJulio.jpg

    PolarScienceFacility-08JuarezJulio.jpg

    PolarScienceFacility-09JuarezJulio.jpg

    PolarScienceFacility-10JuarezJulio.jpg

    Constructive feedback appreciated :)
  • Bart
    Options
    Offline / Send Message
    Good to see you Expanded it since last time I saw it :) Great work as always. That container shader kicks ass !
  • riddlaz
    Options
    Offline / Send Message
    Bart, yeah I remember we where talking about the layout of this scene. Back then the broken container was sitting in the middle of the corridor which looked awkward :P haha.
  • chrisavigni
    Options
    Offline / Send Message
    chrisavigni polycounter lvl 12
    Killer scene! I have been following your work for a while and I must say it is very inspiring.
    Congrats.
  • Rurouni Strife
    Options
    Offline / Send Message
    Rurouni Strife polycounter lvl 10
    Saved in my inspiration folder!

    I really wish I had some more constructive feedback for you. The foreground of the exterior (the nature part) I think needs more loving. A few extra small plant types and a more defined ground would go a long way. To me right now it reads as...fluffy melted marshmallows?? It's just strange.

    My thoughts, this is an absolutely gorgeous scene!!
  • yodude87
    Options
    Offline / Send Message
    yodude87 polycounter lvl 5
    whoa...

    nothing to say, other than...

    whoa :O wonderful work.
  • Minos
    Options
    Offline / Send Message
    Minos polycounter lvl 16
    Incredible work, as always!

    How did you go about the lighting? Are you using color correction and stuff like that?
  • toxic_h2o
    Options
    Offline / Send Message
    toxic_h2o polycounter lvl 8
    Omg so good. please make that material video. :)
  • tinokun
    Options
    Offline / Send Message
    tinokun polycounter lvl 11
    Amazing work! Thanks for sharing!!
  • eY3lEs5
    Options
    Offline / Send Message
    Hey Julio, this looks amazing. Very inspired to create a sci-fi scene. Can't wait to see another update from you, keep up the good work :)
  • 3Dyan
    Options
    Offline / Send Message
    3Dyan polycounter lvl 13
    This looks brilliant. It really does.
  • Gannon
    Options
    Offline / Send Message
    Gannon interpolator
    That liquid material with the bodies inside is fantastic! I'd love to see a break down
    on how you created the little floaters wisping around and stuff inside.

    The models really nice as well, so many details and things going on.

    My only crit is The glass on the tubes are kinda weak, I felt like they could use a
    little more reflection and use some distortion so the ones that are broken bend the light
    and things that are behind it.
  • riddlaz
    Options
    Offline / Send Message
    Minotaur0 wrote: »
    Incredible work, as always!

    How did you go about the lighting? Are you using color correction and stuff like that?

    Lighting Process

    To briefly discuss the lighting process in this scene, because its a video game environment, first thing I do is ensure the shadows will look correct under any lighting condition. This involves lots of tweaking of the uv set used for light maps, as well as the resolution for those light maps. To test those out, I generally just add a dominant light, or other temporary lights.

    After this stage, its when I start adding point lights / spot lights to light sources (Dominant light is the light that enters through the windows / holes). Then experimenting with the following settings:

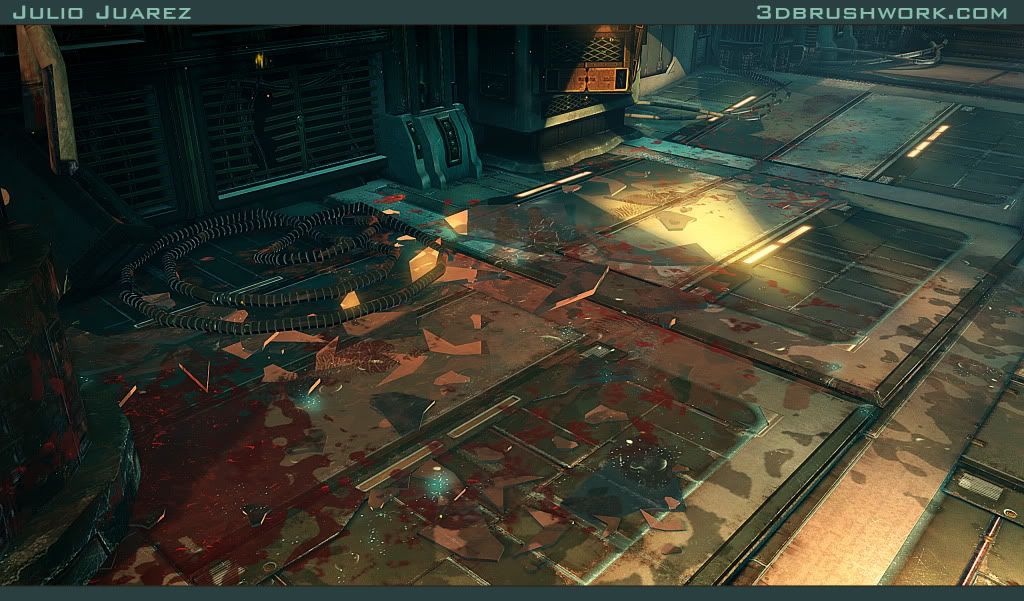
    Indirect lighting scale: Determines the intensity of the bounced light. I generally set it to below .5 (default 1). This way the bounced light is not intense, it produces better light gradients. If you look at the screenshot, there are several point lights there, and this setting is key to ensure the scene does not overexpose.

    Lighting.jpg

    Light Source Radius: Not to be confused with the 'radius' setting. This is relating to light mass and it's also very important, this determines the area in which the lights emit from. Considering that the larger this is, the more of an 'area' light it becomes. The larger the number on this setting, the softer and more spread out the shadows/light will be. So focused lighting with sharp shadows would in reverse, have a low light source radius. In this scene most lights have a light source radius below 10, other light sources that are more ambient, like fire and blue point light that I placed in front of the wall opening (as seen in the screenshot) have a higher setting.

    Lighting02.jpg

    That blue light was placed to imitate 'bounced' cool light. It has a higher light source radius to ensure the cool blue spreads out from the opening.

    The last stage involves balancing everything out, that is in color, intensity, and contrast. Goal is to have cool and warm areas. As well as having the scene go from light to dark, then to light and dark again. These gradients of light help creating more depth. If the image has the same amount of light everywhere it can come out flat.

    I do this before doing any grading/post work. The result from this is not very high contrast (you can see this in the last screenshot). Part of balancing the lighting might be introducing a sky light, considering the skylight can be used to determine the value of the darkest shadow in the environment. Generally the intensity for that light is very low. If the contrast is the same in background elements compared to the foreground, than part of the lighting process is also adding a distance fog / translucent cards.

    Here is a before and after shot, the one in the bottom has the post effects filters applied.

    PostProcess.jpg

    Hope it helps! :)
  • riddlaz
    Options
    Offline / Send Message
    Saved in my inspiration folder!

    I really wish I had some more constructive feedback for you. The foreground of the exterior (the nature part) I think needs more loving. A few extra small plant types and a more defined ground would go a long way. To me right now it reads as...fluffy melted marshmallows?? It's just strange.

    My thoughts, this is an absolutely gorgeous scene!!

    Thanks, I agree the ground looks very soft at the moment. Considering it will be the focus of the video for a few seconds. I'll definitely consider adding more defined detail to the terrain. Thanks for the input!
  • riddlaz
    Options
    Offline / Send Message
    Thanks everyone for the support, this is a great community!

    Toxic_h2o, I'll definitely consider making a video tutorial out of it. I just have to optimize the material so it has a better application in the games environment.

    Scott, thanks for the kind words. Feel free to send me a msg if you want to talk about the project a little more. Wish you the best man, creating a sci-fi theme was allot of fun, and learned allot from the experience :).

    Gannon, I'll post a breakdown of the material when I get a chance so you can see how the floating bits where made. As mentioned before, this will eventually become a video tutorial. Regarding the glass, that is definitely an area that needs some improvement, right now it blends with the BG to easily. Thanks for the feedback!
  • Miller02
    Options
    Offline / Send Message
    hey julio!

    scene is looking super sick! i remember the snow area back before you left. i love the new additions! great work. all your work has been badass, but i think this one takes the cake for sure.


    btw ill be emailing u back the response from ur last email. sorry its taking a bit just getting my second scene done for graduation.

    if you get a chance take a look at my thread or my site. my site has the most recent updates.
  • Minos
    Options
    Offline / Send Message
    Minos polycounter lvl 16
    Thanks for the breakdown Julio.
  • Rurouni Strife
    Options
    Offline / Send Message
    Rurouni Strife polycounter lvl 10
    I just realized that this was a polar facility...so yea...sorry about that! Your ground is just about spot on then!
  • Envart
    Options
    Offline / Send Message
    Envart polycounter lvl 6
    Epic scene! Love the composition. In your lighting breakdown, you have that cool light amidst the warm lights. What type of light is that? (says U on it). do you always use point lights over spotlights, and emissive based lighting?
  • riddlaz
    Options
    Offline / Send Message
    Miller02 wrote: »
    hey julio!

    scene is looking super sick! i remember the snow area back before you left. i love the new additions! great work. all your work has been badass, but i think this one takes the cake for sure.


    btw ill be emailing u back the response from ur last email. sorry its taking a bit just getting my second scene done for graduation.

    if you get a chance take a look at my thread or my site. my site has the most recent updates.

    Thanks Jeff, I just replied to you're linked in message. I'll check out you're thread a few minutes. I understand things can get very fast paced before graduation so no worries. Best of luck with all you're projects!
  • riddlaz
    Options
    Offline / Send Message
    Minotaur0, you're welcome :)

    Walrus, thanks for the compliments on my work :). To attend your question about the lighting. The light that has a U on it is a dynamic light. I placed that to add some rim lighting to the hero prop, it only affects that prop via lighting channels to ensure it does not impact performance to much. The reason it's a light blue is because it contrasts better with the background.

    Using spot lights is almost the same as point lights, the main difference is the cone settings. So I would only use spots if I did not want the light to illuminate beyond a certain radius. They are also useful for projections via light functions as seen in this screenshot.
    Lighting03.jpg
    The placement is only to show this example, in the scene I used this animated projection in the entrance for the destroyed room, I believe that moving objects such as these invite the payer to explore a certain area.

    In regards to emissive lights, I'll use them when it's necessary because I found that having multiple emissive objects turned on could increase the bake time rapidly. On the other hand, the regular lights can be limited to a certain area using light channels, while emissive lights calculate against every object (correct me if I'm wrong).

    From my perspective, the goal is to create the desired look. The methods that are employed are not not the most important. What is more important to me is the time it takes to get from point a to point b, the end quality, and performance.

    Hope this answers you're questions.
  • Envart
    Options
    Offline / Send Message
    Envart polycounter lvl 6
    It does indeed, very illuminating. Thanks for taking the time to answer my queries. Good luck in your future endeavours.
  • riddlaz
    Options
    Offline / Send Message
    You're welcome, good luck to you as well. :)
  • chris89
    Options
    Offline / Send Message
    chris89 polycounter lvl 10
    It has probably been mentioned before, and i havent read the full thread, but: If it's a Polar science facility, why are there leafy trees outside?

    Other than that, really good job, it's a very nice and crisp style and the atmosphere is great. Love it!
  • Rick_D
    Options
    Offline / Send Message
    Rick_D polycounter lvl 12
    do the poles have trees?
  • kio
    Options
    Offline / Send Message
    kio polycounter lvl 15
    haha - that was the only thing i was kinda confused too.

    really nice job!
  • Rhoutermans
    Options
    Offline / Send Message
    Rhoutermans polycounter lvl 12
    Very nice work :) very good scene!
  • riddlaz
    Options
    Offline / Send Message
    haha, yeah it has been mentioned before :D .. Initial plans where to add a verity of pine trees, some of them being less lush.. To be honest, the reason why I haven't made that yet is because I did so many plants for the Cambodia scene, wanted to take a break from them but o well :P

    Thanks guys for the compliments on my work :)
  • Mcejn
    Options
    Offline / Send Message
    Mcejn polycounter lvl 12
    Looks great, makes me want to do some sci-fi art during my breaks at work! Damn time constraints!!! :poly118:
  • riddlaz
    Options
    Offline / Send Message
    Mcejn wrote: »
    Looks great, makes me want to do some sci-fi art during my breaks at work! Damn time constraints!!! :poly118:

    That sucks, you don't have some time aftewards? Maybe you can enter the sci-fi contest at nextgenhardsurface.com to get the ball rolling. I wish I could enter it but most of these pieces where modeled prior to the contest.. Damn it!!!!! :poly127:
  • riddlaz
    Options
    Offline / Send Message
    I updated the trees so there not as flush, as well as placed a medium sized dry plants. Also updated the glass, as it was pointed out in the critiques :). The glass now looks more solid, it distort the image behind it, and has a higher reflection level.

    Thanks for all the advice!

    PolarScienceFacility-11JuarezJulio.jpg

    Constructive feedback welcome.
  • Gannon
    Options
    Offline / Send Message
    Gannon interpolator
    larger screen shots plz :D!
  • Envart
    Options
    Offline / Send Message
    Envart polycounter lvl 6
    Looks amazing. Seconding the higher res shots! :D
  • MaVCArt
    Options
    Offline / Send Message
    MaVCArt polycounter lvl 8
    how do you get your lights to glow like that? (with that stretched out bloom) looks really nice :D
  • roosterMAP
    Options
    Offline / Send Message
    roosterMAP polycounter lvl 12
    Lov it! But something's wrong with tha glass. Are you using a cube map baked from your scene?

    Also, u should shell the shards of glass (and the tubes) to give them depth and put a white light next to them to give them more shine.
13
Sign In or Register to comment.