The BRAWL² Tournament Challenge has been announced!
It starts May 12, and ends Oct 17. Let's see what you got!
https://polycount.com/discussion/237047/the-brawl²-tournament
It starts May 12, and ends Oct 17. Let's see what you got!
https://polycount.com/discussion/237047/the-brawl²-tournament
[STAGE] Mortal Kombat, Bell Tower, Gannon

interpolator
Hey guys, After tossing around some ideas and weighing the limitations I decided to go with the Mortal Kombat Bell tower Stage.

I plan on making it seem like it was lost in a sand storm with Sand pouring in from above and piling up inside.
Here's some of me Ref. Any and all concepts/images are property of their respective creators.
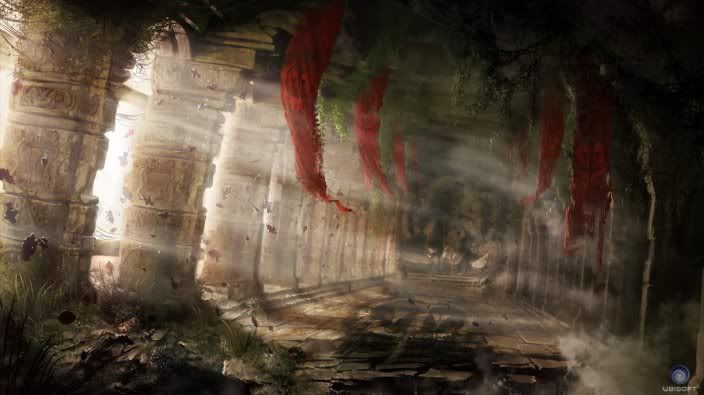

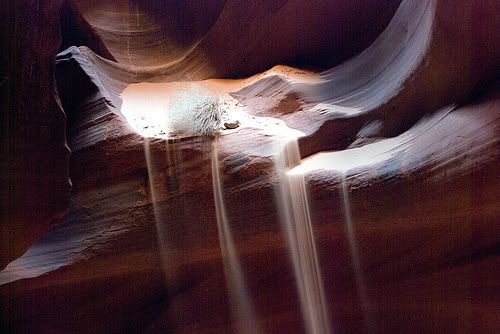

The last ones my favorite and is where I'll be pulling most of the lighting and layout from.
I plan on making it seem like it was lost in a sand storm with Sand pouring in from above and piling up inside.
Here's some of me Ref. Any and all concepts/images are property of their respective creators.
The last ones my favorite and is where I'll be pulling most of the lighting and layout from.
Replies
Sculpts are good, especially the wood beam, it's got a good depth.
ParoXum Thanks,
Nah, I'm honestly winging it and building assets as I go along HAH. I keep throwing new ideas into the mix so the ideas still evolving.
Here's the latest.
UPDATE - Here's the latest, I'll finalize the camera angles and FOV once I get more assets in the scene.
I'm doing some material research instead of modeling most of my assets so it's slowing the process down a little but I'll be done by the deadline for sure.
Going by your reference and concepts it might end up being quite a dramatic scene.
Good luck!
Im pretty new to the UDK really and I understand that the way you'd build a scene would be with brushes and static meshes - is that how you have done that?
I wanted to do my scene in UDK but I wasnt sure if it was worth the maya-> UDK-> working out how to do things cycle would be worth it.
@Jeffro - Thanks, yeah I agree. I need to stick some more planks of wood under them help push the layers of construction ie Tiles > Planks > Beams.
I plan on using some large rope strings hanging over and around some of the wood to give it some more depth as well.
@uk_resistant - Yeah for the most part. There isn't any Brushes in my scene just yet other then ones set for collision on the floor. Most of the objects are static meshes created through Maya and imported in as .FBX files that I assemble kinda like a big lego set.
The cycles pretty similar to other engines, at least with the ones I'm familiar with using.
More models and hopefully the rest of the scene block out this weekend.
I'm feeling the lighting style.
@ Wahlgren - Yeah, I've already thrown in some more planks to beef up the layers of construction, I'm also going to use some vertex painting to get some color variation in my tiles. Everything's super basic at the moment while I lay out the scene.
I may potentially do a second level of the bell tower pending time permits. I need to get the structural assets finished up first though.
So...
I need some outside opinions. I really like both, but I'm torn so I'll leave it up to you guys.
Uploaded with ImageShack.us
maybe some sorta structure layer between the wooden beams and stone tiles? some wooden bell tower ref might give some good ref.
http://www.thebrooklynnomad.com/wp-content/uploads/2009/06/krk-0512-1024x768.jpg
@Mark & Oobersli - SHUT UP IT LOOKS AWESOME..... No I totally know what you mean lol, I just kinda started throwing pieces down there to give an idea of how things would look after being arranged and under some test lighting.
That links pretty cool I really appreciate it. I've never seen wood supports like that inside a brick structure before, it's really cool and is giving me some more ideas. I'll start playing around with some underlying support layouts.
Testing some of the lighting ideas and playing w/ exponential height fog instead of the standard height fog to get some different colors out of said lighting.
Working on the Vertex painted walls and I'm going to play w/ the lighting more.
I'll post a full scene shot later this week, for now you get the 3 materials being blended. I'll probably throw a world position cloud, detail normals and if I can get a working up vector to mask off sand between cracks then I'll do that also. I'm only using 2 Channels at the moment so I've got room for it.
I see you blending 2 normal maps to show some decaying, but there's no change in diffuse which could be a waste. Maybe you could use this vertex channel to add some subtle grime and wear too, thus introducing more color variation? because now it's looking pretty monotonous.
Anyway nice to see tings shaping up. Keep it coming, man:)
I updated the normal map to get rid of some of the perfect straight lines in the and a weird tile also. Pics with the floor and wall re-texture to come later.
Like the lighting as well, looks yummy!
But for now, you can look at my floor. Once I get the sand in the scene I'll go back and make a height map to lerp in some sand between the cracks.
Thoughts?
I really need to get started on those bells. Maybe I'll do that today.
Things to do (mostly for me)
Finish Arch High Poly and Texture
Model and Texture Bells
Finish Pillar Textures
Get Normal Maps for Sand
Finish Broken Wall bricks to get rid of hard edges.
Height Map for ground tiles to get sand vertex painted
Fix Sky Dome
Foliage
Trouble Shoot Decals not showing up on walls
Play with lighting and Post Process Chain
you can probably use this everywere such as the brick. just Stick it in a spot earlier in the expression before you hit the vertex paint.
4 your sand
I'm completely redoing my bricks, they didn't fit well in the scene so I'm redoing them. Pics soon.
The two different arches next to each other seems off. I imagine one would be on the ground and the other would be above it.
Also more cool colors and then some accent colors. Maybe banners or flags hanging.
btw updated the above image
Blot1234: the key is layers and making sure your bricks all line up as if they were laid exactly in the same spot. Hope this helps.
First tut I've thrown together so sorry if it's a little vague.