Alchemist Store

polycounter lvl 11
Hi,
besides my work for RenegadeX I also work on a new personal work.
It's based on this awesome concept of Rowena Wang (http://wang2dog.deviantart.com/):
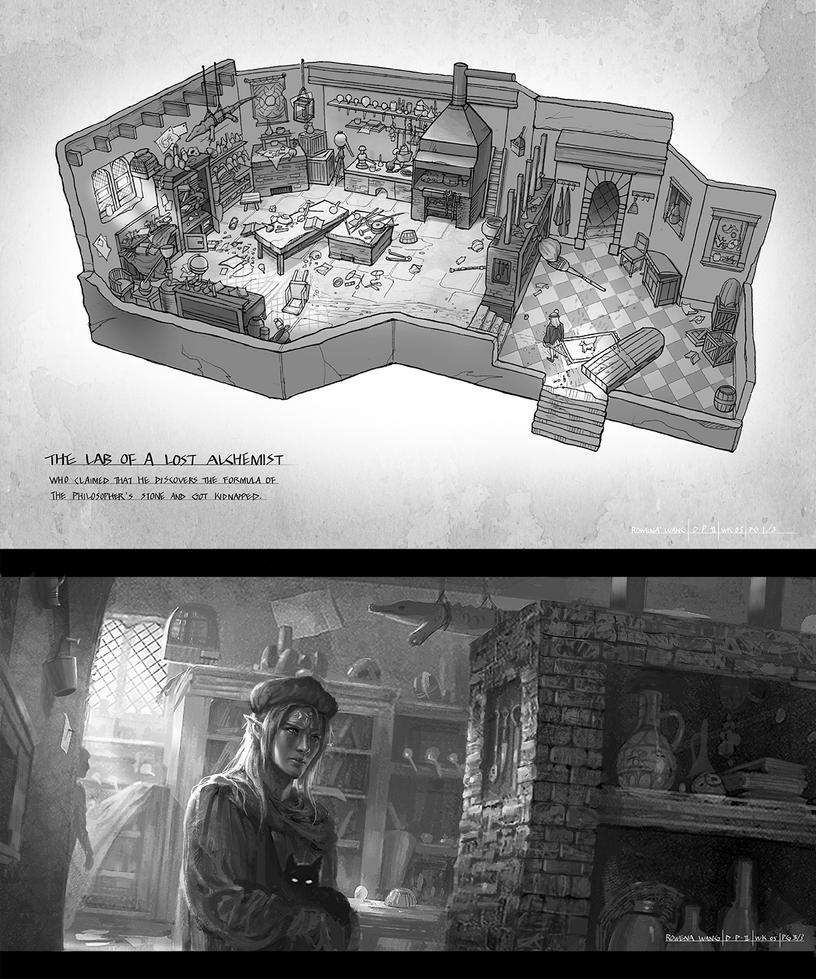
My plan is to create a "WoWish" 3D model of it.
So far I finished the blockout of the basic funiture and the room itself.
Next planned steps:
- bring all the furniture to game quality (low/mid-poly)
- Add small items (flasks etc.)
- start the hand-painted texturing

As this is my first "full-scene" I'm working on workflow tips (and of course other tips & tricks) are welcome.
I looking forward to update this post on a regular basis, so if I got your attention, come back from time to time.")
besides my work for RenegadeX I also work on a new personal work.
It's based on this awesome concept of Rowena Wang (http://wang2dog.deviantart.com/):
My plan is to create a "WoWish" 3D model of it.
So far I finished the blockout of the basic funiture and the room itself.
Next planned steps:
- bring all the furniture to game quality (low/mid-poly)
- Add small items (flasks etc.)
- start the hand-painted texturing
As this is my first "full-scene" I'm working on workflow tips (and of course other tips & tricks) are welcome.
I looking forward to update this post on a regular basis, so if I got your attention, come back from time to time.
Replies
Added some smaller items and did a few optimisations on the boxes
http://fc00.deviantart.net/fs70/i/2013/272/3/a/alchemist_store_1_by_dethling-d6ofwhf.jpg
As I working on my hand painted texturing skills at the moment (http://dethling.deviantart.com/gallery/49023056) I decided to work on this "on the side" and make it more comic/wow'ish
The progress so far...
I redid the furnishing and doors/windows so far, small props will follow soon (tm)
I'm not totally happy how it goes, so probably will make some adjustments to it in the next days:
"Free" areas are for the chair
The UV mapping on the table. No. Those curved legs in the top left area should be straightened. It's much easier to paint a straight line than a curvey one. Also overlap repeatable areas so you can increase the texture resolution.
There's a ton of tutorials on unwrapping and maximizing space. I did a video even for 3dmotive a couple years ago on the subject. You want to balance UV density/resolution and ease of painting. Some things you'll give a little on the UV stretching to paint easier, etc.
I repacked the UV for the table/chair, straighted out and tried as much "space re-use" as possible.
Re-uses:
- all four table-legs in one space (Top left)
- both lower side parts in one space (middle right)
- Table top- and underside (Put the underside in the same middle spot, only issue I see is with the metal blocks at the corners.. have to see how visible it will be
- end parts of chair & table legs in two spots
- Chair legs in two spots
- Chair "seat" (put downside in centre of the upside)
I'm not sure if the "downside uses same space at upside" is really useable because of the light information in hand painted textures.
Map:
As you see I altered the geometry a little and decided not to do two objects in one map.
As usual tricks, tipps, comments & critis welcome
I also reduced the texture size to 512x512 as this is (afaik) the texturesize for WoW props.
I also textured the stone-table which standing next to the wodden one in the concept.
The idea here was to create some heavy which can be used to hammer something (similar like an anvil).
I'm not totally hapy with the metal parts of the smith (I think the highlights have to be sharper and more white).
I recommend forking out for this amazing tutorial by Tyson Murphy, where he guides you through the process of making hand painted texturing. linky.
If you want an awesome free tutorial a fellow polycounter, skylebones has some stellar tuts on his site here.
As for what you have now, it's a great launch pad. Just save what you have now as a backup file and just experiment.
I already have the tutorial from Tyson and it helped me a lot to get into hand painted texturing, so big thanks to Tyson for it.
@slosh:
What do you mean with "clean"? More dirt on the object or are the faces/edges to straight?
But today I took a first try at the floor texture. The plan is to do two different one (lower and upper flor).
So far this is the first shot for the top floor: