Lighting, models and UDK
Hello, I'm trying to get a better understand on how lighting in UDK affects my meshes so I can avoid annoying little errors that take time to trouble shoot.
Senario:
-six 12 tri instanced meshes
-1 dominant directional light
-diffuse map only
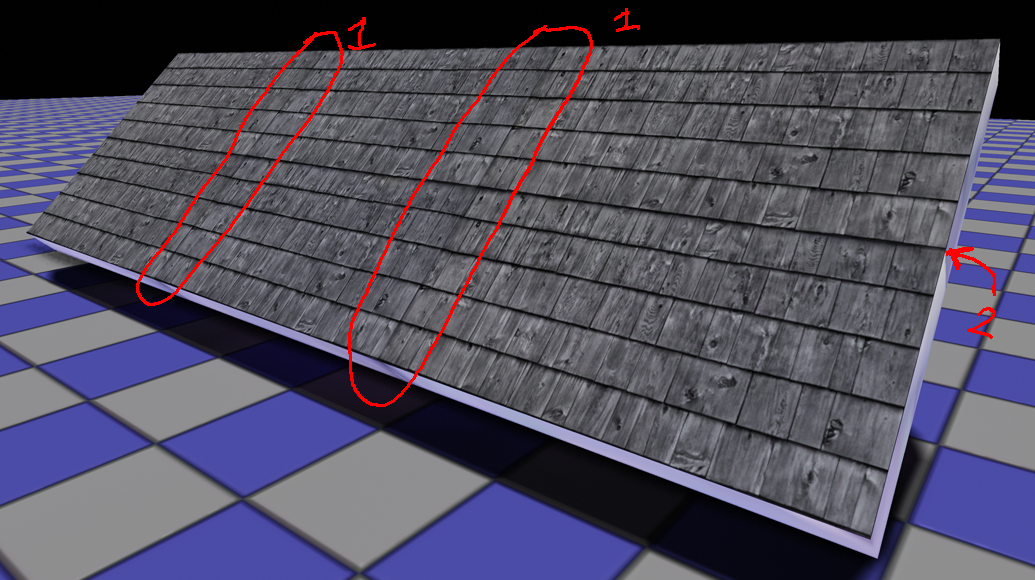
There's obvious seams when I build my lighting in UDK at locations #1 and less noticeable along #2 because of the texture. When viewed from farther out the seams become more pronounced but when I render them in 3DS Max with default lighting it looks fine.
I've tried adding additional edge loops, "clear all" smoothing groups, assigning multiple smoothing groups, generating unique light maps in UDK, increasing light map resolution and adding additional point lights to the scene.
I feel like I'm overlooking something simple here and welcome any information about my issue since I'm at a loss as to what to do next.
Senario:
-six 12 tri instanced meshes
-1 dominant directional light
-diffuse map only
There's obvious seams when I build my lighting in UDK at locations #1 and less noticeable along #2 because of the texture. When viewed from farther out the seams become more pronounced but when I render them in 3DS Max with default lighting it looks fine.
I've tried adding additional edge loops, "clear all" smoothing groups, assigning multiple smoothing groups, generating unique light maps in UDK, increasing light map resolution and adding additional point lights to the scene.
I feel like I'm overlooking something simple here and welcome any information about my issue since I'm at a loss as to what to do next.
Replies
Is there any work arounds besides resorting to adding some sort of natural break into the edge of the texture or add an additional mesh over the seam to obscure it?
One solution is to work with a set of larger unique meshes constructed from smaller modular chunks.
Take your image for example. Make one roof mesh out of three modular sections. Then weld everything together and make sure the lightmap UVs are welded together as well except where you want lighting breaks along the edges.
So in the UDK package for a full environment you might have a bunch of different roof meshes each made out of a different number of modular sections rather than a single modular roof mesh that you've instanced like crazy everywhere in the level.
I hope that makes sense.
Another post and explanation by Zack Fowler about this issue from the Modular Floor Tiles - Outlined in Shadow thread.
Only question I have about this is when you say "make sure the lightmap UVs are welded together" are you talking about the Unwrapped UVs I lay out or a separate set of UVs for the lightmaps?
The general rules for lightmaps in UDK are:
1. Make sure there are no overlapping UVs.
2. Make sure there is 2 pixels of padding around each UV shell (4 pixels total between two different shells) to prevent light from bleeding over to different parts of the model. Back In UE3 you also needed some padding around the outer edge of 0-1 space. Then with UDK Epic originally said you don't need padding around the edge of 0-1 space. Then they made some sort of change that caused lightmaps to be mip mapped at a distance. So I'm thinking it may be best to put at least 2 pixels of padding around the edge of 0-1 space again. Though I'm not too sure about that.
3. Weld the UVs where you want smooth continuous lighting.
4. Split the UVs where you want a break in the lighting. This will probably be where you have hard edges (smooth group splits) on the model itself.
More advanced techniques:
5. Scale the UVs of faces you want more shadow detail up.
6. Scale the UVs of faces that are always in shadow down.
Check out these tutorials:
http://www.hourences.com/tutorials-ue3-lightmapping/
http://udn.epicgames.com/Three/LightMapUnwrapping.html
http://stephenjameson.com/tutorials/lightmap-uvs-tutorial/
Only thing I did to correct a minor detail was go into my imported texture and change the LoD from World to UI. Since I'm not going crazy with my texture space I figure it'll be ok.
Thanks again.